background image

5


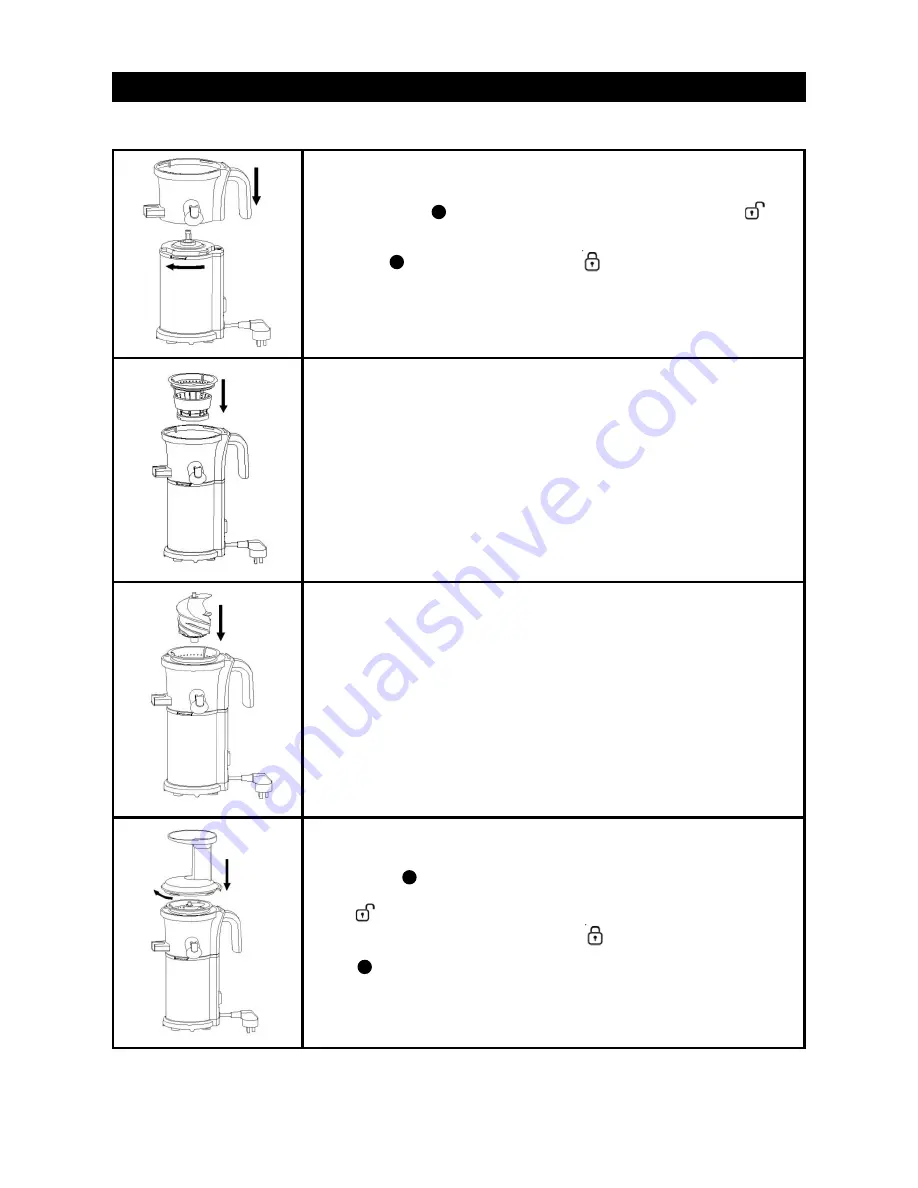
Assembling the juicer


1. Align the “    ” mark on the juicing bowl and the “      ” 

mark on the base unit. Rotate the bowl clockwise  until 
the “    ” is aligned with the “     ” to ensure it is locked 
and secured. 


4. Align “    ” mark on the juicing bowl cover with the


    “     ” mark on the juicing bowl. Rotate the juicing bowl 

cover clockwise and ensure “     ” mark is aligned with 


     “    ”


2.  Slot the pulp strainer into the juicing bowl ensuring 

that it is firmly secured in place. 


3. Place the juice extractor in the centre hole of the 

juicing bowl and pulp strainer and ensure that it is 
firmly secured in place. 


Summary of Contents for AJ001545

Page 1: ... purchase We hope that you are satisfied with your new Andrew James product To fully and safely enjoy the benefits of your new product please read the manual fully before use and keep safe for future reference Slow Juicer ...

Page 2: ...ce and its cord out of reach of children less than 8 years old Never handle or operate any appliance with wet or moist hands Do not immerse appliance cord or plug in water or other liquids Take care whilst cleaning If the appliance has fallen in water do not reach for it immediately switch the appliance off at the mains and unplug it Ensure that the cord is not in a position where it can be pulled...

Page 3: ...when it is empty Do not use fingers utensils or any other foreign objects to push ingredients through the chute Please only use the food pusher provided This appliance has a rated run time RRT of 20 minutes do not exceed this limit Always allow a cool down period of at least 15 minutes after use Do not move or touch operating parts when in use to avoid injury to the user All ingredients must be sl...

Page 4: ...off reverse switch 9 Pulp outlet 2 Juicing bowl cover with food chute 6 Base unit with plug 10 Pulp pitcher 3 Juice extractor 7 Juicing bowl 11 Juice pitcher with handle 4 Pulp strainer 8 Juice outlet 12 Cleaning brush 2 3 4 5 7 8 9 10 12 11 6 1 ...

Page 5: ... secured 4 Align mark on the juicing bowl cover with the mark on the juicing bowl Rotate the juicing bowl cover clockwise and ensure mark is aligned with 2 Slot the pulp strainer into the juicing bowl ensuring that it is firmly secured in place 3 Place the juice extractor in the centre hole of the juicing bowl and pulp strainer and ensure that it is firmly secured in place ...

Page 6: ...ins and unplug the appliance from the socket allow to fully cool and disassemble the juicer to clean 7 When the juicing is complete ensure that the on off rev control switch is set to the middle off position Before first use Thoroughly clean all parts in contact with food in warm soapy water rinse and dry thoroughly before using Please note This appliance has a built in safety lock This feature en...

Page 7: ...ark is aligned with the Pull the juicing bowl gently upwards to remove 2 Remove the juice extractor from the pulp straining by lifting in an upwards motion 3 Remove the pulp strainer from the juicing bowl 4 Rotate the juicing bowl anticlockwise until the marking aligns with the marking ...

Page 8: ...removeable components Troubleshooting Problem Solution Appliance not operating Check that the power cord and power source are connected and switched on Check that all parts have been assembled correctly Unable to remove the juicing bowl cover Check that all residue is removed in the juicing bowl Set the switch to rev to remove any excess debris Ensure that the marking is correctly aligned to the A...

Page 9: ...have the repaired replaced item shipped back to the customer If you wish to return your item for a full refund you have the right to do so within the first 7 days For our returns policy please go to www andrewjamesworldwide com Customers are responsible for any taxes applied to our products when they are shipped outside of the EU All of our prices are inclusive of VAT Once a product has been retur...

Page 10: ...ke an alternative connection to the electrical supply Disposal of the appliance Waste Electrical Electronic Equipment WEEE Waste Recycling Disposal of Electrical and Electronic Waste Non household waste This product must not be disposed of together with ordinary household waste Separate collection of used products batteries and packaging allows the recovery and recycling of materials Reuse of mate...

Reviews: