19
PicoBox Duo and Chassis Assembly Instructions
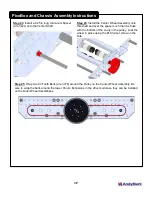
Step 32
: Repeat Steps 31-32 for the Outer Wheel
Assembly on the other end of this half of the
chassis using a 0.25 in long Aluminum Spacer
(am-3424) between the pulley and the bearing on
the Inside Plate.
Step 33
: Repeat Steps 23-32 to assemble the
other half of the drivetrain. Be sure to use the
same length aluminum spacers on each Outer
Wheel Assembly at each end of the chassis to
ensure the wheel spacing is symmetrical.
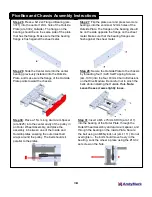
Step 35
: Install the Belly Pan (am-3394) onto the
bottom flanges of the Inside Plates, and secure
with eight 6-32 x 0.5 in Hex Head Screws (am-
1436) and eight 6-32 Nylock Nuts (am-1419).
Install the screws and nuts at each end of the two
flanges on each Inside Plate.
Step 36
: Congratulations! You now have a complete TileRunner 6WD Chassis.
Step 34
: Attach the 4x4 Plates (am-3393) to the
Outer Plates using two 6-32 x 0.5 in Hex Head
Screws (am-1436) and two 6-32 Nylock Nuts
(am-1419) on each 4x4 Plate.
Note: Once
installed, tighten the screws left loose in
Step 29.


