background image


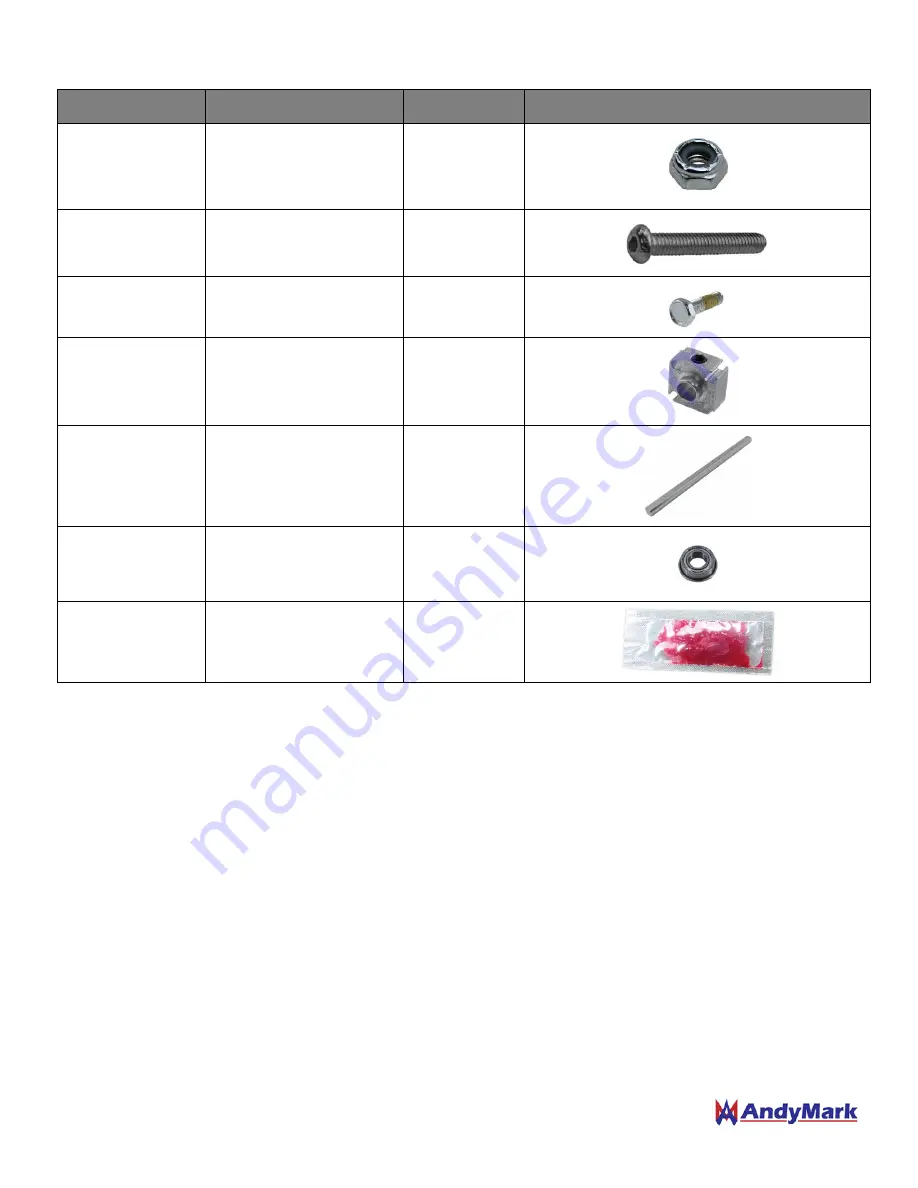
TileRunner Common Drive Bill of Materials 

Part Number 

Component 

Quantity 

Part Photo 

am-1102 

Nut, Nylock Jam 1/4-20 


am-1420 

Button Head Cap 

Screw, 1/4-20 x 1.75 in 


am-1563 

Hex Head Thread 

Patch, 6-32 x 0.5 in 

32 


am-3215a 

6mm D Bore Double 

Boss Nub w/Set Screw 


am-3226-100 

6mm D Shaft, 100mm, 

plated 


am-3377 

6x12x4 Flanged Bearing 

14 


am-2768 

Grease Packet 


Summary of Contents for BT6OC4E

Page 1: ...User Guide TileRunner Six Wheel Drive Popular Variants TileRunner Original 6WD BT6S84E TileRunner Bulldozer BT6S56E TileRunner GTO BT6S62E TileRunner Hulk BT6PB4E TileRunner Omni Wheels BT6OC4E...

Page 2: ...rdware M3 NeveRest Mounting bolts are now 5mm long instead of 6mm added detail to help clarify build steps added assembly instructions for variants 2020 Updates 10 19 20 Updated instructions for incre...

Page 3: ...am 3392_Outside Chassis Outside Plate 2 am 3393 4x4 Plate 4 am 3394 Belly Pan 1 am 3395 Peanut 11 25 2 am 3398 Churro 11 25 2 am 3399 Churro 63mm 8 am 1443 Socket Head Cap Screw M3 0 5 x 5mm 24 am 13...

Page 4: ...Photo am 1102 Nut Nylock Jam 1 4 20 8 am 1420 Button Head Cap Screw 1 4 20 x 1 75 in 8 am 1563 Hex Head Thread Patch 6 32 x 0 5 in 32 am 3215a 6mm D Bore Double Boss Nub w Set Screw 8 am 3226 100 6mm...

Page 5: ...lt Timing HTD 5mm pitch 9mm wide 93 Tooth 4 am 1437 Hex Head Cap Screw 6 32 x 1 25 16 am 1111 Nut Nylock M6 1 0 4 am 1417 Socket Head Cap Screw M6 1 x 75mm 4 am 3424 Spacer aluminum 0 257 in ID x 5 16...

Page 6: ...0 Durometer 6 S8 am 2648 4 Stealth Wheel 8mm Bore Gray 77 Durometer 6 PB am 3612 4 Performance Wheel with Nub Bore 6 am 2611 10 ft of Green Grippy Tread 1 Wide 1 OC am 2648_Blk 4 Stealth Wheel 8mm Bor...

Page 7: ...er Cable with 4 pin Connector 4 am 3406 PicoBox Spacer 8 am 3426 Spacer Aluminum 0 242 id 0 50 od x 0 354 Long 2 am 3405 PicoBox Duo Plate 2 4 am 2964b Gearmotor NeveRest 40 with Encoder and Female JS...

Page 8: ...am 2992 Hall Effect Encoder Cable with 4 pin Connector 4 am 3406 PicoBox Spacer 8 am 3426 Spacer Aluminum 0 242 id 0 50 od x 0 354 Long 2 am 3476 PicoBox GEO Plate 2 P am 3476 PicoBox GEO Plate 2 am 3...

Page 9: ...r Component Quantity Part Photo 1 am 3407 40 Tooth PicoBox Gear 6 A am 3408 35 Tooth Gear for PicoBox 4 am 3409 45 Tooth Gear for PicoBox 4 E am 3407 40 Tooth PicoBox Gear 6 am 3408 35 Tooth Gear for...

Page 10: ...ween two 24 Tooth HTD Pulley Halves am 3401_half and place all three components onto the boss of the Nub 2X Step 4 Align the bolt circles of the Nub and the Pulley Assembly and secure the pulley by th...

Page 11: ...b Be sure to thread the screws into the opposite holes that were used to secure the Nub to the Wheel Step 3 Place two 24 Tooth HTD Pulley Halves am 3401_half onto the boss of the Nub Step 1 Place a 6m...

Page 12: ...bolt circles of the Nub and the Gear 6X Repeat steps 1 3 to make 6 total Gear Assemblies PicoBox Gear Assembly Instructions NOTE If utilizing the 1 1 gear ratio using 40 Tooth gears follow the above i...

Page 13: ...e used per motor if using NeveRest Orbital gearmotors Step 2 Insert a NeveRest gearmotor into the remaining 12mm holes of the PicoBox Duo gearbox plate or the 22mm holes of the PicoBox GEO plate oppos...

Page 14: ...bearing holes on the Tile Runner Chassis Use the following holes on the chassis for the standard 6WD configuration Step 11 Press three 6x12x4 Flanged Bearings am 3377 into the indicated holes from st...

Page 15: ...ide Plate with a single solid flange Step 15 Secure with four 1 4 20 Nylock Jam Nuts am 1102 Step 16 Repeat Steps 1 15 to create another PicoBox TileRunner Inside Plate Assembly Step 14 Insert the Cen...

Page 16: ...25 Churro Extrusions am 3398 to the PicoBox TileRunner Inside Plate Assembly on the same side of the plate as the PicoBox at the indicated attachment points below using four 1 4 20 x 0 75 Self Tappin...

Page 17: ...haft and over the spacer such that it is flush with the bottom of the cavity in the pulley Lock the wheel in place using the 10 32 set screw on the Nub Step 25 Wrap two 93 Tooth Belts am 3378 around t...

Page 18: ...h against the sheet metal Step 29 Secure the Outside Plate to the chassis by threading four 1 4 20 Self Tapping Screws am 1310 into the four 63mm Churro Extrusions on the Drive Module Be careful not t...

Page 19: ...nd of the chassis to ensure the wheel spacing is symmetrical Step 35 Install the Belly Pan am 3394 onto the bottom flanges of the Inside Plates and secure with eight 6 32 x 0 5 in Hex Head Screws am 1...

Page 20: ...p around the wheel with a 1 overlap Narrow each end of the tread about 3 16 on each side leaving about 1 2 to 5 8 tab centered on the tread This allows excess length of tread to fit through the slot a...

Page 21: ...ecommended through the holes in the tread Do not connect and close the ziptie yet Step 3 Thread the ziptie and the ends of the tread through the slot on the performance wheel Step 4 Flip the tread so...

Reviews: