background image

3

Classic Plus Series

GB

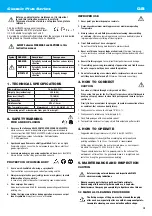
IMPROPER USE


1.   Never point gun towards people or animals.

2.     Never exceed maximum working pressure or maximum operating 

Temperature

3.   Always release air and fluid pressure before cleaning, disassembling 

or servicing.

 Otherwise, remaining pressure can cause bodily injury due to 

improper operation or scattering of cleaning liquid.

4.   Tip of fluid needle set has a sharp point. 

Do not touch the tip during maintenance to avoid accidents.

5.   Never use this gun to spray foods or chemicals. 

Otherwise, foreign sub-

stance, could cause corrosion of fluid passages which could adversely affect 
health.

6.   Never alter this spray gun, 

to avoid insufficient performance and damage.

7.   If something goes wrong, immediately stop operation and find the cause. 

Do not use again, until you have solved the problem.

8.   Do not enter working areas, where robots, reciprocators, etc. are used, 

until they have been turned off. 

Otherwise, they could cause injury.

3. HOW TO CONNECT

 CAUTION

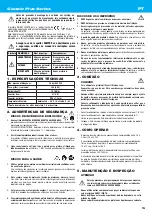
-    Use clean air filtered through air dryer and air filter.
-    When using this gun for the first time after purchase, adjust fluid needle 

packing set, spray cleaner to clean fluid passages and remove rust pre-
ventive oil.

-   Firmly fix hose or container to spray gun, to avoid disconnection of hose 

or container, that can cause bodily injury.

1.  Firmly connect an air hose to air nipple 1/4”M (5-1).
2.  Firmly connect a suitable cup to fluid nipple (5-2).
3.  Flush fluid passages with a compatible solvent.
4.  Pour paint into container, test spray, adjust fluid output and pattern width.

4. HOW TO OPERATE

_  Suggested atomizing air pressure is 2.0 to 3.0 bar (29 to 43PSI).

_  Recommended paint viscosity differs according to paint property and  


  painting conditions. 15 to 23 sec. / Ford cup#4 is recommended.

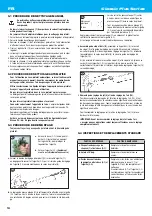
_  Set the spray distance from the gun to the work piece, as near as possi- 


  ble within the range of 150-250 mm (5.9 - 9.8 in)

_  The gun should be held so that it is perpendicular to the surface of the  


  workpiece at all times. Then, the gun should move in a straight and hori- 


  zontal line. Arcing the gun causes uneven painting.

5. MAINTENANCE AND INSPECTION

CAUTION

-  Never use spare parts that are not Anest Iwata originals.

-  Never damage fluid nozzle tip, fluid needle or air cap holes.

-  Never immerse the spray gun completely in liquids such as thinner.

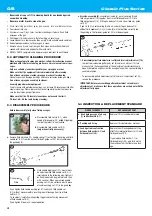
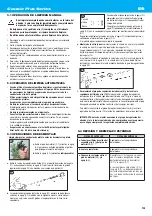
5.1 MANUAL CLEANING PROCEDURE

2. SAFETY WARNING

  FIRE AND EXPLOSION


1.   Never use the following HALOGENATED HYDROCARBON SOLVENTS:


which can cause cracks or dissolution of gun body (aluminium) due to  


 chemical reaction. UNSUITABLE SOLVENTS: methyl chloride, dichloromethane, 
1.2-dichloroethane, carbon tetrachloride,  trichloroethylene,   


1.1.1-trichloroethane                           

2.   Sparks and open flames are strictly prohibited.

 Paints can be highly  


 flammable and can cause fire. Do not expose to open flames, electrical  


 goods, cigarettes etc.

3.   Securely ground spray gun using conductive air hose. 

(Less than1M

Ω

Always ensure that the spray gun is earthed correctly.

PROTECTION OF HUMAN BODY

1.  Use in a well-ventilated site, using a spray booth.


Poor ventilation can cause organic solvent poisoning and fire.

2.   Always wear protective gear (safety glasses, mask, gloves) to avoid  

inflammation of eyes and skin.


In case of any physical discomfort, immediately seek medical advice.

3.   Wear earplugs if necessary.


Noise level can exceed 80 dB(A), depending on operating conditions and  
painting site.

4.   Pulling the trigger many times during operation, may cause carpal 

tunnel syndrome

. Always rest, in case of tiredness.

This  Anest IWATA spray guns kit complies

to ATEX regulations 94/9/EC, protection level:

II 2 G X Suitable for using Zones 1 and 2.

X marking: Any static electricity discharge from the spray gun is to be diverted 

to the ground via the conductive air hose as stipulated. 

ALWAYS observe WARNINGS and CAUTIONS in this 


instruction manual.

Before use, adjustment or maintenance, it is important  

to read this instruction manual very carefully. 

This manual must be stored in a safe place for any future 

reference.

Symbol WARNING

Hazard level

Consequence

WARNING

Potentially hazardous 

situation

Death or serious injury

CAUTION

Potentially hazardous 

situation

Minor to moderate injury

IMPORTANT

Potentially hazardous 

situation

Property damage

1. TECHNICAL SPECIFICATIONS

Max. working air pressure: 

7.0 bar (100 PSI)

Weight g (lbs): (without cup)

380 (0.84)

Noise level (LAeqT)*: 

79.7 dB(A)

Air Connection

G1/4” M

Fluid Connection

M16 x 1.5 mm

Max. Temperature range: 

Atmosphere 5 ~ 40 °C / Air-Fluid 5 ~ 43 °C

* Measuring point: 1m backwards from gun, 1.6 m height.  

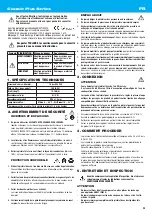
Before carrying out maintenance and inspection ALWAYS
observe warning indications.


The fluid passages of the gun, must be cleaned thoroughly    


after each use, especially after use with bi-component paints.  


Incomplete cleaning can cause defective pattern shape.

Summary of Contents for Classic plus Series

Page 1: ...GRAVITY SPRAY GUNS series W 400 Bellaria W 400 WBX W 400 WB W 400 LHP 400 GB IT FR ES PT DE SV INSTRUCTION MANUAL GB IT FR ES PT DE SV W400 WB W400 ...

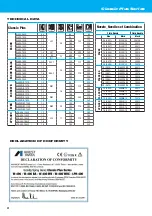
Page 2: ... 370 360 W400 WBX 134G 1 3 195 390 W400 WBX 144G 1 4 200 390 LPH 400 LPH 400 124LV 1 2 LV4 1 1 90 270 260 LPH 400 134LV 1 3 110 280 LPH 400 144LV 1 4 130 290 LPH 400 164LV 1 6 150 270 LPH 400 184LV 1 8 190 320 TECHNICAL DATA Nozzle_Needle set Combination Fluid Nozzle Fluid Needle Size Mark Mark W 400 0 8 0 031 W200 08 20012H 1 0 0 039 W200 10 40012 1 2 0 047 W200 12 40012 1 3 0 051 W200 13 20015 1...

Page 3: ... liquids such as thinner 5 1 MANUAL CLEANING PROCEDURE 2 SAFETY WARNING FIRE AND EXPLOSION 1 Never use the following HALOGENATED HYDROCARBON SOLVENTS which can cause cracks or dissolution of gun body aluminium due to chemical reaction UNSUITABLE SOLVENTS methyl chloride dichloromethane 1 2 dichloroethane carbon tetrachloride trichloroethylene 1 1 1 trichloroethane 2 Sparks and open flames are stri...

Page 4: ...y it into suitable waste container 6 Repeat procedure above until spray gun is clean 7 Remove air cap 1 and cup from gun then clean each section with brush soaked with cleaner and wipe out with waste cloth 8 DRY ALL PARTS completely and apply spray gun lubricant to each thread 5 2 AUTOMATIC CLEANING PROCEDURE _ When using automatic spray gun washer follow the instruction manual provided with it Be...

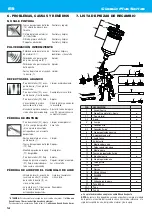
Page 5: ... fluid nozzle 2 1 Tighten Needle packing set 21 loose Adjust clean or replace too tight dirty or worn AIR ESCAPES FROM AIR CAP Air valve 8 air valve seat 7 Clean or replace if neces or air valve spring 9 dirty sary or damaged Air valve seat set o ring Replace 7 1 damaged or worn 7 SPARE PARTS LIST n Marked parts are wearable parts NOTE When ordering parts specify gun model part name with No and ma...

Page 6: ...puntare la pistola in direzione del corpo umano o di animali 2 MAI superare la pressione o la temperatura massima d esercizio 3 Scaricare sempre la pressione dell aria e del materiale prima delle opera zioni di pulizia disassemblaggio e di manutenzione Altrimenti la pressione residua potrebbe causare ferite al corpo provocate da ope razioni scorrette o dall emissione dei liquidi usati per la puliz...

Page 7: ... pistola 5 d La regolazione del set guarnizione astina 21 deve sempre essere effet tuata con l astina 2 2 montata e nel seguente modo chiudere manual mente per una rotazione di circa 60 gradi e successivamente stringere con l apposita chiave I passaggi del materiale devono essere accuratamente puliti dopo ogni utilizzo della pistola ed in particolar modo dopo l uso di vernici bi componenti Una pul...

Page 8: ...21 Trafilamento d aria dal raccordo Stringere della tazza Residui di vernice nell ugello Pulire aria 1 DIFETTI DEL VENTAGLIO Ugello materiale 2 1 o ugello Pulire accuratamente aria 1 incrostati di vernice Ugello materiale 2 1 o ugello Sostituire se necessario aria 1 danneggiati Ugello materiale 2 1 allentato Stringere Viscosità vernice troppo Diluire la vernice o au elevata o troppo bassa mentare ...

Page 9: ...u nettoyage au démontage ou à l entretien du pistolet Dans le cas contraire la pression résiduelle risque de provoquer des lésions corpo relles dues à l emploi abusif ou à la dispersion du liquide de nettoyage 4 L extrémité de l aiguille a un côté coupant Ne pas toucher l extrémité de l aiguille pour éviter de vous blesser 5 Ne jamais pulvériser de produits alimentaires ou chimiques avec ce pistol...

Page 10: ... approprié la peinture restante du godet et du pistolet 2 Verser le liquide de nettoyage dans le godet 3 Dévisser le chapeau 1 de 2 rotations pour permettre à l air d atomisation d effectuer le back flush dans les passages du produit du pistolet 4 Tirer sur la gâchette 16 en s assurant que l air d atomisation entre dans le godet 5 Laisser agir le liquide détergent pendant quelques secondes puis le...

Page 11: ... Ressort d aiguille 11 usé Remplacer Buse 2 1 desserrée Serrer Presse étoupe 21 desserré Régler nettoyer ou rem trop serré sale ou usé placer si nécessaire FUITE D AIR DU CHAPEAU Clapet d air 8 siège de clapet Nettoyer ou remplacer si 7 ressort de clapet 9 nécessaire sales ou endommagés L O ring 7 1 du logement Remplacer du clapet d air est endommagé ou usé ATTENTION Pour le démontage du corps de ...

Page 12: ...estropee nunca los orificios del casquillo de aire del pico de mate rial ni los extremos de la aguja No sumerja nunca completamente la pistola en líquidos como el disol vente ES Classic Plus Series 2 ADVERTENCIAS DE SEGURIDAD RIESGO DE INCENDIO Y EXPLOSIONES 1 No utilice DISOLVENTES DE HIDROCARBONO HALOGENADO que pueden provocar grietas o fundir el cuerpo de la pistola de pulverización aluminio de...

Page 13: ...po de juntas de la aguja 21 siempre se debe llevar a cabo con la aguja 2 2 montada y de la siguiente manera cierre manual mente con un giro de unos 60 grados y luego apriete con la llave corre spondiente c a Cuando retire el grupo de juntas de la aguja 21 compruebe que la pieza de plástico del grupo de juntas de la aguja 21 no quede dentro del cuerpo de la pistola Un apriete excesivo del grupo de ...

Page 14: ...ito Restos de pintura en el casquil Limpiar lo de aire 1 DEFECTOS DEL ABANICO Pico de material 2 1 o cas Limpiar esmeradamente quillo de aire 1 con pintura encostrada Pico de material 2 1 o cas Reemplazar si hace falta quillo de aire 1 estropeados Pico de material 2 1 flojo Apretar Viscosidad de la pintura Diluir la pintura o aumentar demasiado alta o baja la viscosidad El caudal de pintura es dem...

Page 15: ...bmirja completamente a pistola nos líquidos como solvente Classic Plus Series PT 2 ADVERTÊNCIAS DE SEGURANÇA RISCOS DE INCÊNDIOS E EXPLOSÕES 1 Nunca utilize SOLVENTES HIDROCARBONETOS HALOGENADOS que poderiam causar danos e dissolução das partes em alumínio do corpo da pistola provocados por reacções químicas SOLVENTES INCOMPATÍVEIS cloreto de metileno diclorometano 1 2 dicloroetano tetracloreto de...

Page 16: ...a que vem fornecida molhada com solvente e um pano absorvente 8 Seque cada parte completamente e aplique um lubrificante específico em cada secção roscada 5 2 PROCEDIMENTO PARA A LIMPEZA AUTOMATIZADA _ Quando se utiliza a Lavadora de pistola automática siga com atenção o manual fornecido com a aparelhagem Antes de proceder às opera ções de limpeza certifique se de descarregar o ar das passagens de...

Page 17: ...ola da agulha 11 desgastada Substitua a Bico do produto 2 1 afrouxado Aperte Junta da agulha 21 afrouxada Ajuste a limpe a ou demais estreita suja ou desga substitua a se necessário stada ESCAPE DE AR PELO ESPALHADOR Válvula de ar 8 assento da Limpe as ou substitua as válvula de ar 7 mola da vál se necessário vula de ar 9 sujas ou danifi cadas O O ring do corpo da válvula Substitua o de ar 7 1 est...

Page 18: ... Pistole könnten eine ungleichmäßige Lackierung ergeben 5 WARTUNG UND INSPEKTION VORSICHT Nie andere Bauteile oder Ersatzteile verwenden die nicht Original teile von ANEST IWATA sind Nie die Öffnungen der Luftdüse der Farbdüse und des Farbnadel endes beschädigen Die Pistole nie vollkommen in Flüssigkeiten wie Lösungsmittel ein tauchen Die ANEST IWATA Trennmittel Spritzpistole ist in Übereinstimmun...

Page 19: ...nigungsflüssigkeit in den Behälter gießen 3 Die Luftdüse 1 um zwei Umdrehungen lösen um der Zerstäubungsluft zu gestatten den Backflush in den Farbdurchgängen der Pistole auszuführen 4 Den Abzugsbügel 16 ziehen und sich dabei vergewissern dass die Zer stäubungsluft in den Behälter gelangt 5 Die Reinigungsflüssigkeit einige Sekunden einwirken lassen dann zum Entsorgen der schädlichen Flüssigkeiten ...

Page 20: ...gen oder wenn erfor 2 2 oder Pistolenkörper 5 derlich ersetzen im Sitz verkrustet beschädigt oder abgenutzt Lackreste in der Luftdüse 1 Reinigen Reglerknopf 12 der Farbnadel Einstellen gelöst Rückholfeder für Farbnadel 11 Ersetzen abgenutzt Farbdüse 2 1 gelöst Anziehen Farbnadeldichtungsset 21 Einstellen reinigen oder gelöst zu stark angezogen wenn erforderlich erset verschmutzt oder abgenutzt zen...

Page 21: ... aldrig hålen på luftmunstycket färgmunstycket och färgnålens ände Doppa aldrig ned pistolen fullständigt i vätskor som lösningsmedel Classic Plus Series SV 2 SÄKERHETSFÖRESKRIFTER BRAND OCH EXPLOSION 1 Använd aldrig LÖSNINGSMEDEL MED HALOGENKOLVÄTEN som kan orska skador och upplösning av delarna i aluminium hos själva pistolkroppen beroende på kemiska reaktioner ICKE KOMPATIBLA LÖSNINGSMEDEL mety...

Page 22: ...et ut rengöringsvätskan för att inte försämra utrustningens prestanda och kvalitet _ Försäkra dig om att PH nivån för rengöringsvätskan aldrig överskrids PH nivå 6 0 8 0 endast under rengöring 5 3 NEDMONTERINGSPROCEDUR _ Rengör alltid färggångarna innan pistolen nedmonteras a Ta bort färgmunstycket 2 1 medan färgnålen 2 2 hålls utdragen genom att trycka på avtryckaren för att skyd da färgnålens sä...

Page 23: ...rgnålsfjäder 11 sitter löst Byt ut Färgmunstycket 2 1 sitter löst Dra åt Färgnålspackningen 21 sitter Justera rengör eller byt löst sitter för hårt är smutsig ut om det är nödvän eller utsliten digt LUFT LÄCKER UT FRÅN LUFTMUNSTYCKET Luftventilen 8 luftventilsätet Rengör eller byt ut om 7 eller luftventilfjädern 9 det är nödvändigt är smutsiga eller skadade O ringen för luftventilsätet Byt ut 7 1 ...

Page 24: ...60 Fax 46 0 31 340 28 69 info anest iwata se www anest iwata se ANEST IWATA France Tél 33 0 4 74 94 59 69 Fax 33 0 4 74 94 34 39 info anest iwata fr www anest iwata fr ANEST IWATA U K Tel 44 0 1480 40 54 19 Fax 44 0 1480 21 76 10 enquiries anest iwata co uk www anest iwata co uk ANEST IWATA Polska Tel 48 61 657 88 50 Mobile 48 883 395 007 info anestiwata com pl www anest iwata pl ANEST IWATA Corpo...

Reviews: