


PROBLEMS AND REMEDIES
Problem
Where it
Parts to be
Cause
Remedy
occurred
checked
Retighten Adjust
Clean Replace
Air leaks
Air valve set
Air valve
*Dirt or damage on seat
x
x
(from tip
of air cap)
Air valve seat set
*Dirt or damage on seat
x
x
*Wear on air valve spring
x
O ring
*Damaged or deteriorated
x
Paint
Fluid nozzle -
*Dirt, damage, wear
leaks
fluid needle set
on seat
x
x
*Loose fluid needle
adj. knob
x
*Wear on needle spring
x
Fluid nozzle
Fluid nozzle -
*Insufficient tightening
x
gun body
*Dirt or damage on seat
x
x
Fluid needle -
*Needle does not return due
packing set
to packing set too tight
x
x
*Needle does not return due
to paint buildup
on fluid needle
x
x
Fluid needle
Needle packing
*Wear
x
x
set, needle set
Packing seat
*Insufficient tightening
x
Paint does not
Tip of gun
Fluid adj. knob
*Insufficient opening
x
flow
Tip hole of nozzle
*Clogged
x
Paint filter
*Clogged
x
x
5
4
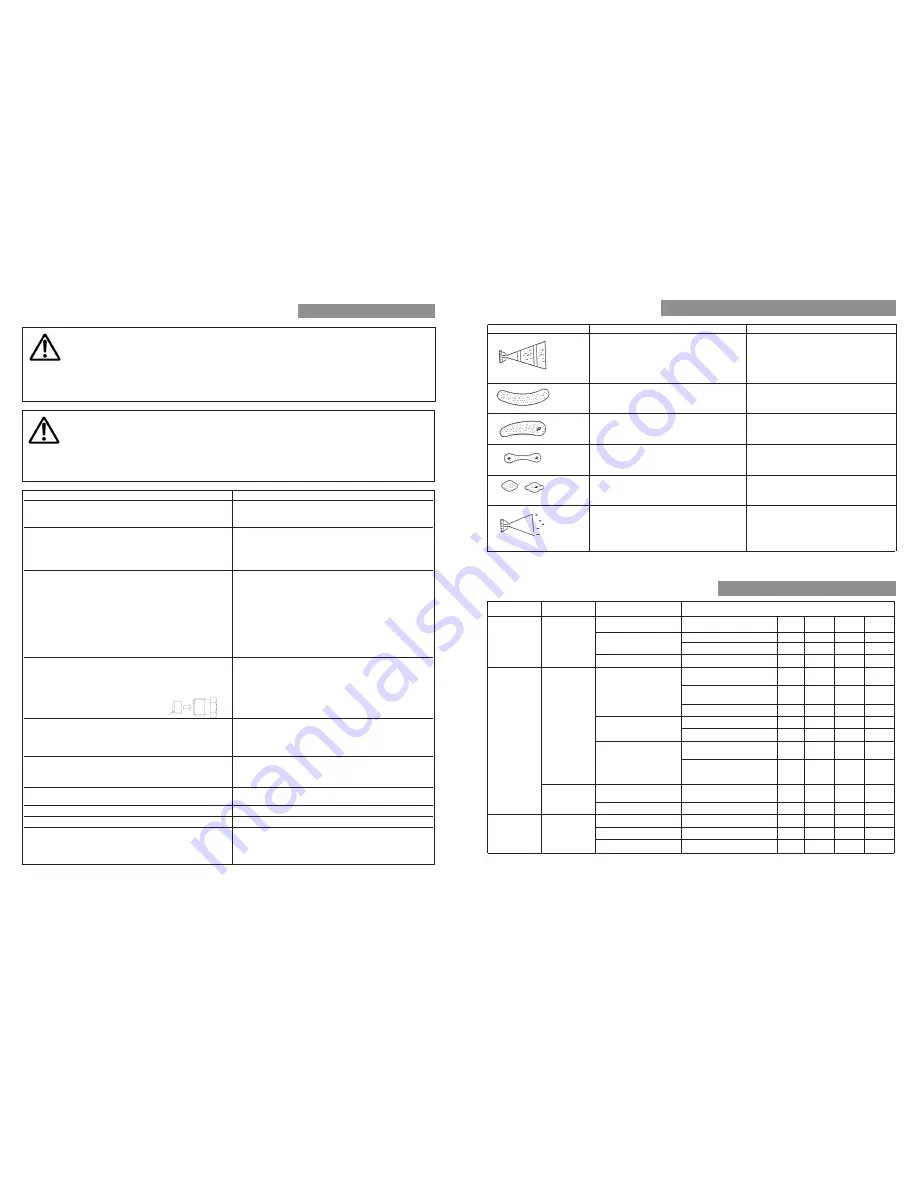
TROUBLESHOOTING
Spray Pattern
Problems
Remedies
1. Air enters between fluid nozzle and
1. Remove fluid nozzle to clean seat.
Fluttering
tapered seat of gun body.
If it is damaged, replace nozzle.
2. Air is drawn from fluid needle packing set
2. Tighten fluid needle packing.
3. Air enters at fluid container fitting nut or fluid
3. Fully tighten joint section.
hose joint.
1. Paint buildup on air cap partially
1. Remove obstructions from horn holes with
Crescent
clogs horn holes. Air pressure from
attached brush. But do not use metal
both horns differs.
objects to clean horn holes.
1. Paint buildup or damage on fluid nozzle cir-
1. Remove obstructions.
Inclined
cumference and air cap center.
Replace if damaged.
2. Fluid nozzle is not properly fitted.
2. Remove fluid nozzle, clean seated section
1. Paint viscosity too low.
1. Add paint to increase viscosity.
Split
2. Fluid output too high.
2. Tighten fluid adj. knob to reduce fluid output
or turn pattern adj. knob clockwise.
Heavy
1. Paint viscosity is too high.
1. Add thinner to reduce viscosity.
Center
2. Fluid output is too low.
2. Turn fluid adj. knob counter-clockwise to
increase fluid output.
1. Fluid nozzle and fluid needle set are
1. Clean or replace fluid nozzle and fluid
Spit
not seated properly.
needle set.
2. The first-stage travel of trigger
2. Replace fluid nozzle and fluid
(when only air discharges) decreases.
needle set.
3. Paint buildup inside air cap set.
3. Clean air cap set.
MAINTENANCE AND INSPECTION
WARNING
- First release air and fluid pressure fully according to item No. 3 of “Improper use of equipment” of WARNING on
page 2.
- Tip of fluid needle set has a sharp point. Do not touch the tip of needle valve during maintenance for protection of
the human body.
- Be careful not to damage the tip of the fluid nozzle or put your hand on it.
- Only an experienced person who is fully conversant with the equipment can do maintenance and inspection.
CAUTION
- Never use commercial or other parts instead of ANEST IWATA original spare parts.
- Never immerse the whole gun into liquid such as thinner.
- Never soak air cap set in solvent for extended period even if cleaning. It may cause defective pattern.
- Never damage holes of air cap, fluid nozzle or fluid needle.
Step-by-step procedure
Important
1.Pour remaining paint to another container. Clean fluid passages and air cap set.
1. Incomplete cleaning can fail pattern shape and uniform particles.
Spray a small amount of thinner to clean fluid passages.
Especially clean fully and promptly after use with two-component paint.
2.Clean each section with brush soaked with thinner and wipe out with waste cloth.
2. Soaking whole spray gun in solvent may cause spray gun malfunction.
When cleaning, never scratch any holes of air cap set, fluid nozzle, or
fluid needle set.
3. Before disassembly, fully clean fluid passages.
3. During disassembly, do not scratch seat section.
(1) Disassemble fluid nozzle.
(1) Remove fluid nozzle after removing fluid needle set or while keeping
fluid needle pulled, in order to protect seat section.
(2) Disassemble fluid needle set.
(2) Be careful when handling tip of fluid needle set since it is sharp.
You do not need to remove fluid adj. guide set from gun body.
Disassemble fluid adj. guide set as little as possible.
Remove fluid adj. knob and fluid needle spring, then pull out fluid needle
spring, and then pull out fluid needle set from back of fluid adj. guide set.
4.The fluid needle packing set, must be adjusted while the fluid needle set is inser-
4. If you tighten fluid needle packing set too much, fluid needle set will not
ted.Tighten fluid needle packing seat by hand and then tighten further by spanner
move smoothly, resulting in paint leakage from tip of fluid nozzle. Try to
1/6 turn (60-degrees). When you remove needle packing set, do not leave plastic
adjust it carefully while pulling trigger and confirming movement of fluid
piece of needle packing set in the
needle set. When you tighten it too much, first loosen it and then tighten it
gun body.
again carefully.
5.In order to assemble air valve, first assemble air valve & air valve spring
5. If you try to fit air valve spring and air valve to gun body set without fluid
& fluid adj. guide set together. Next, insert fluid needle set into fluid adj. guide set,
needle set, air valve will not be fitted correctly and packing inside fluid
then fit it to gun body set and screw fluid adj. guide set.
adj. guide set will be damaged.
6.Turn pattern adj. knob counterclockwise to fully open.
6. If pattern adj.Knob is not fully opened, tip of it can brush against and
Then tighten pattern adj. set or air adj. set.
damage fluid nozzle and cause seizure of thread.
Where to inspect
Parts replacement standard
1. Each hole passage of air cap and fluid nozzle
Replace if it is crushed or deformed.
2. Packings and O rings
Replace if it is deformed or worn out.
3. Leakage from seat section between fluid nozzle and fluid needle set
Replace them if leakage does not stop after fully cleaning fluid nozzle and
fluid needle set. If you replace fluid nozzle or fluid needle only, fully
match them and confirm that there is no leakage.
plastic piece
(white)


