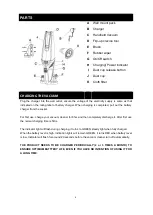
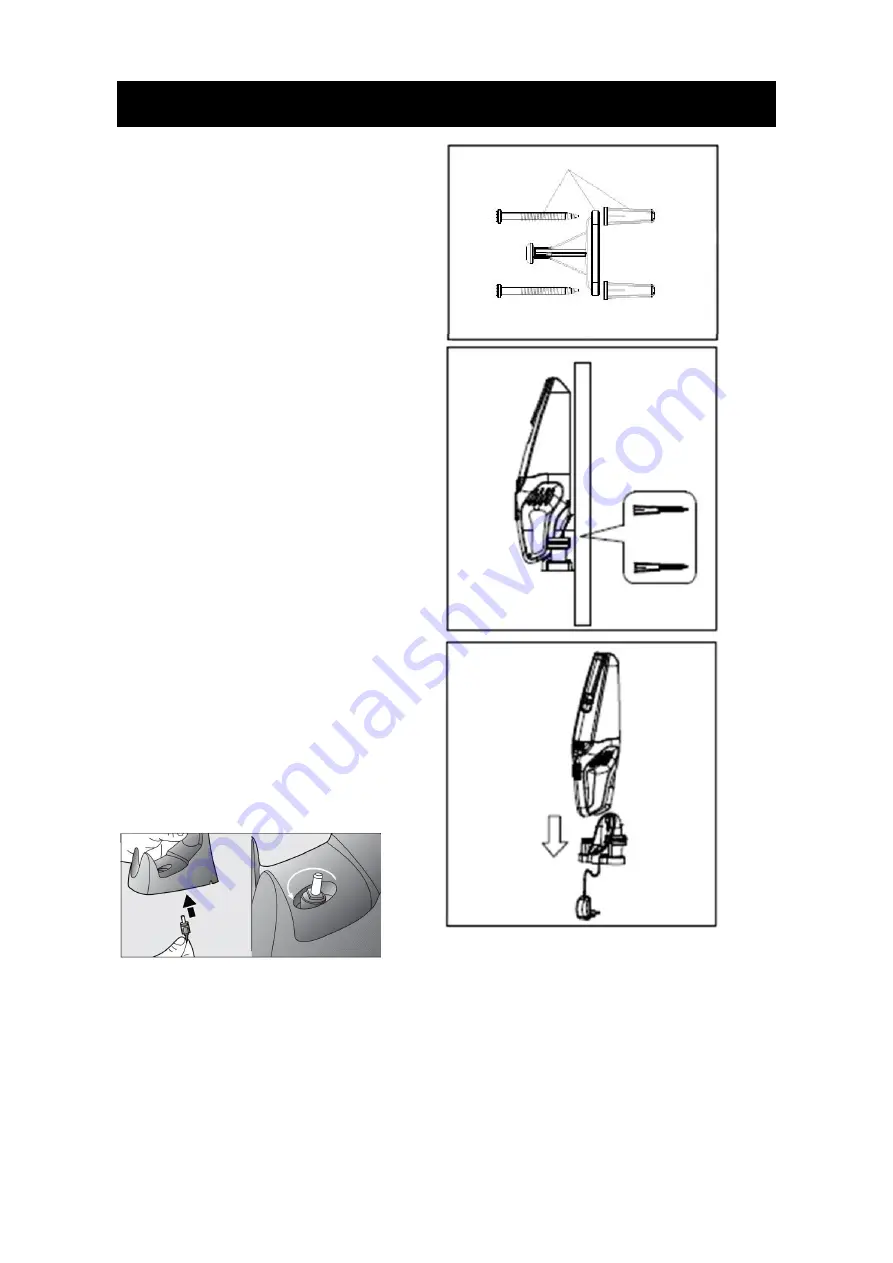
background image

 8 

STORAGE 

Wall Mount 

There is a wall mount accessory 

supplied with screws and wall 

plugs. 

To install the wall mount bracket, 
position it on the wall at a suitable 
height.   
 
Mark the two screw holes through 
onto the wall. Using a suitable drill 
(wood drill bit for timber wall, or 
masonry drill bit for brick / 
concrete walls, drill three holes 
Ø6mm and 35 - 40mm deep.   
 

Insert the plastic wall plugs into 

each hole and gently hammer in 

until they are flush with the wall, 

place the hanging mount over the 

holes then insert the screws and 

tighten up. Do Not Overtighten


Insert the DC jack through the 

bottom hole of wall mount bracket, 

twist in 90deg to hold it at base 


Seat the handheld vacuum on the 

wall mount bracket, the vacuum 

can start charging in this position. 


Summary of Contents for VC8273-L-9

Page 1: ...1 Vacuum Cleaner User Manual Model no VC8273 L 9 PLEASE READ AND SAVE THESE INSTRUCTIONS FOR FUTURE REFERENCE ...

Page 2: ...he power switch must be off 8 Never charge the batteries in temperatures above 37 C or below 0 C 9 It is normal for the charger to become warm to the touch when charging 10 Use only attachments provided 11 Static electricity some carpets can cause a small build up of static electricity Any static discharge is not hazardous to health 12 Do not use your appliance outdoors or expose to weather 13 Do ...

Page 3: ...eed according to the following inspections IMPORTATNT Always fully discharge the batteries before removal and ensure the charger is unplugged 1 Run the vacuum cleaner until it stops to fully discharge the batteries 2 Remove the ergonomic handle and the screws in the main body to open the cleaner 3 Remove the motor housing and disconnect the cables 4 Remove the batteries from the housing Note Conta...

Page 4: ...ery charger from the socket For first use charge your vacuum cleaner for 6hrs and then completely discharge it After first use the normal charging time is 5Hrs The indicator light will flash during charging it turns to GREEN steady light when fully charged When the battery level is high indication lights will remain GREEN it turns RED when battery level is low Indicator will flash for around 20 se...

Page 5: ...lt into the nozzle and can be flipped down for dry vacuum use Fold the crevice tool and attach the rubber wiper provided for wet suction Push the rubber wiper on to the nozzle ensuring it is tightly fixed A brush is provided for general cleaning Flip down the crevice tool then push the brush attachment to crevice tool Ensure it is tightly fixed ...

Page 6: ...by sliding the On Off switch forward i e O OFF I ON To stop slide the switch back Return the product to the charging base after each use MAINTENANCE Empty the dust cup Press the dust cup release button and pull out the dust cup Pull out the filter ...

Page 7: ...up under rinsing water Leave to dry for 24 hours Make sure filter and dust bin are dried thoroughly before fitting them back to the unit IMPORTART Filters must be cleaned regularly for best suction performance and to prevent over heating and damaging the vacuum cleaner ...

Page 8: ...asonry drill bit for brick concrete walls drill three holes Ø6mm and 35 40mm deep Insert the plastic wall plugs into each hole and gently hammer in until they are flush with the wall place the hanging mount over the holes then insert the screws and tighten up Do Not Overtighten Insert the DC jack through the bottom hole of wall mount bracket twist in 90deg to hold it at base Seat the handheld vacu...

Page 9: ...nnection and see if battery is fully charged Suction not strong 1 Brush head not correctly fitted 2 The dust cup is full 3 The filters are blocked 1 Check brush head had connected to main unit 2 Empty dust cup 3 Wash the filter SPECIFICATION Model number V8273 L 9 Battery 14 8V 1300mAh Li ion Working time 15 20min Charging time 5 6hr Battery charger WJA Y081750400W Input 100 240V 50 60Hz 16W Outpu...

Page 10: ...misuse abuse or neglect Please retain your receipt as proof of purchase and contact our Customer Service Centre on 1800 124 125 Australia or 0800 945 995 New Zealand or alternatively via Customer Help at Kmart com au for any difficulties with your product Warranty claims and claims for expense incurred in returning this product can be addressed to our Customer Service Centre at 690 Springvale Rd M...

Reviews: