11
2.2 Safety
Precautions
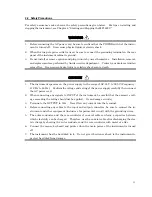
For safety assurance's sake, observe the safety precautions given below. For tips on starting and
stopping the instrument, see Chapter 4, "Starting and Stopping the MP1632C."
1.
Before connecting the AC power cord, be sure to confirm that the POWER switch of the instru-
ment is turned off. It can cause physical injury or electric shock.
2.
When the two-pole power outlet is used, be sure to connect the grounding terminal on the rear
panel of the instrument cabinet to ground.
3.
Do not install or remove options and plug-in units by users themselves. Installation, removal,
and replacement are performed by Anritsu service department. Contact your dealer or Anritsu
sales office. It can cause physical injury or electric shock even to death.
1.
The instrument operates on the power supply in the range of AC 85 V to 265 V (Frequency :
47.2 Hz to 63 Hz). Confirm the voltage and rating of the power supply carefully then connect
the AC power cord.
2.
When connecting any signals to INPUT of the instrument, be careful that the excessive volt-
age exceeding the rating should not be applied. It can damage circuitry.
3.
Terminate the OUTPUT in 50
Ω
. Never flow any current into the terminal.
4.
Before connecting any cables to the input and output connectors, be sure to connect the in-
strument and other equipment (inclusive of experimental circuit) with the grounding wires.
5.
The outer conductor and the core conductor of co-axial cable can form a capacitor between
which electricity can be charged. Therefore, use the co-axial cable after discharging the elec-
tric charge by shorting the outer conductor and the core conductor with metal or a like.
6.
Connect the mouse, keyboard and printer when the main power of the instrument is turned
off.
7.
The instrument has the hard disk in it. Do not give vibration or shock to the instrument to
protect hard disk from damage.
WARNING
CAUTION
Summary of Contents for MP1632C
Page 17: ...xvi...
Page 22: ...1 CHAPTER 1 OVERVIEW...
Page 30: ...9 CHAPTER 2 SETUP...
Page 35: ...14 Blank...
Page 36: ...15 CHAPTER 3 PANEL DESCRIPTION AND CONNECTIONS...
Page 45: ...24 Blank...
Page 46: ...25 CHAPTER4 STARTING AND STOPPING THE MP1632C...
Page 54: ...33 z Group box A frame or box that encloses a set of related controls...
Page 55: ...34 Blank...
Page 56: ...35 CHAPTER 5 DISPLAY DESCRIPTION...
Page 75: ...54 Blank...
Page 76: ...55 CHAPTER 6 OPERATING INSTRUCTIONS...
Page 114: ...93 CHAPTER 7 PERFORMANCE TEST...
Page 117: ...96 Blank...
Page 118: ...97 CHAPTER 8 MAINTENANCE SCRAPPING...
Page 121: ...100 Blank...
Page 122: ...101 APPENDIXES...
Page 127: ...106 Blank...

