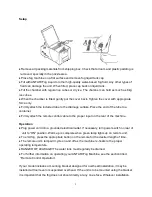
background image


Setup   


♦ Remove all packing materials from shipping box. Check that all oam and plastic padding is 

removed, specially in the nozzle area.   

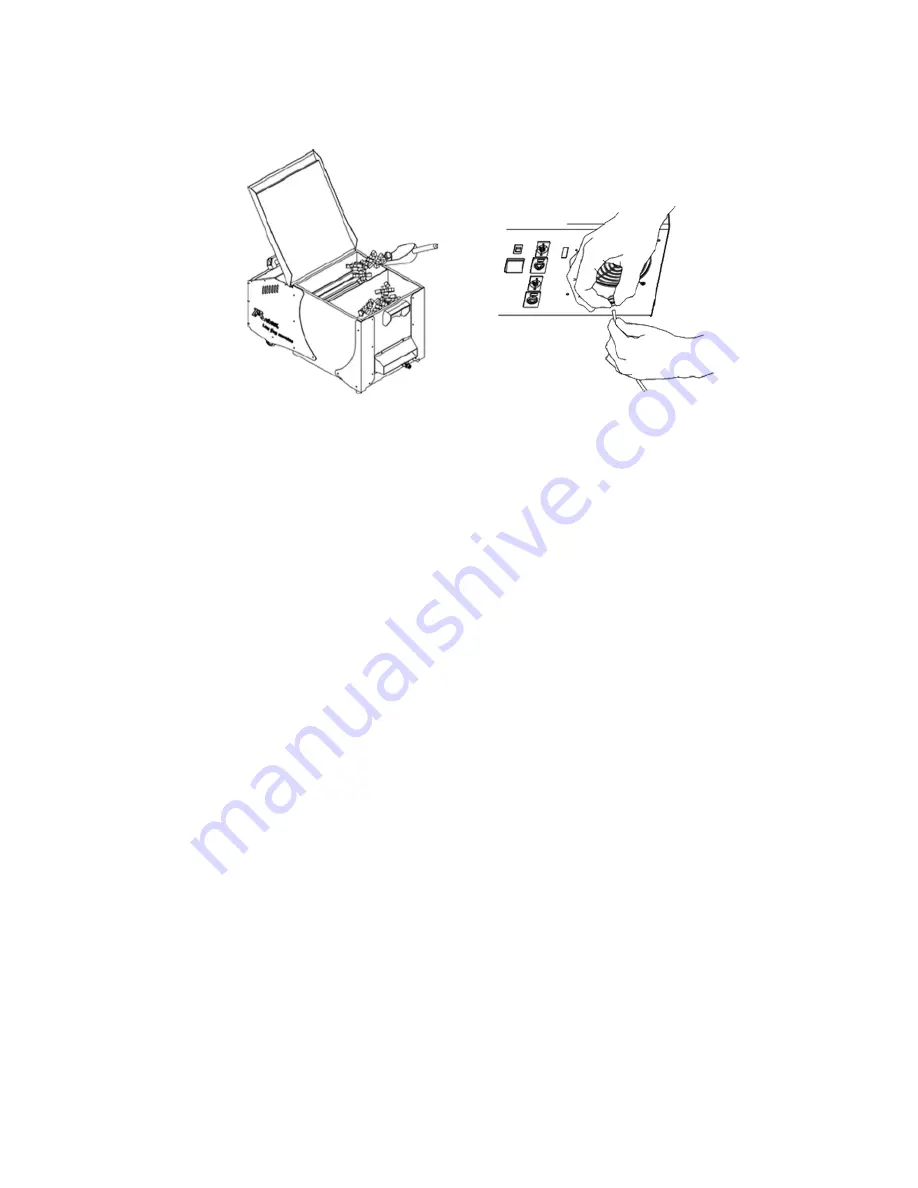
♦ Place fog machine on a flat surface and remove fog liquid tank cap.   
♦ Fill with ANTARI Fog Liquid or other high-quality water-based fog fluid. Any other types of 

fluid can damage the unit. When filled, place cap back on liquid tank.   

♦ Fill the chamber with regular ice cubes or dry ice. The chamber can hold as much as 8 kg 

ice cubes.   
♦ When the chamber is filled, gently put the cover back. Tighten the cover with appropriate 

force only.   
♦ Firmly attach the included tube to the drainage outtake. Place the end of the tube to a 

container.   
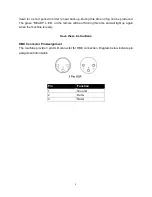
♦ Firmly attach the remote control cable to the proper input on the rear of the machine. 
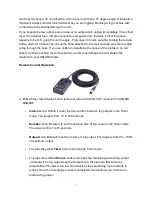
 

Operation 


♦ Plug power cord into a grounded electrical outlet. If necessary, turn power switch on rear of 

unit to “ON” position. Warm-up is complete when green lamp lights up on remote unit.   

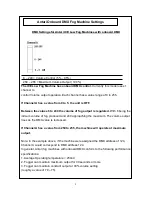
♦ To emit fog, press the appropriate button on the remote for the desired length of time.   
♦ The remote unit’s lamp will cycle on and off as the machine re-heats to the proper 

operating temperature.   
♦ DANGER OF LEAKAGE! The water tank must regularly be drained.   
♦ For further information on operating your ANTARI Fog Machine, see the section titled, 

“Remote Control Operation”.   


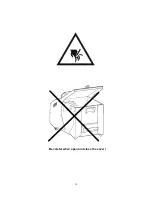
If your model includes a mounting bracket designed for overhead installation, it may be 

installed at floor level or suspended overhead. If the unit is to be mounted using the bracket, 

it is important that the fog does not shoot directly at 

any one’s face. Whatever installation 

Summary of Contents for ICE-101

Page 1: ...1 ICE 101 Low Fog Machine User Manual BODENNEBLER B English Français Deutsch 中文 2014 Antari Lighting and Effects Ltd ...

Page 2: ...2 ...

Page 3: ...r inside use only Not designed for outside use For the 110V models use 3 prong grounded electrical outlet only Prior to use take care to determine that the unit is installed at the rated voltage Always unplug your ANTARI Fog Machine before filling its tank Keep fog machine upright Turn off or unplug when not in use This machine is not water or splash proof If moisture water or fog liquid gets insi...

Page 4: ...as over heating of the heater If your ANTARI Fog Machine fails to work properly discontinue use immediately Drain all fog liquid from the tank pack the unit securely preferably in the original packing material and return it to your ANTARI dealer for service Always drain tank before mailing or transporting this unit Never drink fog liquid If it is ingested call a doctor immediately If fog liquid co...

Page 5: ...e control cable to the proper input on the rear of the machine Operation Plug power cord into a grounded electrical outlet If necessary turn power switch on rear of unit to ON position Warm up is complete when green lamp lights up on remote unit To emit fog press the appropriate button on the remote for the desired length of time The remote unit s lamp will cycle on and off as the machine re heats...

Page 6: ...utton as this may damage the unit Return the machine to your ANTARI dealer Remote Control Operation Z 8 25 feet wired multi function remote control with 4 PIN XLR connector for ANTARI ICE 101 Interval knob Rotate it to set the interval time between fog outputs in the Timer mode The range is from 10 to 250 seconds Duration knob Rotate it to set the duration time of fog output in the Timer mode The ...

Page 7: ...allow machine to finish heating up process 3 Run the machine in a well ventilated area for a few minutes 4 The cleaning is now completed Please refill with fog fluids 5 Run the machine to make sure it can produce fog properly Note All fog machines are prone to clogging due to the thick consistency of fog fluid and the high temperature at which it vaporizes However a properly maintained fog machine...

Page 8: ...READY L E D on the remote will be off during this time and will light up again when the machine is ready Save these instructions DMX Connector Pin Assignment The machine provide 3 pin XLR connector for DMX connection Diagram below indicate pin assignment information Pin Function 1 Ground 2 Data 3 Data ...

Page 9: ... of fog produced and 249 approaching the maximum The volume output rises as the DMX value is increased If Channel A has a value from 250 to 255 the machine will operate at maximum output Note In the example above if the machine were assigned the DMX address of 124 Channel A would correspond to DMX address 124 In general Antari fog machines with onboard DMX conform to the following performance spec...

Page 10: ...10 Be careful when open and close the cover ...

Reviews: