VERTICAL CONTACT TOASTER
12
P/N 1010838 Rev. P 10/16
Burger King
Monthly
REPLACING THE BLACK AND SILVER RELEASE SHEET
NOTE: Depending on usage and level of cleaning,
the Release Sheet may last up to 45-60 days.
1. Remove and discard the Release Sheet.
2. Lay a new Release Sheet on a clean, dry surface
and fold it in half lengthwise. Then gently crease it
at the fold using only your fingers (see below).
3. Install the Release Sheet into toaster.
Fold over so
ends meet.
Press Lightly
with finger to
form crease.
11. Install the Release Sheet by placing it over both
sides of the Platen with the crease centered on
the Platen.
NOTE: Extend the life of the Release Sheet by
rotating from the black side to the silver side on a
daily or weekly basis.
12. Install the Bun Chute so the hooks are over the
lower rear Support Rod. Install the Heat Shield
with the Release Sheet retainer clips securely
over the Release Sheet and Platen.
13. Reinstall the Bun Feeder and plug in the unit.
NOTE: Make sure the Heat Shield is activating the
Conveyor Safety Interlock Switch. The Conveyors
will not rotate unless the Heat Shield is in place
and the Conveyor Safety Interlock Switch is acti-
vated.
NOTE: Check the Release Sheet to make sure it
is not caught in the Conveyor. Additional release
Sheets can be obtained through your Authorized
Service Agency under P/N 7000249 (3-Pack) or
7000250 (10-Pack).
MAINTENANCE (continued)
CAUTION
Failure to use Release Sheets may result in dam-
age to the unit and loss of warranty coverage.
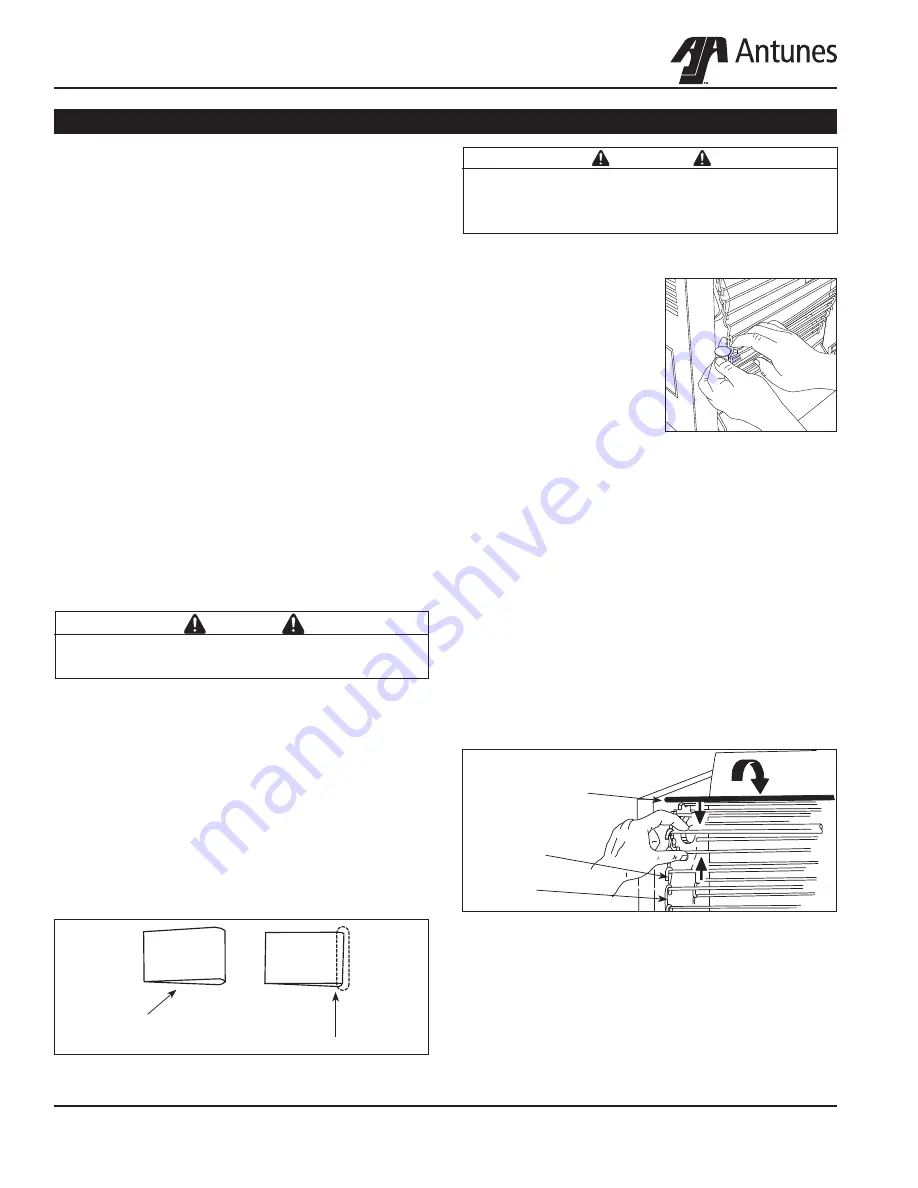
Figure 4. Removing Conveyor Belt
Rotation
Upper Support Rod
Large Link
P/N 0800121
Small Link
P/N 0800204
MEASURING CONVEYOR BELT
Facing the toaster, locate
the approximate center
point of the Conveyor
Chain. Pull the chain
away from the edge of
the toaster. Stand a U.S.
Dime, 11/16” (1.8 cm) coin
on end between the frame
and the chain. If the gap
is significantly wider than
the coin, REMOVE links as described below. Then,
measure the gap again to make sure it is not too tight.
Check the opposite side of the toaster using the same
measurements.
3. To shorten a stretched Conveyor Belt Chain,
remove one 1/2” link from the belt.
4. Reassemble the Conveyor Belt Chain onto the
sprockets as described below.
NOTE: If the belt is too short to be reassembled,
remove a second 1/2” small link and install a 3/4”
large link. This will shorten the belt by 1/4” overall.
WARNING
Turn the unit off, disconnect the power source,
and allow the unit to cool down before performing
any service or maintenance on the unit.
REMOVING CONVEYOR BELTS
After a period of time, the Conveyor Chain links will
wear and the chain will stretch, eventually skipping on
the sprockets. This is easily fixed by removing one or
more conveyor links from each side of the belt.
1. Perform steps 1-4 under
Replacing Belt Wraps
on the previous page.
2. Disconnect the Conveyor Belt Chain by squeez-
ing any two links together and unhooking both
ends of one link (Figure 4).


