background image

+1 (630) 784-1000

+1 (800) 253-2991

+1 (630) 784-1650

+86-512-6841-3907

+86-512-6841-3637

®

Summary of Contents for 9210857

Page 1: ...le during the period of this warranty Antunes will pay labor costs to an Authorized Service Agent to replace the part plus travel expenses Antunes reserves the right to make changes in design or add improvements on any products The right is always reserved to modify Equipment because of factors beyond our control and government regulation Changes to Equipment do not constitute a warranty charge Th...

Page 2: ... a claim Freight damage claims are the responsibility of the purchaser and are not covered under warranty The warranty does NOT extend to Damages caused in shipment or damage as result of improper use Installation of electrical service Normal maintenance as outlined in this manual Malfunction resulting from improper maintenance Damage caused by abuse or careless handling Damage from moisture into ...

Page 3: ...and any other applicable codes 24 5 8 625 mm 25 1 4 641 mm 14 9 16 370 mm Dimensions Electrical Specifications Plug Configuration Model Mfg No Volt Watts Hz Plug Description Plug Configuration 9210857 China only 9210862 International 220 240 3300 50 60 IEC 309 Pin Sleeve 16 Amp 230 Volt 9210866 Taiwan 220 240 3300 50 60 L6 30P Twist Lock 32 Amp 220 250 Volt ...

Page 4: ...The equipment should be grounded according to local electrical codes to prevent the possibility of electrical shock It requires a grounded recep tacle with separate electrical lines protected by fuses or circuit breaker of the proper rating Bread may burn Therefore toasters must not be used near or below curtains or other combustible walls and materials Failure to maintain safe operating distances...

Page 5: ... contains HEBT 3V toaster Accessories box 2 Remove the accessories box from the large box 3 With the help of another person carefully remove the HEBT 3V from the large box 4 Remove all protective coverings from the unit 5 Open the Accessories Box It contains Owner s Manual Bun Buffer Frame 6 Wipe the entire exterior of the toaster and the accessories mentioned above with a clean towel sprayed with...

Page 6: ...ront 3 Press the PROGRAM button to proceed to the Front Platen Heater menu The display shows the actual temperature of Platen B rear 4 Press the LIGHTER button to toggle between the setpoint and actual temperature of Platen B rear 5 Press the PROGRAM button to proceed to the Motor Menu The display shows the actual speed of the motor 6 Press the LIGHTER button to toggle between the setpoint and act...

Page 7: ...protective caps 3 Press and release both buttons Reinstall the pro tective caps NOTE If the Hi Limit Controls require continuous resetting contact your Authorized Service Agency Purging buns from Toaster If buns get stuck in the toaster press and hold both the UP and DOWN arrow buttons to increase the belt speed until the buns are purged from the toaster There are variations in bun products Worldw...

Page 8: ...s if there is heavy carbon buildup on the conveyor belt 6 Inspect the rear belts for any tears discoloration or damage to the Belt Wrap snaps Replace any damaged Belt Wrap as needed With proper maintenance the Crown and Main Belt Wraps can six months or longer Refer to PR 68 Q1 and PR 68 Q2 for belt replacement instructions 7 If the rear belt is in good condition spray a clean damp sanitized towel...

Page 9: ...HEBT 3V BUN TOASTER 9 P N 1011314 Rev I 10 18 McDonald s Figure 3 Examples of Damaged Belts MAINTENANCE continued ...

Page 10: ...14 Rev I 10 18 McDonald s MAINTENANCE continued Figure 4 Example of Damaged Belt BELT IS TORN AND FOLDED REPLACE BELT BELT IS MISSING SNAPS AND IS DAMAGED REPLACE BELT Figure 5 Example of Damaged Belt Figure 6 Example of Damaged Belt ...

Page 11: ... panel Set the bun compression knob to 7 6 Push down on the front and rear belt rollers and move them away from the center of the toaster Use both hands This removes tension and locks the rollers in place 7 Lift the upper belt frame lock Then rotate down so it rests on the camshaft of the rear be lt roller 8 Pull down the lower belt frame lock This provides access to the front and rear belt roller...

Page 12: ...ttom roller Make sure the belt lines up properly on the rollers The snaps on the belts should face the inside of the roller 4 Lift up the front and rear belt roller Use both hands This will add tension and lock them in place 5 Lift the lower conveyor lock to lock the rollers into place NOTE Lift up on the camshaft of the rear conveyor roller while lifting the conveyor lock 6 Lift the upper belt fr...

Page 13: ...he electrical compartment for crumbs and debris Clean out all crumbs and debris using a clean dry towel or nylon bristled brush Be careful not to disrupt any of the electrical wiring 5 Slowly close the control housing cover Reconnect with the screws 6 Remove the screws from the bottom plate on the rear of the unit and slowly lower the cover 7 Remove any debris or dust from the cooling fan with a s...

Page 14: ...Control Display flashes Err 18 continuously Buns Burn Failed B Platen Solid State Relay Contact your maintenance person or Authorized Service Agency for service Failed Control Board Failed B Platen Thermocouple Control Display flashes Err 13 continuously Buns not toasting prop erly Loose A Platen Thermocouple con nection on Control Board or the Front Platen Thermocouple is open Re secure the A Pla...

Page 15: ...perly locked in place To adjust compression light dark setting and or temperature see page 7 Inspect the proper position of the locks as described in the Maintenance section of this manual Compression side door will not close Either both Upper Lower Conveyor Locks are not properly locked in place Inspect the proper position of the locks as described in the Maintenance section of this manual The lo...

Page 16: ...cuit Breakers If they trip again check the Power Cord Plug and outlet for damage Contact your maintenance person Authorized Service Agency and Electrician for service Faulty Transformer Replace Transformer Conveyors not turning Motor Drive Chain is detached from sprockets Reinstall the Drive Chain Drive Chain needs lubrication Lubricate Drive Chain with Lubit 8 P N 2140152 Failed Drive Motor Conta...

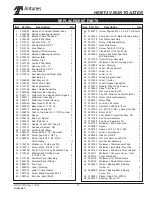
Page 17: ... Screw Mach One Way 8 32 1 48 3080143 Nut Hex Keps 8 32 1 49 3100213 Screw Phpnhd 10 16 X 3 4 Thrd Form 4 50 4000202 Fan Axial 230V Metal Housing Imp1 51 0013178 Adj Platen Assembly 1 52 0013181 Relay Sink Bracket Assy 1 53 0507247 Heat Sink Relay 1 54 3080157 Screw Tap 8 32 X 3 8 Lg 4 55 4010187 Transformer 240 Vac 12Vac 1 56 4050240 Relay Solid State Dual Pole W Conn Recept 1 57 0013182 Control ...

Page 18: ... Sleeve Bearing 50 Od X 75 Lg 2 134 2120224 Sleeve Bearing 50 Od X 375 Lg 2 135 2120260 Spacer Adjustable Frame Rh 2 136 2120263 Spacer Platen Rh 2 137 2140109 Loctite 242 Blue 1 138 2140125 Lubricant White Ptfe 1 139 2150185 Sprocket 25B18 1 2 Bore 2 Item Part No Description Qty Item Part No Description Qty REPLACEMENT PARTS CONTINUED 140 2150285 Bearing Single Groove S S 8 141 2150324 Chain Driv...

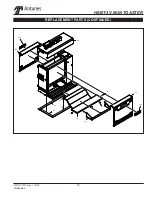
Page 19: ...HEBT 3V BUN TOASTER 19 P N 1011314 Rev I 10 18 McDonald s REPLACEMENT PARTS CONTINUED 125 109 89 125 110 36 36 20 26 25 25 26 85 ...

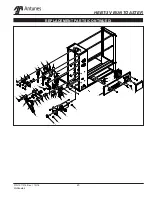
Page 20: ... 20 P N 1011314 Rev I 10 18 McDonald s REPLACEMENT PARTS CONTINUED 78 126 82 155 101 98 140 98 117 117 127 127 93 94 98 140 113 155 160 154 115 104 105 162 133 98 162 129 118 154 162 133 17 129 39 39 22 28 131 106 161 129 ...

Page 21: ...HEBT 3V BUN TOASTER 21 P N 1011314 Rev I 10 18 McDonald s REPLACEMENT PARTS CONTINUED 88 144 92 91 144 144 87 87 176 167 51 108 158 90 152 111 107 158 97 147 167 95 143 176 ...

Page 22: ...HEBT 3V BUN TOASTER 22 P N 1011314 Rev I 10 18 McDonald s REPLACEMENT PARTS CONTINUED 53 56 55 54 54 69 68 66 65 64 151 172 67 145 171 166 146 163 165 165 157 112 151 58 ...

Page 23: ...0 18 McDonald s REPLACEMENT PARTS CONTINUED 73 158 71 75 74 141 14 9 9 11 139 139 132 155 10 98 140 6 2 2 96 102 3 15 13 161 150 149 142 116 116 149 150 155 100 140 98 93 117 117 99 94 127 127 99 76 115 161 118 27 27 164 146 43 50 151 49 44 154 ...

Page 24: ...HEBT 3V BUN TOASTER 24 P N 1011314 Rev I 10 18 McDonald s WIRING DIAGRAM ...

Page 25: ...HEBT 3V BUN TOASTER 25 P N 1011314 Rev I 10 18 McDonald s NOTES ...

Page 26: ...HEBT 3V BUN TOASTER 26 P N 1011314 Rev I 10 18 McDonald s NOTES ...

Page 27: ...HEBT 3V BUN TOASTER 27 P N 1011314 Rev I 10 18 McDonald s NOTES ...

Page 28: ... 1 630 784 1000 1 800 253 2991 1 630 784 1650 86 512 6841 3907 86 512 6841 3637 ...

Reviews: