10
P/N 1011443 Rev. C 08/17
Clean Cooling Fan and Electrical
Housing
1. Press the Power button to turn
the unit off. The unit enters a cool
down mode and the belts continue
to turn. The toaster automatically
shuts down when complete. Wait
for the unit to shut down.
NOTE:
For this step, you must wait until
the toaster shuts down after the
cool down period.
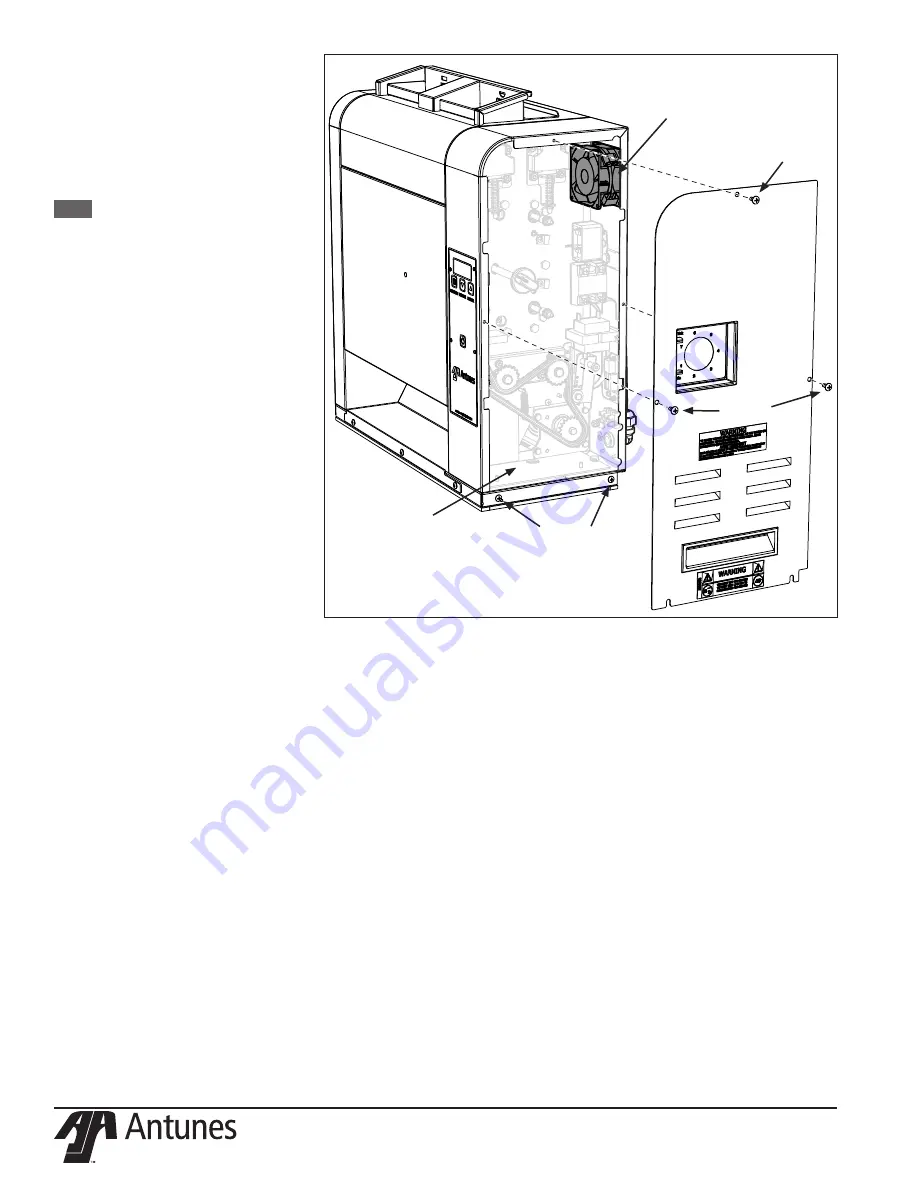
2. Refer to Figure 13. Loosen but do
not remove the bottom screws
indicated. Then, remove the other
indicated screws.
3. Remove any debris or dust from
the cooling fan with a small brush.
Wipe away any debris with a clean,
dry towel.
4. Inspect the electrical compartment
for crumbs and debris. Clean out all
crumbs and debris using a clean,
dry towel or nylon bristled brush.
Be careful not to disrupt any of the
electrical wiring.
5. Slowly close the control housing
cover. Reconnect with the screws.
6. Remove the screws from the bot-
tom plate on the rear of the unit
and slowly lower the cover.
7. Remove any debris or dust from the
cooling fan with a small brush. Wipe
away any debris with a clean, dry
towel. Inspect the electrical com-
partment for crumbs and debris.
Clean out the crumbs and debris
using a clean, dry towel or nylon
bristled brush. Be careful not to
disrupt any of the electrical wiring.
8. Close the bottom plate and re-
install the screws.
9. Reattach the bun feeder. Plug in the
power cord, turn the power on, and
test the unit before returning it to
service.
REMOVE
SCREW
REMOVE
SCREWS
LOOSEN
THESE
SCREWS
CLEAN INSIDE
AND OUTSIDE
OF FAN
Figure 13. Cleaning Fan and Electrical Compartment
CLEAN ANY DEBRIS
FROM THE INSIDE
OF THE ELECTRICAL
COMPARTMENT


