background image

P/N 1011308 Rev. E 11/16

Mini Contact Toaster

owner’s manual

Model VCT-2

Mfg. Numbers:

9210905

www.antunes.com

EQUIPMENT

Contact Toaster

Summary of Contents for VCT-2

Page 1: ...P N 1011308 Rev E 11 16 Mini Contact Toaster owner s manual Model VCT 2 Mfg Numbers 9210905 www antunes com EQUIPMENT Contact Toaster ...

Page 2: ...ing a claim Freight damage claims are the responsibility of the purchaser and are not covered under warranty The warranty does not extend to y y Damages caused in shipment or damage as result of improper use y y Installation of electrical service y y Normal maintenance as outlined in this manual y y Malfunction resulting from im proper maintenance y y Damage caused by abuse or care less handling y...

Page 3: ... facturer or its service agent or a similarly qualified person in order to avoid a hazard y y Do not modify the power sup ply cord plug if it does not fit the outlet have a proper outlet installed by a qualified electrician y y Do not use an extension cord with this appliance y y Electrical ground is required on this appliance y y Check with a qualified electrician if you are unsure if the applian...

Page 4: ... N 1011308 Rev E 11 16 Model Mfg No Volts Watts Amps Hertz Plug Description 9210904 VCT 2 120 1800 15 50 60 5 15P 15 Amps 120 V Non Locking assembly only 25 5 647 7 mm 13 330 2 mm 10 254 mm SPECIFICATIONS ...

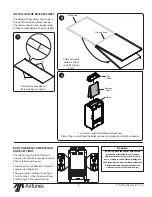
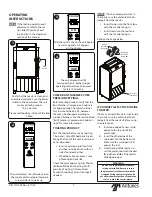
Page 5: ...heet in the sink The Release Sheet must be washed by hand 5 Wipe all surfaces of the unit with a hot damp cloth 6 Wipe both sides of the Release Sheet with a hot damp cloth NOTE Do NOT use a dripping wet cloth Wring out before use 7 Re install the Bun Feeder and Bun Chute onto the unit 8 Refer to the section titled Install ing the Release Sheet on the next page Install the Release NOTE The main Co...

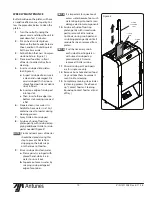
Page 6: ...Setting 1 is the thinnest setting and Setting 6 is the widest setting WARNING Do NOT operate the toaster without the release sheet installed Do not use any abrasive cleansers or tools such as scrub bers or scrapers on the Platen Damage to the Platen from operation without a Release Sheet or damage caused from abrasive cleansers or tools voids the warranty Fold UP Fold UP 1 2 Fold and crease edges ...

Page 7: ...ng 1 bun and 1 slice of Wheatberry bread Facing the front of the unit insert prod uct as described y y Bun Feed crown into front slot and heel into back slot with cut sides facing each other y y Wheatberry bread place 1 slice of bread into back slot Check the color against Quality Photos Buttered White Bun Toasting Multi grain Bun Toasting Chicken Salad Sandwich toasting Adjust settings if needed ...

Page 8: ...tings 1 Turn the toaster off 2 Pres and hold both the Light and Dark buttons and turn the toaster on 3 Continue holding the Light and Dark buttons until fr factory reset appears in the display The toaster beeps when resetting is done and starts up normally Hi Limit HI LIMIT RESET BUTTON A hi limit control turns off power to the unit if it overheats To reset this Hi Limit control allow sufficient t...

Page 9: ...if it is worn creased or torn 2 Spray an approved cleanser on a clean dry towel 3 Wipe the Release Sheet firmly from top to bottom 4 Repeat this procedure with a clean dry towel dampened with water 5 Next wipe the release sheet with a clean towel dampened with an approved sanitizer Allow to air dry 6 Repeat Steps 1 through 6 on the inside portion of the Release Sheet Set the clean Release Sheet as...

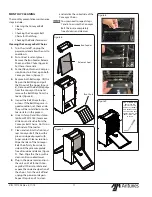
Page 10: ...y with scrub pad ap plying additional Sizzle to scrub pad as needed Figure 5 NOTE Front and rear covers of toaster should be closed during this step to prevent Sizzle from dripping on the belt wraps or other areas of toaster 9 Rinse scrub pad in clean water a Press against scrub pad with gloved hand while it is in water to rinse it out b Squeeze out excess water by scraping scrub pad against edge ...

Page 11: ... this process 6 Use a Hi Temp Detail Brush Eco lab item 92212765 to remove all debris and residue from the Conveyor Belt Chains Do this on both sides of the toaster 7 Clean and sanitize the front and rear Conveyor Belt Chain with a green scrub pad sprayed with Super contact Cleaner solution Wipe the links of the Conveyor Belt Chain firmly from side to side until they are completely free of residue...

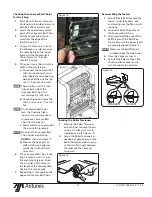
Page 12: ...Chain hooks are pointing DOWN as shown in Figure 10 d Measure the gap again to confirm the gap is approxi mately the width of the U S Dime coin 6 If the Conveyor Belt Chain is too tight remove a small 1 2 inch link and install a large 3 4 inch link in its place This increases the length of the Conveyor Belt Chain by 1 4 inch overall 7 Repeat steps 1 through 6 on the opposite Conveyor Belt Chain Ch...

Page 13: ...92212765 to carefully remove all debris and residue from the inside components of the toaster Figure 15 Do this on both sides of the toaster NOTE With proper and regular daily and monthly cleaning the inte rior of toaster should be free of residue and debris If you find that the interior is extremely dirty on a regular basis please review how the daily and monthly the frequency and dai ly and mont...

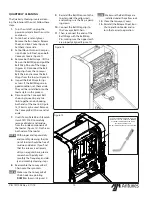
Page 14: ...the flap is pointing down 6 Attach the Belt Wrap clips to the Conveyor Chain 7 Then connect the ends of the Belt Wraps with the Pin making sure the zipper teeth are properly aligned Figure 19 NOTE Verify both clips are attached by pulling belt wrap away from chain and reattach if needed 8 Close the Conveyor Covers 9 Reinstall the Bun Chute and Bun Feeder and return the toaster to operation INCORRE...

Page 15: ...n or replace release sheet as described in the Maintenance section of this manual Platen has butter debris buildup Clean Platen as described in the Maintenance section of this manual Light Dark setting needs to be adjusted Adjust light dark setting See Operation section of this manual Crowns and or Heels must be forced into the toaster Buns sticking and burning Belt wraps are dirty worn or damaged...

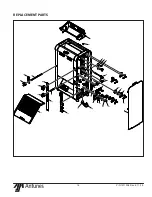
Page 16: ...16 P N 1011308 Rev E 11 16 27 86 54 51 23 71 60 63 62 82 85 85 75 55 55 45 74 14 79 39 29 44 36 28 38 44 12 4 67 9 65 15 16 81 65 62 17 REPLACEMENT PARTS ...

Page 17: ...17 P N 1011308 Rev E 11 16 9 70 22 50 53 64 75 55 67 48 68 23 76 52 57 70 49 49 49 17 47 70 75 54 54 44 6 47 27 43 70 22 50 53 100 Included in Kit 7001115 REPLACEMENT PARTS CONTINUED ...

Page 18: ...2 75 13 65 18 65 19 63 63 65 21 63 20 3 3 7 74 44 19 63 65 18 65 65 65 5 2 91 5 45 45 51 73 30 51 73 73 51 73 51 30 65 94 3 3 7 74 44 75 75 44 74 97 96 93 92 89 92 90 91 89 92 90 92 93 95 96 1 98 88 88 REPLACEMENT PARTS CONTINUED ...

Page 19: ...19 P N 1011308 Rev E 11 16 67 25 71 77 26 80 17 46 42 69 56 66 78 26 REPLACEMENT PARTS CONTINUED ...

Page 20: ...g Retainer Kit 1 51 7000207 Sprocket Kit 25B28 x 1 2 Bore SteppedTooth 1 52 2150258 Bearing Idler 1 Incl with kit 7001115 Item 100 53 2150260 Spacer Bearing 6 54 2150368 Miter Gear 20 Pressure Angle 4 55 2150370 Chain Drive 1 56 2180145 Cover Bumper 4 57 3000124 Ring Retaining 3 8 1 Incl with kit 7001115 Item 100 58 304P105 Nut Hex Keps 4 40 2 59 306P121 Screw Mach 6 32 X 3 4 2 60 306P123 Screw Ma...

Page 21: ...OCK 1 TERMINAL GND TRANSFORMER 1800W PLATEN 4 3 S S RELAY 1 2 WHT BLK SWITCH 5 7 81517 4 6 11 14 16 1 2 1 2 3 4 TC BLOCK 3 TERMINAL BLOCK 2 TERMINAL TERMINAL FAN MOTOR J1 J2 BLK WHT WHT POWER WHT BLK WHT WHT BLK BLK BLK BLK WHT WHT HI LIMIT J5 YEL J3 1 2 YEL MAIN DISPLAY BOARD 22 GA XLP 125Ā C 14 GA TFE 200Ā C WHT BLK BLK RED BRD MOV ...

Page 22: ...22 P N 1011308 Rev E 11 16 NOTES ...

Page 23: ...23 P N 1011308 Rev E 11 16 NOTES CONTINUED ...

Page 24: ...elt Chain Link removal Belt Wraps and Dampers This warranty does not cover damage to the Platen due to operating the toaster without a Release Sheet or cleaning with abrasive cleansers or tools misuse or dropping of unit This warranty does not cover problems or failures resulting from improper incorrect voltage supply This warranty does not cover Travel Time Mileage in excess of 2 hours 100 miles ...

Reviews: