BUILDING CONNECTIONS THAT LAST
9
PIPE SET-UP AND POSITION - CTS COPPER SYSTEM
(MODEL 1007 & 3007)
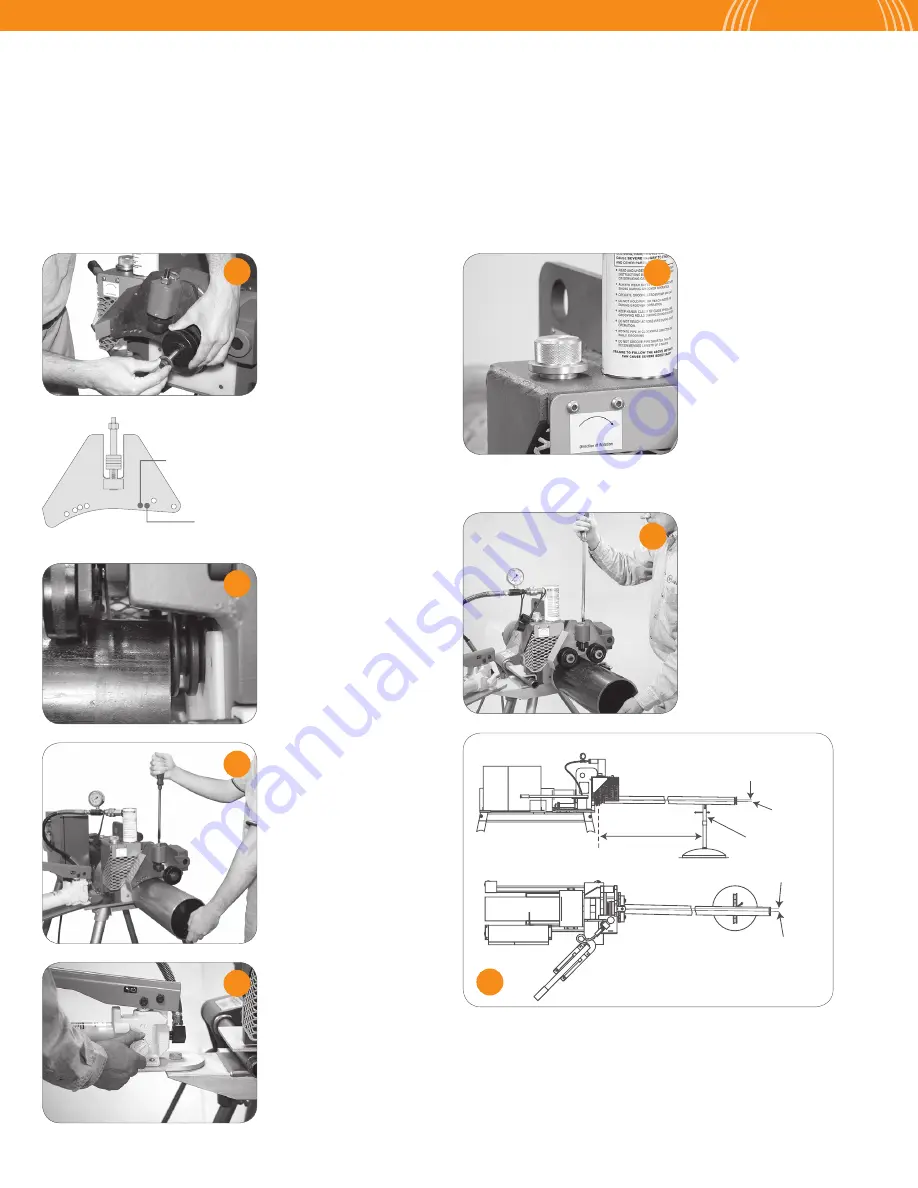
To groove copper tube using the CTS Copper System, the Steel/CTS Dual Guide Roll Assembly must be used for all sizes of tube.
(K, L, M, DWV). DO NOT use the Advanced Copper Method guide roll assembly when using the Copper CTS System. Failure to use
the correct guide roll assembly will result in the tubing rolling out of the machine before a correct groove can be made. If the Groover
is set-up for steel pipe or Advanced Copper Method, is will also be necessary to change the grooving rolls to the ones required for CTS
Copper System. Refer to page 13 for grooving roll and guide roll plate changeout.
Groover Centerline
TOP VIEW DIAGRAM
Pipe Centerline
0 to
1
/
4
toward user
Set one plastic guide roll
located on the front of the
Groover, into the correct hole
for the size tube being
grooved (1/4" allen wrench).
See hole location below.
Make sure the knurled stop
(groove diameter stop) is not
in contact with the top surface
of the groover housing. If contact
is noted, release hydraulic pressure
by turning the release valve knob
counterclockwise allowing the
groover head to raise.
Turn the knurled stop
counterclockwise sufficiently
to allow clearance between the
Insert tube over the bottom
roll (groove roll) positioning
the tube flush against the
front flange of the bottom
roll. Be certain tube does not
override this flange.
Using the slot on top of the
Roller plate adjustment rod,
lower the guide rolls into firm
contact with the tube.
Note:
Improper tool adjustment
will cause tube flare and/or the
tube to roll out of the machine.
Using the slot on top of the
roller plate adjustment rod,
raise (counterclockwise
rotation) the guide roll
mounting plate sufficiently
to ensure that the top
grooving roll makes contact
with the tube prior to guide
roll contact.
Close the release valve on
the hydraulic pump by
turning the knob clockwise.
Pump the hydraulic hand
pump to lower the top
grooving roll into light firm
contact ( approx. 100 psi)
with the tube.
Use one (1) roller pipe stand to support the pipe. Adjust the outboard pipe
stand to assure proper contact between the tube and guide rolls. Pipe stand
should be 65% - 75% of the pipe length away from Groover. Looking at the
front of the Groover, the pipe stand should be positioned to angle the tube
approximately 0° to 1/4° downward, away from the front of the groover and
1/4° to the left side at the Groover. See figures above.
1
5
2
6
3
4
7
65% – 75% OF
PIPE LENGTH
Adjustable Height
Pipe Stand
Groover Centerline
Pipe Centerline
0 to
1
/
4
down
SIDE VIEW DIAGRAM
GUIDE ROLL – HOLE LOCATION
2"-3" CTS Copper
(Same as 2"-3
1
/
2
" Steel)
4"-8" CTS Copper
(Same as 4"-6" Steel)
SIDE VIEW
TOP VIEW
bottom of the knurled stop and the top of the groover housing when the top
grooving roll is in contact with the tube.


