background image


15 

OSD Setting 

Basic and simple instruction on the control keys. 


1.  Press the


MENU-button

 to activate the OSD window.   

2.  Press


  or 


to navigate through the functions. Once the desired function is highlighted,   

press the 


to activate it. If there is a sub-menu, press


to navigate through the sub-menu 

functions. 

3.  Press


  or 

to change the settings of the selected function. Press 

▲ 

AUTO

 to exit. If you want to adjust 

any other function, repeat steps 2-3.   

4. 

OSD lock function: When the OSD menu is closed, press and hold the “Down” key for about 10 seconds to lock 

or unlock the OSD menu. 


Notes:


1.  If the product has only one signal input, the item of "Input Select" is disabled. 

2.  If the product screen size is 4:3 or input signal resolution is native resolution, the item of "Image Ratio" is 

disabled. 

3.  One of Clear vision, DCR, Color Boost, and Picture Boost functions is activated; the other three functions are 

turned off accordingly. 

Summary of Contents for U2790PQU

Page 1: ...1 LCD Monitor User Manual U2790PQU LED backlight www aoc com 2018 AOC All Rights Reserved...

Page 2: ...necting the Monitor 11 Wall Mounting 12 Adjusting 13 Hotkeys 13 OSD Setting 15 Luminance 16 Image Setup 17 Color Setup 18 Picture Boost 19 OSD Setup 20 Extra 21 Exit 22 LED Indicator 23 Driver 24 i Me...

Page 3: ...used as follows NOTE A NOTE indicates important information that helps you make better use of your computer system CAUTION A CAUTION indicates either potential damage to hardware or loss of data and...

Page 4: ...ectrician install the correct outlet or use an adapter to ground the appliance safely Do not defeat the safety purpose of the grounded plug Unplug the unit during a lightning storm or when it will not...

Page 5: ...recommended by the manufacturer A product and cart combination should be moved with care Never push any object into the slot on the monitor cabinet It could damage circuit parts causing a fire or elec...

Page 6: ...t the stain instead of strong detergent which will cauterize the product cabinet When cleaning make sure no detergent is leaked into the product The cleaning cloth should not be too rough as it will s...

Page 7: ...are not blocked by a table or curtain Do not engage the LCD monitor in severe vibration or high impact conditions during operation Do not knock or drop the monitor during operation or transportation...

Page 8: ...ables DP HDMI USB cables CD manual will be provided for all countries and regions Please check with the local dealer or AOC branch office for confirmation CD Manual Warranty Card Stand Base Power Cabl...

Page 9: ...9 Setup Base Please setup or remove the base following the steps as below Please place the monitor on a soft and flat surface to prevent the scratch Setup Remove...

Page 10: ...to look at the full face of the monitor and then adjust the monitor s angle to your own preference Hold the stand so you will not topple the monitor when you change the monitor s angle NOTE Do not ad...

Page 11: ...the back of the monitor 2 Optional Requires a video card with HDMI port Connect one end of the HDMI cable to the back of the monitor and connect the other end to the computer s HDMI port 3 Optional R...

Page 12: ...ble the wall mounting arm 3 Place the wall mounting arm onto the back of the monitor Line up the holes of the arm with the holes in the back of the monitor 4 Insert the 4 screws into the holes and tig...

Page 13: ...uto configure Only for the models with D Sub Volume When there is no OSD press to active volume adjustment bar press or to adjust volume Only for the models with Audio ECO When there is no OSD press d...

Page 14: ...for 5 seconds to activate the Clear Vision Demo and a message of Clear Vision Demo on will be display on the screen for a duration of 5 seconds Press Menu or Exit button the message will disappear Pre...

Page 15: ...nction Press AUTO to exit If you want to adjust any other function repeat steps 2 3 4 OSD lock function When the OSD menu is closed press and hold the Down key for about 10 seconds to lock or unlock t...

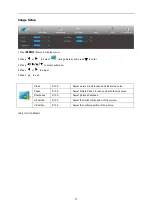
Page 16: ...ster Brightness 0 100 Backlight Adjustment Eco mode Standard Standard Mode Text Text Mode Internet Internet Mode Game Game Mode Movie Movie Mode Sports Sports Mode Uniformity Uniformity Mode Gamma Gam...

Page 17: ...to adjust 5 Press to exit Clock 0 100 Adjust picture Clock to reduce Vertical Line noise Phase 0 100 Adjust Picture Phase to reduce Horizontal Line noise Sharpness 0 100 Adjust picture sharpness H Pos...

Page 18: ...r Color Temperature from EEPROM DCB Mode Full Enhance ON OFF Disable or Enable Full Enhance Mode Nature Skin ON OFF Disable or Enable Nature Skin Mode Green Field ON OFF Disable or Enable Green Field...

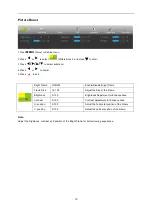
Page 19: ...Disable Bright Frame Frame Size 14 100 Adjust the Size of the Frame Brightness 0 100 Brightness Adjustment for Enhance Area Contrast 0 100 Contrast Adjustment for Enhance Area H position 0 100 Adjust...

Page 20: ...0 Adjust the OSD timeout DP Capability 1 1 1 2 If the DP video content supports DP1 2 please select DP1 2 for DP Capability otherwise please select DP1 1 H Position 0 100 Adjust the horizontal positio...

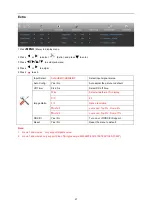
Page 21: ...adjust the picture to default Off Timer 0 24 hrs Select DC off time Image Ratio Wide Select wide format for display 4 3 4 3 1 1 Native resolution Movie 1 over scan Top 9 Down 9 Movie 2 over scan Top 9...

Page 22: ...22 Exit 1 Press MENU Menu to display menu 2 Press or to select Exit and press to enter 3 Press to exit...

Page 23: ...23 LED Indicator Status LED Color Full Power Mode White Power Saving Orange...

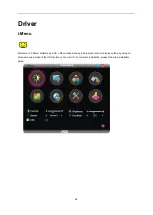
Page 24: ...lcome to i Menu software by AOC i Menu makes it easy to adjust your monitor display setting by using on screen menus instead of the OSD button on the monitor To complete installation please follow the...

Page 25: ...l wizard to complete software installation Under each of the four PC statuses you may choose the desired time in minutes from the pull down menu for your monitor to automatically shutdown The example...

Page 26: ...ool it splits the desktop into different panels and each panel displays a different window You only need to drag the window to a corresponding panel when you want to access it It supports multiple mon...

Page 27: ...efer to the Setting the Optimal Resolution If the initial screen the login screen does not appear contact the Service Center or your dealer Can you see Input Not Supported on the screen You can see th...

Page 28: ...The LED should either turn ON or OFF after hitting the CAPS LOCK key Missing one of the primary colors RED GREEN or BLUE Inspect the monitor s video cable and make sure that no pin is damaged Make su...

Page 29: ...um 335 664mm Optimal preset resolution 3840x2160 30Hz HDMI2 3840x2160 60Hz HDMI1 DP Plug Play VESA DDC2B CI Input Connector DP HDMIx2 USBx2 Earphone Power Source 100 240V 50 60Hz Power Consumption Typ...

Page 30: ...75 029 SXGA 1280x1024 60Hz 63 981 60 020 1280x1024 75Hz 79 976 75 025 WXGA 1440x900 60Hz 55 935 59 887 1440x900 60Hz 55 469 59 901 WSXGA 1680x1050 60Hz 65 290 59 954 1680x1050 60Hz 64 674 59 883 FHD...

Page 31: ...CL 6 TMDS Data 1 16 SDA 7 TMDS Data 0 17 DDC CEC Ground 8 TMDS Data 0 Shield 18 5V Power 9 TMDS Data 0 19 Hot Plug Detect 10 TMDS Clock 20 Pin Color Display Signal Cable Pin No Signal Name Pin No Sign...

Page 32: ...SA DDC STANDARD It allows the monitor to inform the host system of its identity and depending on the level of DDC used communicate additional information about its display capabilities The DDC2B is a...

Reviews: