background image

11

F

1

2

Charging

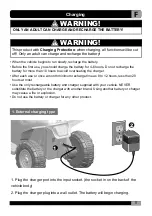
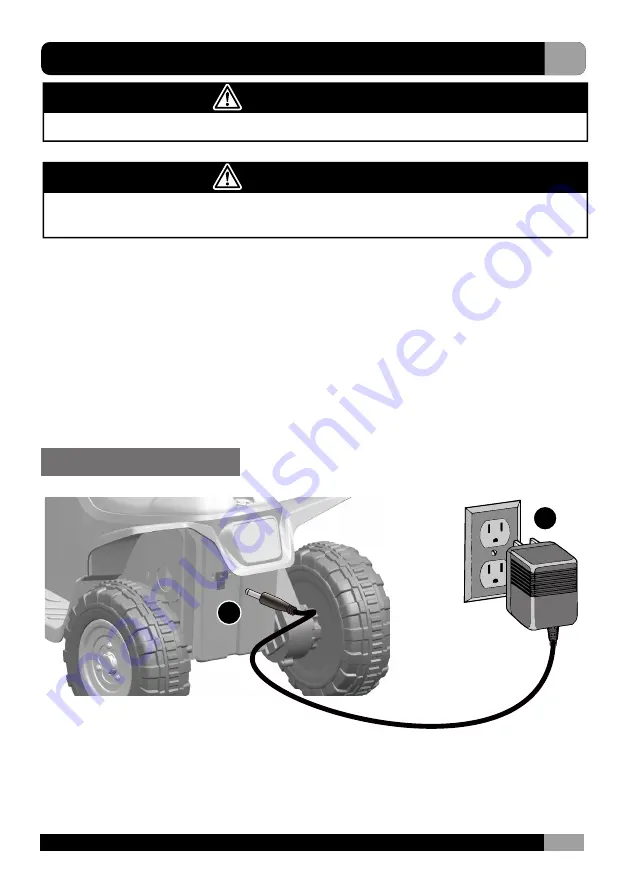
1. Plug the charger port into the input socket. (the socket in on the back of the 

vehicle body) 

2. Plug the charger plug into a wall outlet. The battery will begin charging.

WARNING!

ONLY AN ADULT CAN CHARGE AND RECHARGE THE BATTERY!

WARNING!

This product with 

Charging Protection

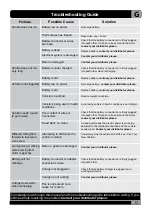
: when charging, all functions will be cut 

off!  Only an adult can charge and recharge the battery!

1. External charging type

• When the vehicle begins to run slowly, recharge the battery.
• Before the first use, you should charge the battery for 4-6 hours. Do not recharge the 

battery for more than 10 hours to avoid overheating the charger.

• After each use or once a month minimum recharge time as 8 to 12 hours, less than 20 

hours at most. 

• Use the only rechargeable battery and charger supplied with your vehicle. NEVER 

substitute the battery or the charger with another brand. Using another battery or charger 
may cause a fire or explosion.

• Do not use the battery or charger for any other product.

Summary of Contents for 370-166V80

Page 1: ...t 30 kg IMPORTANT RETAIN FOR FUTURE REFERENCE READ CAREFULLY Read and understand this entire manual before using Please keep this manual for future reference as it contains important information Before first time use charge the battery for at least 4 6 hours but no more than 10hours WARNING Must be assembled by an adult ...

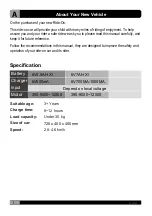
Page 2: ...ture reference Follow the recommendations in this manual they are designed to improve the safety and operation of your ride on car and its rider Suitable age Charge time Load capacity Size of car Speed About Your New Vehicle 3 Years 8 12 hours Under 30 kg 720 x 400 x 455 mm 2 8 4 6 km h Specification Battery Charger input Motor 6V4 5AH X1 6V500mA 390 9000 12000 6V7AH X1 6V700MA 1000MA 390 9000 120...

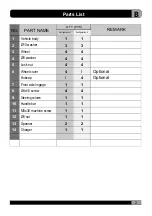
Page 3: ... 9 10 11 12 13 14 NO PART NAME Q TY PCS Configuration 1 Configuration 2 REMARK Vehicle body Ø10 washer Wheel Ø8 washer Lock nut Wheel cover Hubcap Front axle lingage Ø4x16 screw Steering column Handle bar M5x30 machine screw Ø5 nut Spanner Charger Parts List Optional Optional ...

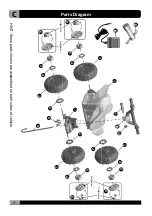
Page 4: ...3 1 7 11 10 12 2 2 2 3 3 3 3 4 4 4 4 5 5 5 5 6 6 6 6 8 9 13 14 C Configuration 2 Configuration 1 Configuration 2 Configuration 1 HINT Some parts shown are assembled on both sides of vehicle Parts Diagram ...

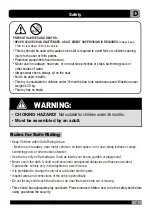
Page 5: ...playground Never use in the dark A child could encounter unexpected obstacles and have an accident Operate the vehicle only in the daytime or a well lit area It is prohibited to change the circuit or add other electric parts Inspect wires and connections of the vehicle periodically Do not let any child touch the wheels or be near them when the car is moving This toy should be used with caution sin...

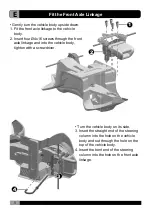
Page 6: ... screws through the front axle linkage and into the vehicle body tighten with a screwdriver Turn the vehicle body on its side 3 Insert the straight end of the steering column into the hole on the vehicle body and out through the hole on the top of the vehicle body 4 Insert the bent end of the steering column into the hole on the front axle linkage ...

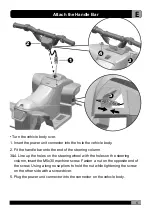
Page 7: ...nd of the steering column 3 4 Line up the holes on the steering wheel with the holes on the steering column insert the M5x30 machine screw Fasten a nut on the opposite end of the screw Using a long nose pliers to hold the nut while tightening the screw on the other side with a screwdriver 5 Plug the power unit connector into the connector on the vehicle body ...

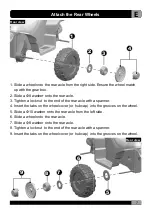
Page 8: ...he end of the rear axle with a spanner 4 Insert the tabs on the wheel cover or hubcap into the grooves on the wheel 5 Slide a Φ10 washer onto the rear axle from the left side 6 Slide a wheel onto the rear axle 7 Slide a Φ8 washer onto the rear axle 8 Tighten a lock nut to the end of the rear axle with a spanner 9 Insert the tabs on the wheel cover or hubcap into the grooves on the wheel Rear view ...

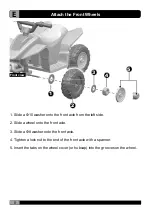
Page 9: ...o the front axle from the left side 2 Slide a wheel onto the front axle 3 Slide a Φ8 washer onto the front axle 4 Tighten a lock nut to the end of the front axle with a spanner 5 Insert the tabs on the wheel cover or hubcap into the grooves on the wheel Front view ...

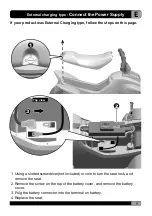
Page 10: ...g type follow the steps on this page Top view 1 Using a slotted screwdriver not included or coin to turn the seat lock and remove the seat 2 Remove the screw on the top of the battery cover and remove the battery cover 3 Pulg the battery connector into the terminal on battery 4 Replace the seat ...

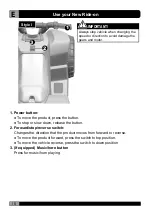
Page 11: ...t the product moves from forward to reverse To move the product forward press the switch to top position To move the vehicle reverse press the switch to down position 3 If equipped Music horn button Press for music horn playing Use your New Ride on Style I Always stop vehicle when changing the speed or direction to avoid damage the gears and motor IMPORTANT ...

Page 12: ...1 External charging type When the vehicle begins to run slowly recharge the battery Before the first use you should charge the battery for 4 6 hours Do not recharge the battery for more than 10 hours to avoid overheating the charger After each use or once a month minimum recharge time as 8 to 12 hours less than 20 hours at most Use the only rechargeable battery and charger supplied with your vehic...

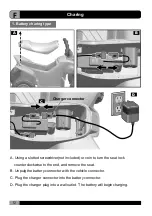
Page 13: ...coin to turn the seat lock counterclockwise to the end and remove the seat B Unpulg the battery connector with the vehicle connector C Plug the charger connector into the battery connector D Plug the charger plug into a wall outlet The battery will begin charging 1 Battery charing type ...

Page 14: ... is not being delivered to the terminal connection and the vehicle needs repair Contact your distributor please Attempting to shift while the vehicle is motion Completely stop the vehicle and shift see Use Your New Vehicle Check that the battery connectors are firmly plugged into each other when recharging Replace battery contact your distributor please Replace battery contact your distributor ple...

Page 15: ...hicle are not cracked or broken Occasionally use a lightweight oil to lubricate moving parts such as wheels Park the vehicle indoors or cover it with a tarp to protect it from wet weather Keep the vehicle away from sources of heat such as stoves and heaters Plastic parts may melt Recharge the battery after each use Only an adult can handle the battery Recharge the battery at least once a month whe...

Page 16: ......

Reviews: