background image

14

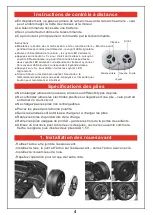
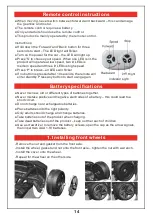
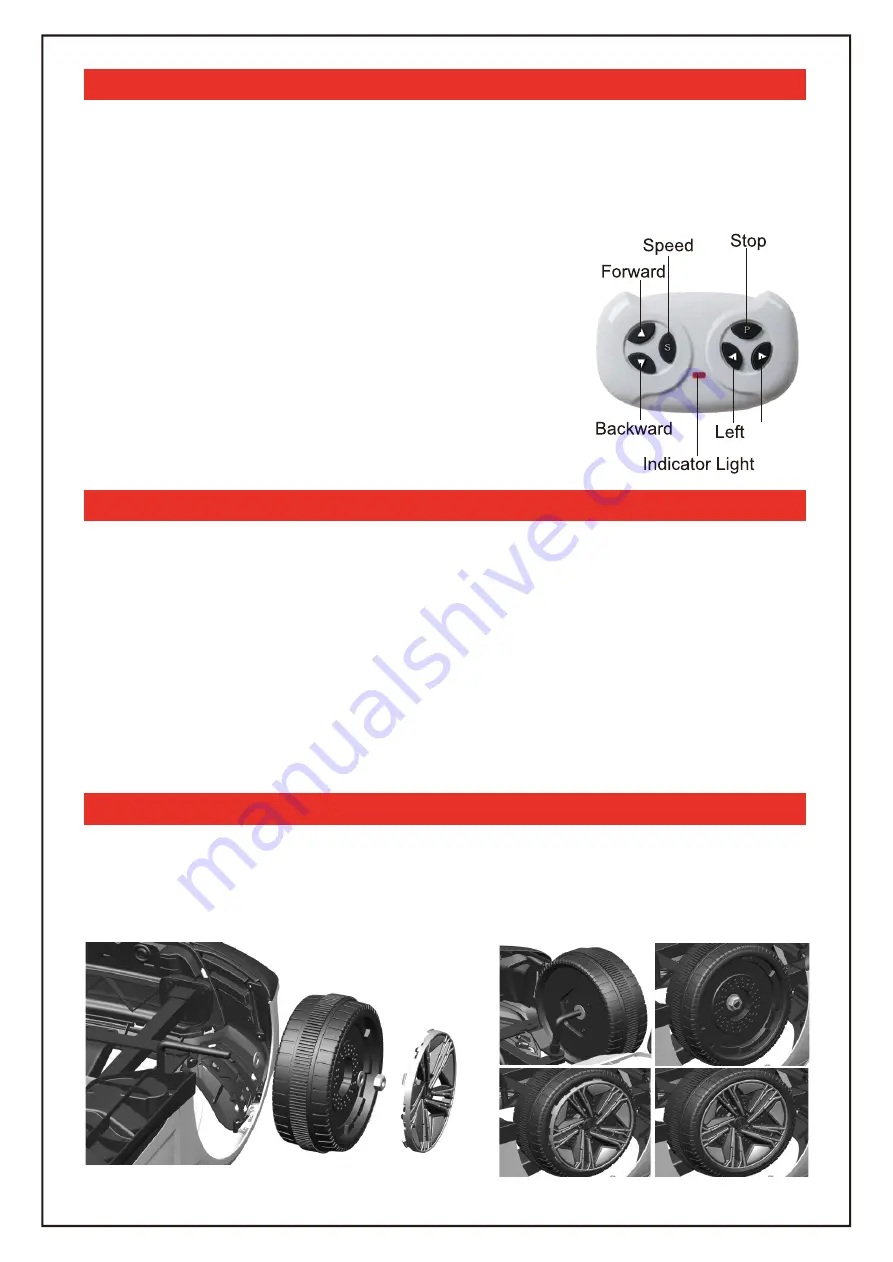
Remote control instructions 

● When moving, never switch between forward and backward – this can damage 

the gearbox and motor. 

● The remote control requires a battery.  
● Only and adult should use the remote control.  
● This product is mainly operated by the remote control. 

Instructions: 
● Hold down the 'Forward' and 'Back' button for three 

seconds to start – The LED light will flicker.

● Turn on the power for the car – the LED will light up. 
● Press 'S' to choose your speed. When one LED is lit, the 

product will operate at low speed, two lit LEDs is 
medium speed and three lit LEDs is high speed. 

● Press 'P' to break – all LEDs will flicker. 
● If no button is pressed after 10 seconds, the remote will 

enter standby. Press any button to start using again. 

Right

Battery specifications 

● Never mix new, old or different types of batteries together. 
● Never mistake positive and negative electrodes of a battery – this could lead to a 

short circuit. 

● Do not charge non-rechargeable batteries. 
● Place batteries into the right polarity. 
● Only adults should charge and change batteries. 
● Take batteries out of the product when charging. 
● Take dead batteries out of the product – keep out the reach of children. 
● Use a screwdriver to remove the battery screws, open the cap as the arrow signals, 

then insert two AAA 1.5V batteries. 

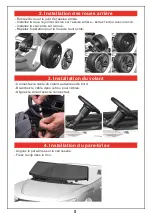
1. Installing front wheels 

- Remove the nut and gasket from the front axle. 
- Install the wheel, gasket and nut onto the front axle – tighten the nut with a wrench. 
- Install the cover onto the wheel. 
- Repeat for the wheel on the other side. 

Summary of Contents for 370-220V80

Page 1: ...is 37 95 Voiture électrique pour enfant Instructions d installation et d utilisation Modèle de voiture simulée Système piloté par télécommande Marche avant marche arrière et direction par télécommande Marche avant et arrière par changement de vitesse manuel Fonction musicale du volant Techniques de régulation de volume et fonction d amplification MP3 Affichage de la puissance de la batterie Poids max...

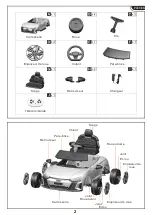
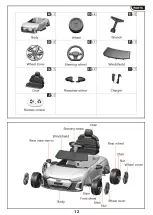
Page 2: ...oue Clé Enjoliveur de roue Volant Pare brise Siège Rétroviseur Chargeur Télécommande Rétroviseur Pare brise Volant Siège Roue arrière Joint Écrou Enjoliveur de roue Carrosserie Roue avant Joint Joint Écrou Enjoliveur de roue ...

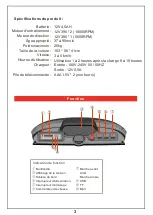
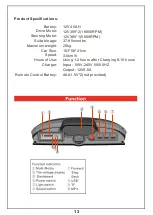
Page 3: ...H 12V390 2 18000RPM 12V380 1 5600RPM 37 à 95mois 25kg 103 58 41cm 3 à 5 km h Utilisation 1 à 2 heures après la charge 8 à 10 heures Entrée 100V 240V 50 60HZ Sortie 12V0 5A AAA1 5V 2 non fourni Fonction Indication de fonction Multimédia Affichage de la tension Tableau de bord Interrupteur d alimentation Interrupteur d éclairage Commutateur de vitesse Marche avant Arrêt Marche arrière USB TF Mp3 ...

Page 4: ...u après 10 secondes la télécommande passe en mode veille Appuyez sur n importe quel bouton pour recommencer à l utiliser Spécifications des piles Ne mélangez jamais de nouveaux anciens ou différents types de piles Ne confondez jamais les électrodes positives et négatives d une pile cela pourrait entraîner un court circuit Ne chargez pas les piles non rechargeables Placez les piles dans la bonne pola...

Page 5: ...écrou avec une clé Installez le couvercle sur la roue Répétez l opération pour la roue de l autre côté 3 Installation du volant Connectez le câble du volant au tableau de bord Branchez le câble dans le trou pour câbles Alignez le volant avec le connecteur 4 Installation du pare brise Alignez le pare brise sur la carrosserie Fixez le clip dans le trou ...

Page 6: ...nnectez le cordon d alimentation à la batterie Mettez l appareil sous tension pour vérifier les circuits 6 Installation du siège Retirez les deux vis de l avant du siège Alignez le siège sur sa position sur la carrosserie serrez le avec les vis ...

Page 7: ...7 7 Installation des rétroviseurs Séparez les rétroviseurs gauche et droit Insérez les rétroviseurs dans les trous de la porte ...

Page 8: ...télécommande sous la pluie Tenez la à l écart de l eau et d autres liquides pour éviter tout dommage La charge maximale est de 25 kg ce produit ne peut être utilisé que par un enfant à la fois Veillez à ce que l alimentation soit débranchée lorsqu elle n est pas utilisée Retirez le connecteur de la batterie lorsqu il n a pas été utilisé pendant un certain temps Avant l utilisation et la charge vér...

Page 9: ... batterie Changez les appareils électriques Changez le générateur La voiture ne démarre pas La batterie ne se charge pas Défaillance du connecteur de la batterie Le chargeur ne se charge pas Chargeur défectueux Réinstallez le connecteur Rebranchez le chargeur Changez le chargeur La voiture ne roule pas loin La batterie n est pas complètement chargée Batterie surutilisée Veillez à ce que la batteri...

Page 10: ...rface avec un chiffon sec Nettoyez les pièces en plastique avec du vernis à meubles sans cire Ne nettoyez pas les pièces en plastique avec des solutions chimiques Ne nettoyez pas la voiture avec de l eau Ne conduisez pas par temps humide cela pourrait endommager le générateur le système de circuit ou la batterie Lorsqu il n est pas utilisé assurez vous que l alimentation est coupée l interrupteur d...

Page 11: ...11 Audi RS e tron GT Ride on IMPORTANT RETAIN FOR FUTURE REFERENCE READ CAREFULLY Officially Licensed by AUDI AG ASSEMBLY INSTRUCTION 370 220V80 months 37 95 Simulation car model EN ...

Page 12: ...12 ...
Page 13: ...ble age Maximum weight Car Size Speed Hours of Use Charger Remote Control Battery 12V4 5AH 12V390 2 18000RPM 12V380 1 5600RPM 37 95months 25kg 103 58 41cm 3 5km h Using 1 2 hours after Charging 8 10 hours Input 100V 240V 50 60HZ Output 12V0 5A AAA1 5V 2 not provided ...

Page 14: ...nds the remote will enter standby Press any button to start using again Right Battery specifications Never mix new old or different types of batteries together Never mistake positive and negative electrodes of a battery this could lead to a short circuit Do not charge non rechargeable batteries Place batteries into the right polarity Only adults should charge and change batteries Take batteries out ...

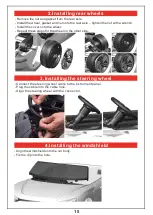
Page 15: ...rench Install the cover onto the wheel Repeat these steps for the wheel on the other side 3 Installing the steering wheel Connect the steering wheel cable to the instrument panel Plug the cable into the cable hole Align the steering wheel with the connector 4 Installing the windshield Align the windshield onto the car body Fix the clip into the hole ...

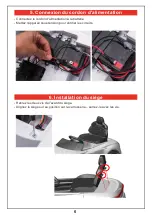
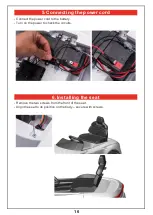
Page 16: ...power cord Connect the power cord to the battery Turn on the power to check the circuits 6 Installing the seat Remove the two screws from the front of the seat Align the seat to its position on the body secure with screws ...

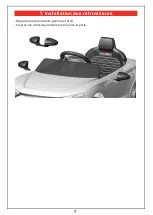
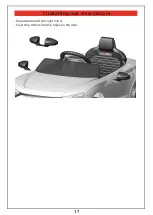
Page 17: ...17 7 Installing rear view mirrors Separate the left and right mirror Insert the mirrors into the holes on the door ...

Page 18: ...not use the remote control in rain Keep the car away from water and other liquids to avoid damage The maximum load is 25kg this product can be used by one child at a time Ensure the power is switched off when not in use Remove the battery connector when it has not been used for a while Before using and charging check the plug and other parts for any damage Charging Charge the battery for less than ...

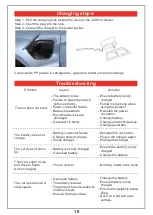
Page 19: ...he power connector Change battery Change electrical devices Change generator The car does not start The battery does not charge Battery connector failure Charger doesn t charge Faulty charger Reinstall the connector Plug in the charger again Change the charger The car doesn t drive far Battery isn t fully charged Overused battery Ensure the battery is fully charged Change the battery There s a sli...

Page 20: ...ters to avoid plastic from thawing Clean its surface with a dry cloth Clean plastic parts with non wax furniture polish Do not clean plastic parts with chemical solutions Do not clean the car with water Do not drive in wet weather this could damage the generator circuit system or battery When not in use ensure the power is off the switch should be on STOP or OFF Do not use a fuse that does not conf...

Reviews: