User Guide
APconnections, Inc. // 303.997.1300 // www.netequalizer.com
Page 25 of 120
rev. 20170131
© 2014-2017 APconnections, Inc. All Rights Reserved
version 8.4
Creating a Hard Limit
To create a Hard Limit,
click on your computer’s TAB to put the focus into the Host IP
address field.
Type in:
Host IP address
in 11.22.33.44 format.
TAB to CIDR field. On the CIDR field,
Click on -> [dropdown arrow]
to select a CIDR
value. For an individual IP, use /32, for a Class B use /16, for a Class C use /24, or any
other subnet value from 1-32. If using subnets, each IP in the subnet will get the Hard
Limit.
TAB to Download Mbps Hard Limit field. Type in:
a Positive Number
. TAB off the field to
complete your entry.
TAB to Upload Mbps Hard Limit field. Type in:
a Positive Number
. TAB off the field to
complete your entry.
Note: In 8.4, you must use “tab” to move between rows. If you hit “return”, your data will be
cleared. This will be fixed in a future release.
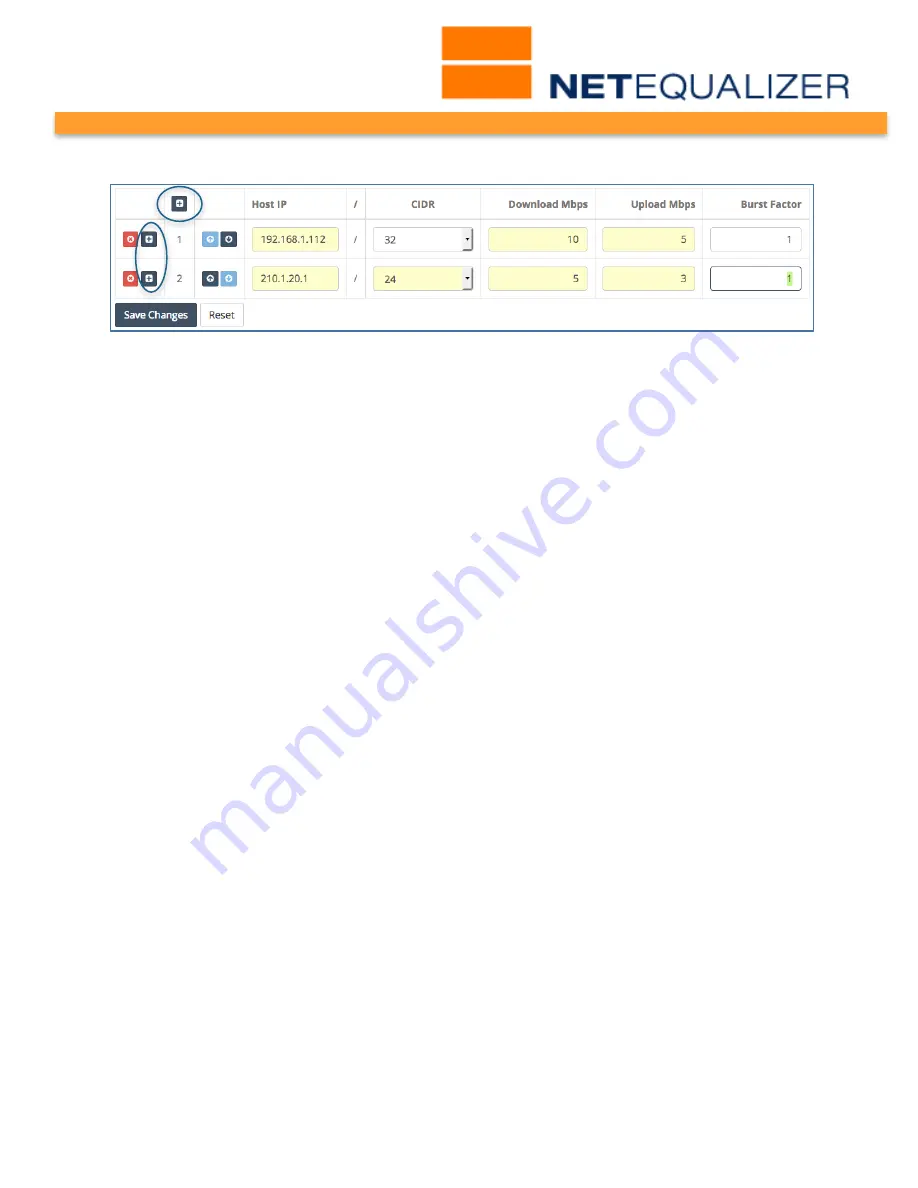
Click on any of the “+” icons (circled in blue) to continue adding Hard Limits. Any
unsaved fields are shown in yellow, as a visual reminder that you have not yet saved
your changes. If you were to click off this screen before saving changes, your data
would be cleared.
Once you have entered all of your limits,
Click on -> [Save Changes]
to save changes or
Click on -> [Reset]
to discard changes. We are now prompted to Restart Equalizing, for
the new Hard Limits to take effect. Once we
Click on -> [Restart Equalizing]
, our new
Hard Limits will be available to the NetEqualizer process.
In our example, we have created two Hard Limit (HL) rules. The first is a HL of 10Mbps
Down/5Mbps Up for individual IP address 192.168.1.112 (/32). The second is a subnet HL
(/24) of 5Mbps Down/3Mbps Up for all IP addresses within 210.1.20.
Modifying a Hard Limit
As of Software Update 8.4, we provide you with the ability to modify your Hard Limits, using
the Configure Hard Limit screen. Additionally, you can make multiple edits at once, and
then
Click on -> [Save Changes]
to save changes or
Click on -> [Reset]
to discard.
From the NetEqualizer Dashboard or Navigation Menu
Click on ->[Setup] -> Manage Traffic
Limits -> Configure Hard Limits
. The Configure Hard Limits screen opens, shown below.
In our example, we first changed our subnetted HL CIDR from /24 to /16. We also changed
the Upload Mbps from 3 to 4. These fields turn yellow, showing that we have updated the
Hard Limit but not saved it.


