


SUBJECTIVE BREATHING TEST
NOTE:
Extremely small leaks may be better detected by applying a
soap solution or Snoop™ to the leak area. Bubble streams will indicate
the source of the leak. Before disassembling to correct any leaks,
rinse the entire regulator thoroughly with fresh water and blow out all
residual moisture with filtered, low-pressure (25 psi) air. Disassemble
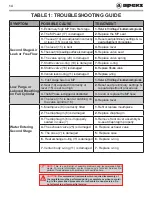
and remedy the problem, referring to
Table 1: Troubleshooting.
NOTE:
Do not confuse bubbles from trapped air with a true leak. If
there is an air leak, bubbles will come out in a constant stream.
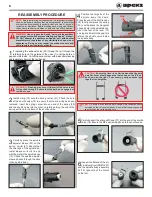
EXTERNAL LEAK TEST
THIS CONCLUDES SERVICING OF THE XL4
SECOND STAGE
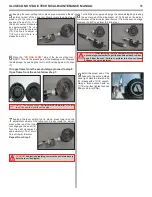
1
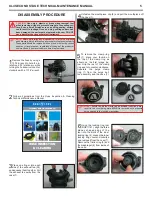
After disconnecting the regu-
lator from the test bench,
connect it to a scuba cylinder
filled to approximately 3,000
psi (207 bar). Open the cylinder
valve to repressurize the regula-
tor, and submerge the entire sys-
tem in a test tank of clean water.
2
Observe any bubbles arising from the submerged regulator over
a one minute period. The recommended time is necessary due
to slower bubble formation that occurs in smaller leaks. Bubbles
indicate a leak, which requires the system to be disassembled at the
source to check sealing surfaces, assembly sequence and compo-
nent positioning in order to correct the problem(s).
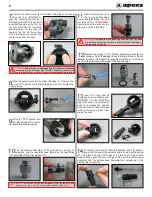
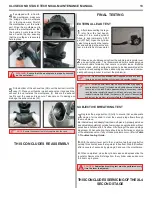
3
Depress the purge button (2) fully to ensure that an adequate
volume of air needed to clear the second stage flows through
the mouthpiece.
a.
Inhale slowly and deeply from the mouthpiece. A properly serviced
and adjusted regulator should deliver air upon deep inhalation without
excessive inhalation effort, freeflow, or fluttering of the second stage
diaphragm. When exhaling, there should be no fluttering or sticking
of the exhalation valve. If any of these problems occur, refer to
Table
1: Troubleshooting Guide.
b.
With the venturi lever set to the + position tap the purge button
quickly, this should cause the regulator to freeflow. Stop the freeflow
after a couple of seconds by placing a hand over the mouthpiece.
c.
When completed, close the cylinder valve and depressurize the
regulator. Remove the first stage from the cylinder valve and secure
the dust cap in place.
FINAL TESTING
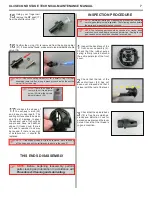
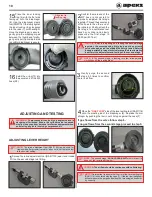
4
If equipped with a Comfo-
bite mouthpiece, make sure
the ‘bridge’ of the mouthpiece
(9) is facing upward. Stretch
the mouthpiece over the outlet
port. Wrap the mouthpiece clip
around the mouthpiece so that
the buckle points toward the
hose. Fasten the clip, ensuring
that the mouthpiece is securely
held in place.
5
Fit the bottom of the exhaust tee (26) over the bottom rim of the
case (7). Place your thumbs in each exhaust port and push the
exhaust tee up towards the mouthpiece (9). Ensure the exhaust
tee fits over the case and is secure. Take care not to damage or
dislodge the exhaust valve (25).
NOTE:
Ensure the exhaust tee is fully captured by the case.
CAUTION:
Subjective breathing test must be performed every
time the lever is adjusted.
THIS CONCLUDES REASSEMBLY
WARNING:
Ensure that the mouthpiece is properly secured
on the outlet port.
13
XL4 SECOND STAGE TECHNICAL MAINTENANCE MANUAL


