Commissioning
16
Programming the operator
The control unit has an automatic force setting. The control system
memorizes the required force during the “OPEN” and “CLOSE” door
movements and stores it when the end position has been reached.
Program the operator with two people. One person works the
operator, the other remains outside the garage to supervise.
Caution!
Insert both battery units into the control unit before
you program the operator.
Important information!
The fi rst movement of the operator after connecting the X-Box
must always be door OPEN. If this isn't the case, contact
the specialist dealer.
•
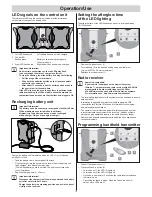
Insert the operator plug (XLR plug) on the underside of the control unit.
2
4
3
1
•
Take off the rubber cover (1).
•
Press the button (2) (e.g. with a small screwdriver), the door opens
until the door OPEN end position is reached or is open.
•
Close door, press button (2).
Resetting the control unit
•
Activate control unit by pressing on the wall button (2).
– White LED lighting lights up.
•
Press button (3) until the red LED (4) goes out.
•
LED off – force values deleted, release button (3).
•
Red LED (4)
fl
ashes – controller reset successful.
Perform the following procedure twice:
•
Press button (2) 1x – door opens to switch-trigger (H, door OPEN)
•
Red LED (4)
fl
ashes during opening and when open – not yet
programmed!
•
Press button (4) 1x – door closes to switch-trigger (V, door CLOSED)
•
Red LED (4) does not
fl
ash.
Important information!
The white LED lighting must remain on during the entire reset.
It must no go out until the red LED (4) is no longer fl ashing.
• When the red LED (4) stops fl ashing in end position
“door CLOSE”, force values are programmed and saved.
• The operator has been successfully programmed!
Check door end positions
OPEN + CLOSED
The running path of the operator can be extended or shortened by means
of the guide idlers.
Check whether the door opens and closes completely. If this isn't the case,
then the running path must be adjusted.
•
Activate command initiator (e.g. button, handheld transmitter)
once. Door opens.
If the door does not reach the required end positions on door OPEN +
CLOSE, reset the end positions. See the chapter “Adjusting the door
OPEN + CLOSE end positions”.
Checking the emergency release
Important information!
You can activate backjump for sectional doors or doors
with ceiling guides by means of DIP switch 6; this relieves
the operator and door mechanisms.
Simpler actuation of the emergency release.
V
N
1
•
Close the door with the operator.
•
Pull once on the emergency release (N).
•
If the emergency release cannot be actuated, loosen the end switch (V)
and push it a bit in direction (1).
•
Open and close the door with the operator.
Recheck the emergency release.
Check the force settings.
For every run of the door, the control unit compares the stored force values
with the actual values required and automatically adjusts the stored values
upon reaching the end position.
Check: See Care and maintenance.
Programming handheld transmitter
Important information!
Before programming the handheld transmitter for the fi rst
time, always clear the radio receiver memory completely.
2
4
3
1
5
Deleting the radio receiver memory
•
Take off the rubber cover (1).
Press and hold the Teach-in button (2).
– After 5 seconds, the LED (3 or 4)
fl
ashes – after another 10 seconds
the LED (3 or 4) is steady.
– After a total of 25 seconds, both LEDs light up (3 + 4).
•
Release Teach-in button (2) – the deletion procedure is ended.
Programming handheld transmitter
•
Activate command initiator (e.g. button, handheld transmitter)
once. Door opens.
– 1x for channel 1; the LED (3) lights up.
– 2x for channel 2; the LED (4) lights up.
– If no button is pressed on the handheld transmitter (5) within
10 seconds, the radio receiver switches to Normal mode.
– Cancelling the teach-in mode: Press the Teach-in button (2)
until no more LEDs are lit.

