18
V-Belt Tension and Replacement
For the first few days of operation new belts
should be checked occasionally and adjusted for
tension as necessary until the belts are properly
“worn in.”
The v-belts on the main motor should
be checked for proper tension.
Tighten any of the v-belts as follows:
1. Disconnect sander from power source.
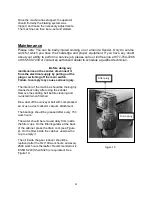
2. Loosen the lower hex nut (A, Figure 11)
on the motor base.
3. Tighten the top hex nut (B, Figure 11) to
lower the motor plate until proper tension is
achieved.
4. When the belt is properly tensioned, you
should be able to push in the belt
approximately 3/4” at a point midway
between the pulleys using moderate finger
pressure.
5. Re-tighten the bottom hex nut (B, Figure
11) against the bottom of the motor plate.
If installing a new v-belt, use the hex nuts to
raise the motor plate enough to remove the old
belt and mount the new one.
NOTE:
When replacing v-belts on the main
motor, replace the entire set simultaneously.
Preferably a matched set is best.
Figure 11
B
A
Summary of Contents for EZ Sander EZ3760M
Page 1: ...by Operation Manual Machine Model EZ3760M Metal...
Page 41: ...41...
Page 42: ...42...
Page 43: ...43...
Page 44: ...44...
Page 45: ...45...
Page 46: ...46...
Page 47: ...47...
Page 48: ...48...
Page 49: ...49...
Page 50: ...50...
Page 51: ...51...
Page 52: ...52...
Page 53: ...53...
Page 54: ...54...
Page 59: ...59...
Page 60: ...60...
Page 65: ...65...
Page 70: ...70...

