

AEx-8XXP(H) Series User Manual
5
Table of Contents
Revision History…………………………………………………………………………………………………….1
Warning!/Caution………………..……………...................................…………………………….…2
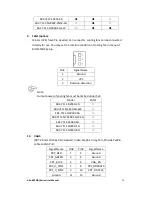
Packing List…………………………………….……………………………………………………………………..3
Safety Precautions…………………………………………………………………….…..……………………..4
Chapter 1 Getting Started
1.1 Features………………………..………………………...…………………………..7
1.2 Specifications…………………...………………………………………………….7
1.3 Dimensions………………………....…………………………………………..….9
1.4 Brief Description of AEx-8XXP(H)………………………….……….……11
1.5 VESA Mounting…………………………………………………………………12
1.6 Panel Mounting…………………………………………………………………12
Chapter 2 Hardware
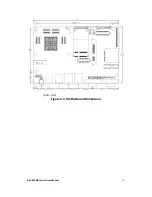
2.1 Motherboard Introduction……………………...……………..………....13
2.2 Specifications…………………………..…………………………………………13
2.3 Jumpers and Connectors Location……………………………………...17
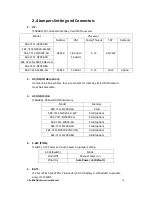
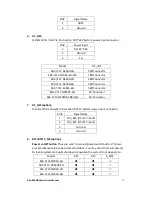
2.4 Jumpers Setting and Connectors…………………………………..……18
Chapter 3 BIOS Setup
3.1 Operations after POST Screen…...…….……...…………………………32
3.2 BIOS Setup Utility……………………………………………………………….32
3.3 Main Settings……………………………………..………………………………33
3.4 Advanced Settings……………………………………………………………...34
3.5 Chipset Settings……………………………………….………………………...42
3.6 Security Settings…………………………………………….…………………..44
3.7 Boot Settings…..………………………………………….……………………..45
3.8 Save & Exit Settings……………………………………..…………………....46
Chapter 4 Installation of Drivers
4.1 Intel (R) AtomTM SoC Chipset ………..……...………….………………49
4.2 Intel (R) VGA Chipset……………………………………………….……......52
4.3 Realtek ALC662 HD Audio Driver Installation…….……..………...56
4.4 Com Driver……………………………………………………..…………………58
4.5 Intel_TXE(Win) Driver……….……………………………………………….60
Summary of Contents for AEx-815P
Page 17: ...AEx 8XXP H Series User Manual 16 units mm Figure 2 1 Motherboard Dimensions ...
Page 52: ...AEx 8XXP H Series User Manual 51 Step 5 Click Finish to exit the wizard ...
Page 55: ...AEx 8XXP H Series User Manual 54 Step 5 Click Next to continue Step 6 Click Next to continue ...
Page 63: ...AEx 8XXP H Series User Manual 62 Step 5 Click Finish to complete the installation ...
Page 67: ...AEx 8XXP H Series User Manual 66 Step 6 Click Finish to complete the installation ...