APC-3X19 User Manual
32
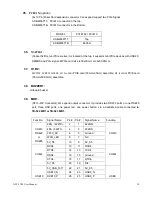
Pin7- Ground:
RESET Button
, They are used to connect reset button. The two pins
are disconnected under normal condition. You may short them temporarily to
realize system reset.
Pin6- Pin8:
POWER on/off Button
, They are used to connect power switch button.
The two pins are disconnected under normal condition. You may short them
temporarily to realize system startup & shutdown or awaken the system from
sleep state.
Pin9- Pin10:
BUZZER
, They are used to connect an external buzzer.
Pin11~Pin18:
GPIO IN/GPIO OUT,
General-purpose input/output port, it provides a group of
self-programming interfaces to customers for flexible use.
Pin19~Pin24:
PS2 KB/MS,
PS/2 keyboard and mouse port, the port can be connected to PS/2
keyboard and mouse via a dedicated cable for direct used.
Pin25~40:
USB0/USB1/USB2/USB3
, Front USB connector, it provides 4 USB ports via
a dedicated USB cable, speed up to 480Mb/s.
Note:
When connecting LEDs and buzzer and GPIO and USB, pay special attention to the signal polarity.
Make sure that the connector pins have a one-to-one correspondence with chassis wiring, or it
may cause boot up failure.
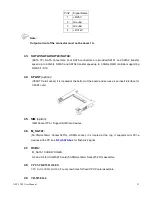
41. SATA_P1/SATA_P3:
(2.5mm Pitch 1x2 box Pin Header), Two onboard 5V output connectors are reserved to provide
power for SATA devices.
Pin#
Signal Name
1
+DC5V
2
Ground
Note:
Output current of the connector must not be above 1A.
42. SATA_P2/SATA_P4:
(2.5mm Pitch 1x4 box Pin Header), Two onboard 5V and 12V output connectors are reserved to
provide power for SATA devices.
Summary of Contents for APC-3X19
Page 9: ...APC 3X19 User Manual 9 Figure 1 3 Dimensions of APC 3919 ...
Page 13: ...APC 3X19 User Manual 13 Step 5 That s how it should look after it has been installed ...
Page 64: ...APC 3X19 User Manual 64 Step 5 Click Next Step 6 Click Continue Anyway ...
Page 65: ...APC 3X19 User Manual 65 Step 7 Click Continue Anyway Step 8 Click Next ...
Page 66: ...APC 3X19 User Manual 66 Step 9 Select Yes I want to restart this computer now Click Finish ...
Page 70: ...APC 3X19 User Manual 70 Step 6 Click Finish to compete the installation ...
Page 79: ...APC 3X19 User Manual 79 Step 8 Click Finish to compete installation ...
Page 84: ...APC 3X19 User Manual 84 Setting ...
Page 87: ...APC 3X19 User Manual 87 Step 2 When the mapping screen message appears click OK ...
Page 91: ...APC 3X19 User Manual 91 NOTE The Rotate function is disabled if you use Monitor Mapping ...


