VITAM-9XXA Series User Manual
10
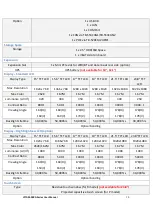
Option
1 x USB 3.0
1 x LAN
1 x COM Port
1 x CAN via TB-553CAN1/TB-553CAN2
1 x POE via TB-528E1U2UPOE
Storage Space
Storage
1 x 2.5” HDD/SSD Space
1 x mSATA slot on board
Expansion
Expansion Slot
1 x Mini PCIe slot for WIFI/BT and Antenna at rear side (option)
UPS
UPS battery
(not available for 10”, 12.1”)
Display – Standard LCD
Display Type
15” TFT LCD 15.6” TFT LCD 17” TFT LCD
19” TFT LCD
21.5” TFT LCD
23.8” TFT
LCD
Max. Resolution
1024 x 768
1366 x 768
1280 x 1024
1280 x 1024
1920 x 1080
1920 x 1080
Max. Color
262K
16.7M
16.7M
16.7M
16.7M
16.7M
Luminance (cd/m
2
)
420
300
350
350
300
250
Contrast Ratio
800:1
500:1
1000:1
1000:1
3000:1
3000 : 1
Viewing Angle
160(H)/
160(V)
160(H)/
160(V)
170(H)/
170(V)
170(H)/
165(V)
178(H)/
178(V)
178(H)/
178(V)
Backlight Lifetime
30,000hrs
50,000hrs
50,000hrs
50,000hrs
30,000hrs
30,000 hrs
Option
Optical bonding
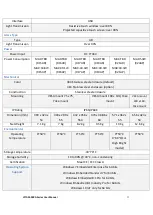
Display – High Brightness LCD (option)
Display Type
15” TFT LCD 15.6” TFT LCD 17” TFT LCD
19” TFT LCD
21.5” TFT LCD 23.8”TFT LCD
Max. Resolution
1024 x 768
1366x768
1280 x1024
1280 x1024
1920x1080
1920x1080
Max. Color
262K/16.2M
16.7M
16.7M
16.7M
16.7M
16.7M
Luminance (cd/m
2
)
1000
1000
1000
1000
1000
1000
Contrast Ratio
800:1
500:1
1000:1
1000:1
3000:1
5000:1
Viewing Angle
160(H)/
150(V)
160(H)/
160(V)
170(H)/
160(V)
170(H)/
160(V)
178(H)/
178(V)
178(H)/
178(V)
Backlight Lifetime
30,000hrs
50,000hrs
50,000hrs
50,000hrs
50,000hrs
30,000hrs
Option
Optical bonding
Touch Screen
Type
Resistive touch window (for R model)
(not available for 23.8”)
Projected capacitive touch screen (for P model)
Summary of Contents for VITAM-9 A Series
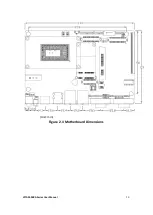
Page 21: ...VITAM 9XXA Series User Manual 20 Unit mm Figure 2 1 Motherboard Dimensions ...
Page 106: ...VITAM 9XXA Series User Manual 105 the installation Step4 Click Next to continue ...
Page 107: ...VITAM 9XXA Series User Manual 106 Step5 Click Finish to complete the installation ...
Page 112: ...VITAM 9XXA Series User Manual 111 Step10 Click Finish to complete the installation ...
Page 116: ...VITAM 9XXA Series User Manual 115 Step6 Click Finish to complete installation ...


