Hardware
4-15
5.
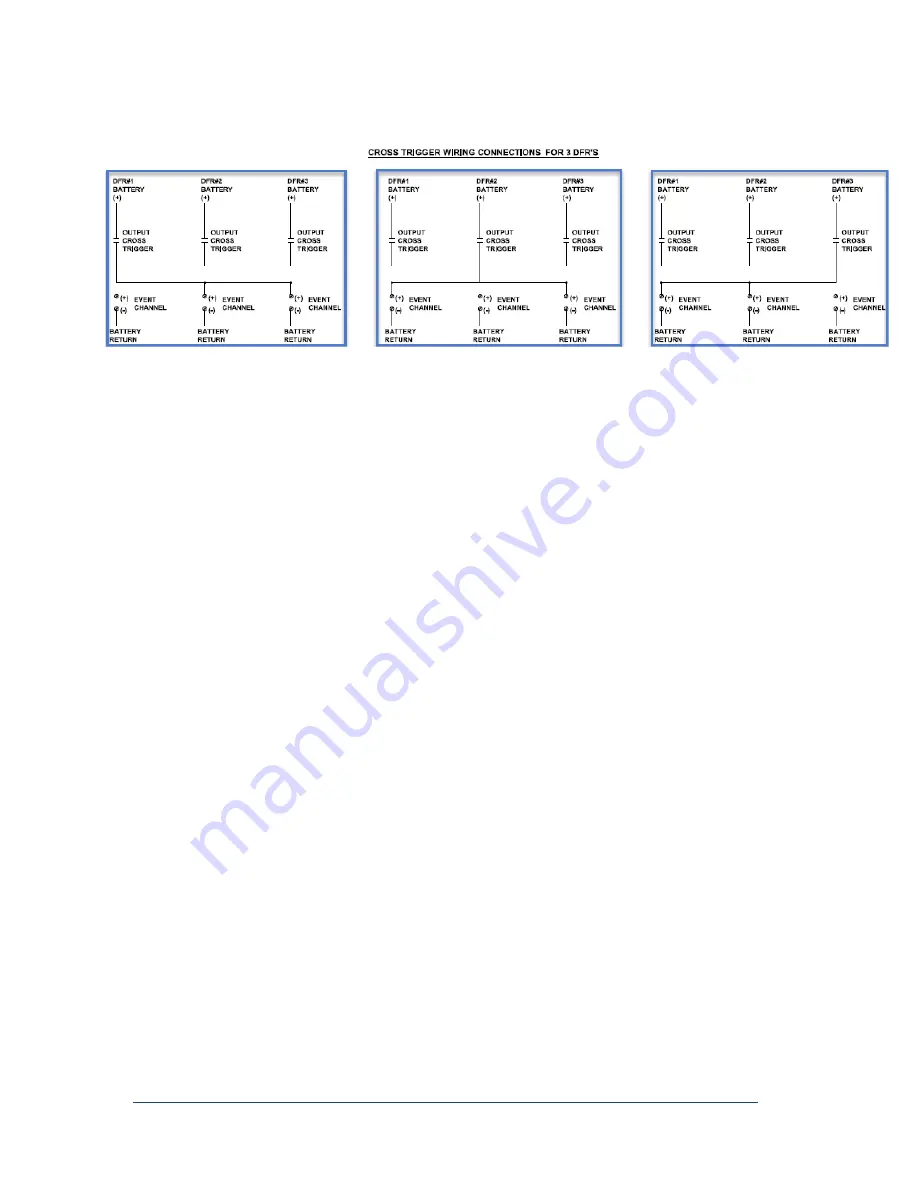
We recommend setting the prefault timer on all DFRs at least 750ms.
Figure 12: Cross Trigger Wiring, 3 DFR Example
4.5.5 Event Circuit Board
An event board contains 8 event inputs. The maximum number of event channels in a Data
chassis is 80 (10 boards x 8 channels per board).
The standard voltage range for an event input is 45-250VDC. Other input voltage ranges are
available as an option.
An event board utilizes a 16 position pluggable connector. The plug will accept a maximum
wire size of 14AWG.
Inputs are user programmable as either normally open or normally closed. See the Point
Assignment Record.
On our standard event circuit board, inputs need to be externally wetted. APP offers an
internally wetted event circuit board upon request.
For common return simply daisy chain the (-) negative terminals together and connect to
station battery return (DC return).
Event channels are scanned at the same rate as the analog channels. The scan rate is user
programmable and includes choices of 1200Hz, 2400Hz, 4800Hz, 9600Hz, and 19,200Hz,
and 24,000Hz.
Event channels can be user programmed as DFR, SER, or BOTH. If a channel is setup as
DFR, all channels on the recorder begin recording and a COMTRADE record is created when
it goes abnormal. If a channel is setup as SER, it alone is recorded in the Sequence of Event
Report when it goes abnormal. If a channel is setup as BOTH, then both DFR and SER
recordings occur simultaneously.
If an event channel is setup as a DFR channel, it can also be user programmed to trigger on a
rising edge, falling edge, or both.
To prevent nuisance event triggers, user programmable settings are available to automatically
shut down and then restart event triggers.
Event channels can be user programmed to include a de-bounce time. De-bounce time of 0.40
ms is typical.
Summary of Contents for APP-601
Page 1: ...APP 601 Recorder Operating Manual...
Page 15: ...Introduction 1 1 1 Introduction...
Page 18: ...2 1 2 Specifications...
Page 25: ...Installation Overview 3 1 3 Installation Overview...
Page 38: ...Hardware 4 1 4 Hardware...
Page 61: ...Installing the Recorder Software 5 1 5 Installing the Recorder Software...
Page 67: ...Using the APP Recorder 6 1 6 Using the APP Recorder...
Page 117: ...Using the APP Recorder 6 51...
Page 124: ...Using the APP Driver 7 1 7 Using the APP Driver...
Page 128: ...Using the OScope 8 1 8 Using the OScope...


