background image

Appleton • 1.800.621.1506 • www.appletonelec.com

650457-000 Rev. E 05/13 • Page 6 of 8

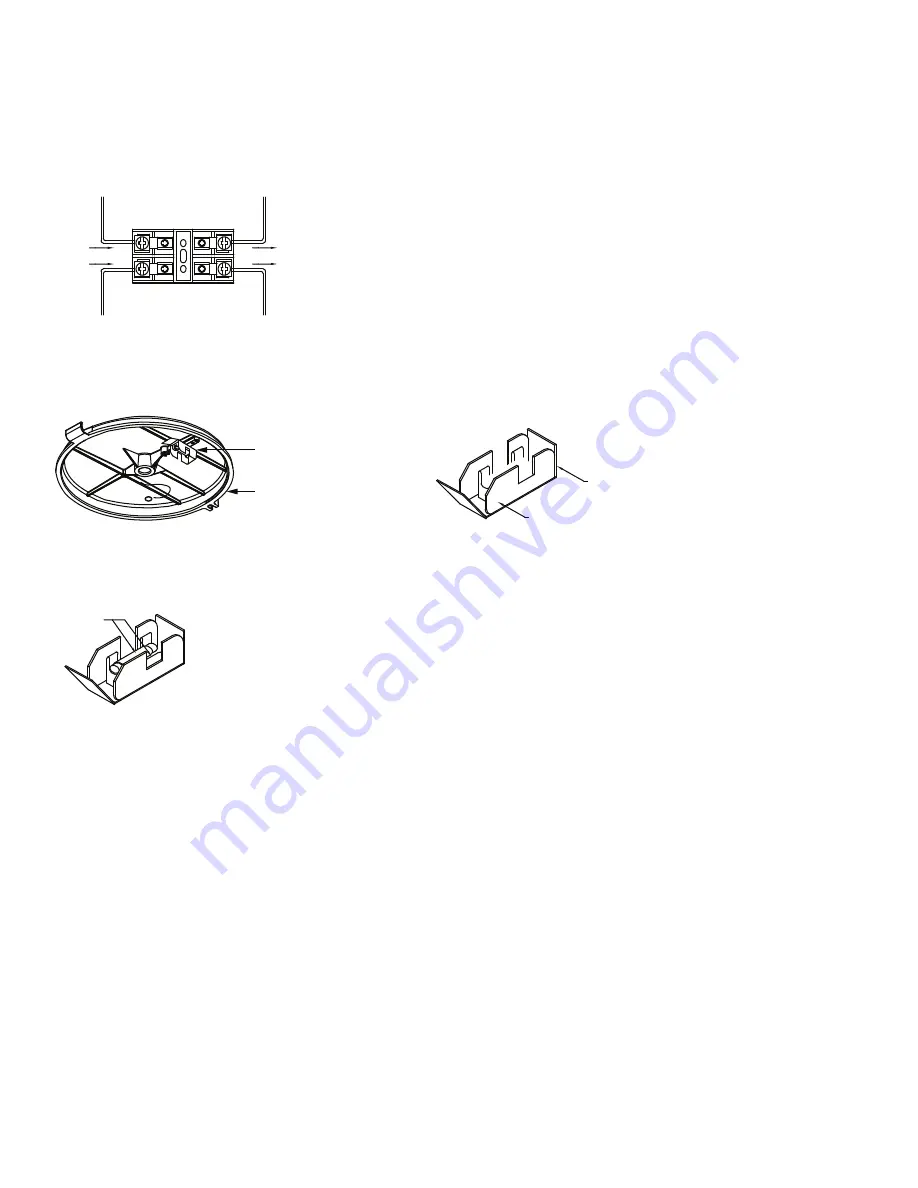
Optional Fuse Kit

Installation

1. 

Attach the line and lEd leads to the fuse holder per the diagram below.

PHASE LINE LEAD

FROM SUPPLY

BLACK LEAD

TO LED DRIVER

LINE LEAD

FROM SUPPLY

WHITE LEAD

TO LED DRIVER

2. 

Attach the fuse holder and fiber insulation to the boss inside the mounting hood with the thread forming screws (supplied).

FIBER INSULATION

FUSE HOLDER

MOUNTING HOOD

FUSE KIT INSTALLED

3. 

complete the wire connections.

4. 

install the fuses.

FUSES

NOTES:

•  canadian Electrical code does not allow fusing in hazardous locations.

Summary of Contents for Mercmaster Series

Page 1: ... a hazardous situation which if not avoided could result in death or serious injury CAUTION indicates a hazardous situation which if not avoided could result in minor or moderate injury NOTICE is used to address practices not related to physical injury Safety Instructions WARNING Do not open or remove the luminaire with the circuit energized WARNING Do not use this luminaire on ungrounded systems ...

Page 2: ...9 mm 16 93 430 0 mm 25 15 40 Dia 391 16 mm 18 87 479 3 mm 17 22 437 4 mm 9 79 248 7 mm 15 40 Dia 391 16 mm 25 STANCHION MOUNT WALL MOUNT 90 STANCHION MOUNT 8 54 216 9 mm Depending on the length of the conduit stem 15 40 Dia 391 16 mm PENDANT MOUNT 6 66 169 16 mm 5 59 142 0 mm 15 40 Dia 391 16 mm PENDANT CONE MOUNT 10 92 277 36 mm 15 40 Dia 391 16 mm CEILING MOUNT 7 22 183 38 mm ...

Page 3: ...al lines spaced equally apart on the conduit stem Thread the pendant cone hood onto the 3 4 inch or 1 inch conduit stem 2 Tighten the set screw CONDUIT STEM SET SCREW Ceiling KPC 75 KPC 100 Mounting 1 Bolt the ceiling hood directly to a structural member thread onto a 3 4 inch or 1 inch conduit stem or bolt to a flush mounted junction box see NOTES 2 Remove unused conduit plugs and reinstall with ...

Page 4: ... grease in approximately three equal lines spaced equally apart on the conduit stem Thread the stanchion hood onto the 1 1 4 inch or 1 1 2 inch conduit stem NOTE Five full threads must be engaged 2 Determine the orientation and tighten the set screw SET SCREW 90 Stanchion KPST 125 KPST 150 Mounting 1 Apply TLC 3 grease in approximately three equal lines spaced equally apart on the conduit stem Thr...

Page 5: ...talog numbers MLEDN70P5BH MLEDN10P5BH MLEDN15P5BH MLEDN17P5BH and MLEDN25P5BH 208 120 G N 220 240 277 LED DRIVER LED ARRAY RED POSITIVE BLUE NEGATIVE GROUND BLACK LINE WHITE NEUTRAL BLACK LINE WHITE NEUTRAL TERMINAL BLOCK TERMINAL BLOCK FOR MLEDN70P5BU MLEDN10P5BU MLEDN15P5BU MLEDN17P5BU MLEDN25P5BU GREEN 208 120 G N 220 240 LINE LED DRIVER LED ARRAY RED POSITIVE BLUE NEGATIVE GROUND BLACK LINE WH...

Page 6: ...FROM SUPPLY BLACK LEAD TO LED DRIVER LINE LEAD FROM SUPPLY WHITE LEAD TO LED DRIVER 2 Attach the fuse holder and fiber insulation to the boss inside the mounting hood with the thread forming screws supplied FIBER INSULATION FUSE HOLDER MOUNTING HOOD FUSE KIT INSTALLED 3 Complete the wire connections 4 Install the fuses FUSES NOTES Canadian Electrical Code does not allow fusing in hazardous locatio...

Page 7: ...NAL BLOCK 208 120 G N 220 240 277 LED DRIVER LED ARRAY RED POSITIVE BLUE NEGATIVE GROUND BLACK LINE WHITE NEUTRAL BLACK LINE WHITE NEUTRAL TO DESIRED LED DRIVER LINE LEAD RED PHOTOCONTROL 120 V ac OR 208 277 V ac OUT TERMINAL BLOCK FOR MLEDN70P5BU MLEDN10P5BU MLEDN15P5BU MLEDN17P5BU MLEDN25P5BU SHOWN AVAILABLE PHOTOCONTROLS PC120D2 FOR 120 V ac PC242D2 FOR 208 277 V ac GREEN NOTES Photocontrol doe...

Page 8: ...rized to extend Appleton s warranties to any consumer While every precaution has been taken to ensure accuracy and completeness in this manual EGS Electrical Group LLC assumes no responsibility and disclaims all liability for damages resulting from use of this information or for any errors or omissions Specifications are subject to change without notice The Appleton and Emerson logos are registere...

Reviews: