background image


19

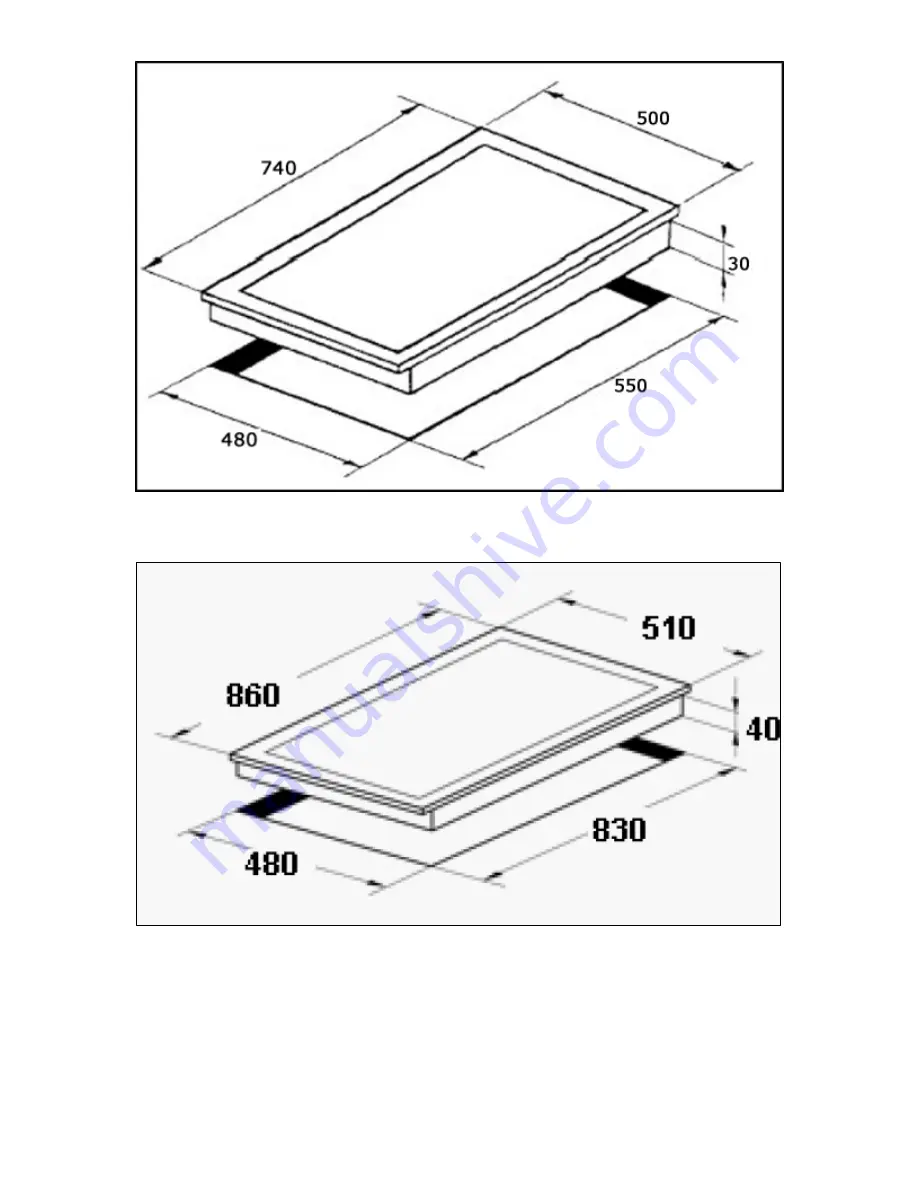
CL75SS 

L90SS 

le in the worktop that corresponds with the illustration 

above.  

the underneath of the appliance and any surface that is below it. 


C


o


Cut a ho


o


IMPORTANT: You must have a gap of at least 25 mm between 

Summary of Contents for CL64SS

Page 1: ...ruction Manual contains important information including safety installation points which will enable you to get the most out of your appliance Please keep it in a safe place so that it is easily available for future reference for you or any person not familiar with the operation of the appliance GS 21 12 10 ...

Page 2: ...ps 14 15 Cleaning 15 16 Cleaning the hob top 15 After each use 15 16 Cleaning the hob burners 16 Maintaining the cast iron pan stands 16 CL66SS CL75SS CL90SS Installation 17 27 Positioning 17 Unpacking the appliance 17 18 Installing the appliance 18 21 Gas connection 21 Ventilation requirements 21 22 Gas Safety Installation and Use Regulations 22 23 Gas Adjustment Conversion to LPG 23 24 Minimum f...

Page 3: ...Environmental note 3 o The packaging materials that we use are environmentally friendly and can be recycled all packaging material with due regard for the environment o Please discard ...

Page 4: ...t be able to withstand a minimum temperature of 85 C above the room it is located in whilst in use o Certain types of vinyl or laminate kitchen furniture are particularly prone to heat damage or di temperatures below the guidelines given above o Any damage caused by the appliance being installed in contravention the owner o Your new appliance is guaranteed against electrical or mechanical defects ...

Page 5: ... it can ignite extremely quickly For e left unattended o Make sure that all of the cooking zones are switched off after use Child Safety o We strongly recomm touch the appliance at any time During and after use all surfaces will be hot kitchen please ensure that they are kept under close supervision at all times o Older childr General Safety o The appliance should only be installed and connected b...

Page 6: ... be disconnected from the m o Great care should be taken whilst using this appliance and when following the cleaning procedure o You sho cleaning e Installation This appliance must be correctly installed by an Authorised Service Agent strictly in ac w relevant Standards Please see the specific section of this booklet that refers to installation damage to person or property as a result of improper ...

Page 7: ...50 mm r burner urner ion s tandard accessories o LPG conversion jets Depth 510 mm Width 595 mm Width Height 30 mm Product specifications o 1 x 3 30 kW rapid burne o 2 x 1 75 kW semi rapid o 1 x 1 00 kW auxiliary b o Front control operat o Automatic ignition o Enamelled pan stand S ...

Page 8: ...1 75 kW semi rapid burner rner o Heavy duty cast iron pan stands ty device o LPG conversion jets Depth 510 mm W Height 30 mm Product specifications o 1 x 3 60 kW rapid burner o o 1 x 1 00 kW auxiliary bu o Front control operation o Automatic ignition o Flame failure safe Standard accessories ...

Page 9: ...burner rner o Heavy duty cast iron pan stands ty device o LPG conversion jets o Wok stand Depth 500 mm W Height 30 mm Product specifications o 1 x 4 20 kW triple crown wok bu o 1 x 3 30 rapid burner o o 1 x 1 00 kW auxiliary bu o Front control operation o Automatic ignition o Flame failure safe Standard accessories ...

Page 10: ...rapid burner rner o Heavy duty cast iron pan stands ty device o LPG conversion jets Depth 510 mm W Height 40 mm Product specifications o 1 x 4 20 kW triple crown wok bu o 1 x 3 30 rapid burner o o 1 x 1 00 kW auxiliary bu o Front control operation o Automatic ignition o Flame failure safe Standard accessories ...

Page 11: ...el 230 Vac 50 Hz Supply Connection 13 A doub 3mm contact gap M Mains Suppl Gas details Connection Rp ISO R7 Type Natura Alternative LPG G30 28 30 mbar For future reference please record the following information which can be found on the rating plate and the date of purchase which can be found on your sales invoice The rating plate of yo th this information before you install your ap Model Number ...

Page 12: ...wn wok burner B 1 75 kW semi rapid burner C 1 00 kW auxiliary burner D Control panel L75S A 4 20 kW triple crown wok burner B 3 30 kW rapid burner C 1 75 kW semi rapid burner D 1 00 kW auxiliary burner E Control panel C S CL90SS C ...

Page 13: ... control knob to your required o urner off turn the control knob fully clockwise to the gas off position rotation of the control knob All operation positions must be selecte and minimum position o Never select position o The symbol on the control panel next to the control knob will indicate which gas burner it operates Automatic ignition CL64SS W To ignite a burner Press in the control knob of the...

Page 14: ...i PANS A CL75SS CL90SS The appliance is fitted with a flame failure safety device on each burner which is designed to stop the flow of gas to th th To ignite a burner o Press in the control knob of the burner that you wish to light and turn it anti clockwise to the m o If you keep the control knob depressed the automatic ignition for the burner will operate flame on the burner has lit o After this...

Page 15: ...ng agents will damage it You should remove any residues with ace ater Although it is easier to clean some deposits whilst the soft oth be wrung out after being taken out of the soapy water bing the surface with a soft clean cloth the hob is The appliance should be disconnected from your mains supply before commencing any cleaning process ing the hob top Clea A warm soapy water Abrasive cleaners or...

Page 16: ...should be wrung out after being taken out of the soapy water o Using a paper towel thoroughly dry the pan stands o To maintain the appearance of the cast iron pan stands we would recommend that you rub a small amount of olive oil into the pan stands after you have finished cleaning them flammable detergent is used to clean the glass surface of the hob Cleaning the hob burners they get soiled o IMP...

Page 17: ...he room it is located in during periods of use o This appliance can be located in a kitchen a kitchen diner or a bed sitting room IMPORTANT The appliance must not be installed in This appliance is classified as Class 3 and therefore is to be built into a kitchen unit depending on size or 600mm worktop providing the following minimum distances are allowed o 700 mm b the burners and the underside of...

Page 18: ...ws ealing strip F Clamps S LPG conversion jets Self adhesive label for amending the gas category on the appliance s rating plate required if the LPG conversion jets are used Installing the appliance CL64SS W CL66SS ...

Page 19: ...5SS L90SS le in the worktop that corresponds with the illustration above the underneath of the appliance and any surface that is below it C o Cut a ho o IMPORTANT You must have a gap of at least 25 mm between ...

Page 20: ...against the aperture This will make it difficult to remove the hob from the aperture in future if it needs to be serviced A Sealing strip B Clamp C Screw o Place the clamp B over the holes that match the size of the screws There are one set of screw holes in each corner of the hob Slightly tighten a screw C through the clamp B so that the clamp is attached to the hob but so that you can still adju...

Page 21: ... must be installed by a qualified person in accordance with the current edition of the Gas Safety Installation and Use Amendment Regulations and the relevant building I E E Regulations o Failure to install the appliance correctly could invalidate your guarantee and lead to prosecution under the regulations quoted above Ventilation requirements o The room containing the hob should have an air suppl...

Page 22: ...and near the hob should be resistant to heat steam and condensation o Remember that the quantity of air necessary for combustion must never be less than 2m h for each kW of power see total power in kW on the appliance rating plate Gas Safety Installation and Use Regulations IMPORTANT The appliance MUST be connected to the gas supply by use of a BSP Elbow seal copper pipe and an isolation tap fitte...

Page 23: ...ssure complies with the gas standards in force o IMPORTANT On completion carry out a gas soundness test Gas adjustment Conversion to LPG All work must be carried out by an Authorised Service Agent IMPORTANT Always isolate the hob from the electricity supply before changing the injectors and or adjusting the minimum flow of the burners o Remove the pan stands burners and flame spreaders A o Unscrew...

Page 24: ...he minimum flow adjustment process must be completed before the appliance is next used Minimum flow adjustment for hob gas taps All work must be carried out by an Authorised Service Agent IMPORTANT Always isolate the hob from the electricity supply before changing the injectors and or adjusting the minimum flow of the burners o Switch the burner on and set the knob at the minimum position 24 o Rem...

Page 25: ...p becomes stiff to operate then you should proceed as follows o Remove the control knobs pan supports burners hob fixing screws and clamps o Remove the hob from the worktop and remove any underside protective covers o Disconnect the fixings holding the tap to the fascia panel and separate the assembly Then clean the cone and seating with a cloth dampened with solvent o Lightly smear the cone with ...

Page 26: ...ake sure that the supply voltage marked on the rating plate corresponds with your mains supply volt o Cable type H05 RRF 3 core x 0 80 mm Type RR F HAR marked o The mains supply cable is supplied with this product Replacing the mains supply cable If the mains supply cable is damaged then it must be replaced by an appropriate replacement The mains supply cable should be replaced in accordance with ...

Page 27: ... fault then you may be liable for the cost of the call out charge The appliance must be accessible for the engineer to perform any necessary repair If your appliance is installed in such a way that an engineer is concerned that damage will be caused to the appliance or your kitchen then he will not complete a repair This includes situations where appliances have been tiled in sealed in with sealan...

Page 28: ...28 ...

Page 29: ...29 ...

Page 30: ...30 ...

Page 31: ...31 ...

Reviews: