background image

4.18

The Output Effect Section

51

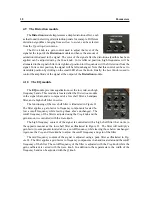
The Delay drop down menu is used to choose between different delay algorithms. The effect

can be synchronized to the Clock module with the Sync drop-down menu. Sync values range from
1/8 of a quarter note (a thirty-second note) to 16 quarter notes (4 whole notes) where the duration
of the whole note is determined by the value (in BPM) appearing in the Tempo display of the Clock
module. The effect can also be synced to a triplet (t) or dotted note (d).

The different delay algorithms can be controlled with the three knobs appearing at the bottom

of the module. The Mix knob is used to adjust the ratio of “dry” and “wet” in the output signal of
the module. When the knob is adjusted in the left position, only the original or “dry” signal is sent
to the output while in the right position only the processed or “wet” signal is sent to the output. In
its center position there is equal amounts of “dry” and “wet” signal in the output signal. The Depth
knob is used to adjust the amount of signal re-injected from the output of a line into the other one
while the Rate knob controls the length of the delay lines and therefore the delay between echoes.

4.18.4

The Reverb module

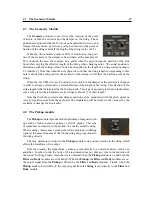
The Reverb module is used to recreate the effect of reflections of sound on the walls of a room or
hall. These reflections add space to the sound and make it warmer, deeper, as well as more realistic
since we always listen to instruments in a room and thus with a room effect.

The Reverb drop down menu is used to choose between different reverb algorithms representing

different types of rooms or halls. Each algorithm can be adjusted with the knobs located at the
bottom of the module. The Mix knob is used to set the relative amount of “dry” and “wet” signal
which is related to the proximity of the sound source. The Decay is used to control the reverberation
time of the room. In a real room, the reverberation time is not constant across the whole frequency
range because the walls of the hall are generally more absorbent at high frequencies which results
in a shorter reverberation time for these frequencies. This effect is controlled with the Color knob
which sets the reverberation time of high frequencies relatively to the value of the Decay knob.

Note that the settings of the different modules of the output stage are saved with presets. In

order for the effects to remain with the same settings even when loading new presets, click on the
Lock icon at the top of the module.

4.18.5

Topology

The three effects of the output section can be used in four different configurations as shown in
Figure 32 and where the ChorusDelay and Reverb modules are labeled AB, and respectively.

Figure 32: The four topologies in which the effects can be applied after the Amp module of the
two module rows; A

=

Chorus module, B

=

Delay module and C

=

Reverb module.

Summary of Contents for STRINGSTUDIO

Page 1: ...USER MANUAL ...

Page 2: ...Applied Acoustics Systems DVM Inc Copyright c 2005 Applied Acoustics Systems DVM Inc All rights reserved Printed in Canada Program Copyright c 2005 Applied Acoustics Systems Inc All right reserved String Studio VS is a Trademark of Applied Acoustics Systems DVM Inc Windows 98 2000 NT ME XP and DirectX are either trademarks or registered trademarks of Microsoft Corporation Macintosh Mac OS QuickTim...

Page 3: ...ram changes 18 1 4 3 Using String Studio as a Plug in 19 1 5 Getting help 19 1 6 Forum and User Library 19 1 7 About this manual 19 2 Browser and Presets 21 2 1 Playing Presets 21 2 2 Editing and Saving Presets 21 2 3 Deleting Presets 22 2 4 Documenting Presets 22 2 5 Defining a Default Preset 23 2 6 Locating a Preset in the Browser 23 2 7 MIDI maps 23 2 8 Exporting and Importing Presets and MIDI ...

Page 4: ...tator Module 32 4 3 1 Plectrum 32 4 3 2 Hammer 33 4 3 3 Bow 33 4 4 The Body Module 34 4 5 The Damper Module 35 4 6 The Termination Module 36 4 7 The Geometry Module 37 4 8 The Pickup module 37 4 9 The Distortion module 38 4 10 The EQ module 38 4 11 The Filter Module 39 4 11 1 Resonant Low Pass Filter 40 4 11 2 Resonant High Pass Filter 41 4 11 3 Band Pass Filter 41 4 11 4 Notch Filter 42 4 11 5 Fo...

Page 5: ... 49 4 17 3 Rate and Synchronization 49 4 17 4 Latch mode 49 4 18 The Output Effect Section 49 4 18 1 The Clock Module 50 4 18 2 The Chorus Module 50 4 18 3 The Delay Module 50 4 18 4 The Reverb module 51 4 18 5 Topology 51 4 18 6 The Output Module 52 4 18 7 The Recorder Module 52 5 Toolbar 53 5 1 Preset Display 53 5 2 MIDI map 53 5 3 Polyphony Combo Box 53 5 4 MIDI Channel combo box 53 5 5 Value D...

Page 6: ... 6 2 6 Creating the MIDI Program Change Map 57 6 3 Audio Control Panel 58 6 4 Latency Settings 58 7 Using the String Studio as a Plug In 60 7 1 Window Size 60 7 2 Synchronization to the Host Sequencer 60 7 3 Audio and MIDI parameters 60 7 4 Automation 60 7 5 Multiple Instances 60 7 6 Saving Projects 61 7 7 MIDI channel 61 7 8 MIDI program change 61 7 9 Performance 61 8 Quick reference to commands ...

Page 7: ...ange of string instruments String Studio is also equipped with a distortion module filters and a com prehensive output effect stage to add the finishing touch to the sound Finally String Studio offers a wide range of performance features including keyboard modes portamento vibrato and legato functions a programmable pattern arpeggiator and a complete set of MIDI features for optimal controller int...

Page 8: ... and double click on the installer file to launch the installer If you purchased this software online simply double click on the installer file that you have downloaded and follow the instructions of the installer 1 3 Authorization and Registration During the installation procedure the authorization page will appear The String Studio uses a proprietary challenge response copy protection system whi...

Page 9: ...s on the back of the sleeve of the String Studio CD ROM If you purchased String Studio online an email with your serial number will have been sent to you at the address which you provided during the purchase process Figure 1 Enter your serial number in the pop up window After entering your serial number click on the Next button and your challenge key will appear automatically in the window Figure ...

Page 10: ...ture support issues and notify you of product updates promptly This information is kept completely confidential Registration of your product will entitle you to receive support and download updates when available as well as take advantage of special upgrade prices offered from time to time to registered A A S users Note that this if you already purchased or registered another A A S product the inf...

Page 11: ... response key and paste it into the last field of the installer window of String Studio If you obtained your response key from another computer type the response key by hand in the installer window Finally click on the Finish button in order to complete the unlock process Figure 5 Final step of the unlock process Enter your response key in the window After unlocking String Studio it will be launch...

Page 12: ...et please follow the instructions at the end of this section Figure 6 Choose the Automatic unlock mode if your computer is connected to the internet other wise choose the manual method In the third window shown in Figure 7 type your email address and click on the right arrow In the fourth window see Figure 8 enter your serial number as it appears on the back of the sleeve of the String Studio CD R...

Page 13: ...erial number information about yourself including your mailing address and phone number This information will be used to register your product Note that only a valid email address is required to regis ter your product We nevertheless recommend this information be provided to ensure our support ...

Page 14: ... you already purchased or registered another A A S product the information that you have already sup plied under the same email address will appear in the form Feel free to update this information if it is outdated Click on the Next button and your challenge key will appear in the window as shown in Figure 10 Copy the response key and paste it in the String Studio installer window as illustrated i...

Page 15: ...the right arrow and your challenge key will be displayed as illustrated in Figure 13 For convenience click on the Save Registration Information button to save this information in a text file Take note of your serial number and challenge key and proceed to an internet connected com puter Launch your browser and go to the unlock page of the A A S website at http www applied acoustics com unlock htm ...

Page 16: ...ion Figure 12 Choose the manual unlock mode if your computer is not connected to the internet Figure 13 Generation of the challenge key during manual installation You change your computer You uninstall the program ...

Page 17: ...ode Using String Studio in standalone mode Windows Double click on the String Studio icon located on your desktop or select String Studio from the Start All Programs menu Mac OS Double click on the String Studio icon located in the Applications folder Before you start exploring the factory presets take a moment to set up you audio and MIDI configuration as explained below Audio Configuration This ...

Page 18: ...ntent To load a preset double click on a preset icon blue knob The Browser makes it easy to organize presets in whatever manner you choose To create a new preset folder click in the browser to select this region of the interface and choose New Folder from the File menu You can now save new presets in this folder or copy or move existing presets to this folder by dragging preset icons from one fold...

Page 19: ...ages are located at www applied acoustics com faq htm 1 6 Forum and User Library The A A S community site contains the String Studio user forum a place to meet other users and get answers to your questions The community site also contains an exchange area where you will find presets for your A A S products created by other users and where you can make your own creations available to other users ht...

Page 20: ...on Bold characters are used to name modules commands and menu names Italic characters are used to name controls on the interface Windows and Mac OS keyboard shortcuts are written as Windows shortcut Mac OS shortcut ...

Page 21: ...t icon from the browser onto the synthesizer interface Switch to the next or previous preset in the hierarchy by clicking on the and sign on the right of the preset name in the left corner of the toolbar at the top of the String Studio interface or by using the and keys of the computer keyboard Select a preset in the Browser by using the up and down arrows from the computer keyboard and click on t...

Page 22: ...t menu or the Ctrl Y Apple Y command Note that the number of Undo levels is unlimited and that this command is effective on any control of the interface but not on the different Save commands Once a preset has been modified it is also possible to move back and forth between the current state of the preset and its original state when it was loaded This is very helpful in order to hear again the ori...

Page 23: ...connector icon MIDI maps are treated exactly the same way as presets in the browser and are saved using the Save MIDI Links or Save MIDI Links As commands from the File menu 2 8 Exporting and Importing Presets and MIDI maps The Import and Export commands found in the File drop down menu allow one to easily ex change presets and MIDI maps with other String Studio users This feature can also be used...

Page 24: ...er to another by using the Copy and Paste commands from the Edit drop down menu or by simply dragging objects from one folder and dropping them into the folder of your choice Ultimately how things are organized is left entirely up to you The browser can also be hidden from the interface This can be convenient in order to save screen space To hide the browser use the Hide Browser command from the V...

Page 25: ...l modules and output stage of String Studio Panel A The first row of modules of Panel A is an output effect stage which includes a multi effect module a master clock module a master level control and a recorder module The bottom row of this same panel includes the modules related to performance and the processing of MIDI events including a Keyboard Arpeggiator Portamento and Vibrato module The mod...

Page 26: ...n the strings in order to reduce the decay time of the oscillation This is the case on a piano for example when felt is applied on the strings when the keys and the sustain pedal are released The vibration from the string is then transmitted to the Body of the instrument which can radiate sound efficiently In some instruments the string vibration is transmitted directly to the through the bridge I...

Page 27: ... dotted lines 3 2 Modulation Sources The physical parameters of the String Excitator Damper and Termination modules can be modulated with the pitch and velocity signals received from the Keyboard In addition to the pitch signal from the Keyboard the cutoff frequency and resonance quality factor of the multi mode Filter module can be modulated with the signal from a low frequency oscillator LFO mod...

Page 28: ...ment is sent to the output effect stage for further processing A Reverb Delay and Chorus module are available in this effect stage allowing for a wide range of processing possibilities Effects can be applied before or after mixing of the signal from each line as will be explained in greater detail in Section 4 18 ...

Page 29: ...ted control The value of the control currently selected is displayed on the toolbar at the top of the String Studio window The number displayed on the counter is a value corresponding to the setting of the control currently selected For knobs the reading is a value between 0 turned fully to the left and 127 turned fully to the right 4 1 2 Buttons Buttons are switched on or off by clicking on them ...

Page 30: ... When these knobs are in their leftmost position the mod ulation signals are multiplied by zero which has the effect of turning off the modulation source Turning the knobs clockwise increases the gain factor and therefore the influence of the correspond ing modulation source The modulation signal can be inverted by clicking on the LED located on the right at just above the knob Each modulation kno...

Page 31: ... parameters can be modulated with the pitch signal received from the keyboard In a first approximation a string can be considered to be harmonic meaning that its partials are located at frequencies equal to multiples of its fundamental frequencies Real strings however are more or less inharmonic depending mostly on the width of the string This characteristic of strings is adjusted with the Inharm ...

Page 32: ... string before it is set into free vibration As can be understood from figure 18 a vertical motion of the plate which could be a hand holding the plectrum will lift the string with the plectrum but will also result in a com pression of the spring and an horizontal motion of the plectrum The string will move with the plectrum until the protrusion Prot of the plectrum is equal to the compression of ...

Page 33: ... knob and controlling the absorption of the impact between the string and the hammer by the hammer Note that this parameter is not related to the decay time of the string oscillation or the overall sound On the contrary the effect of this parameter may sometimes seem counter intuitive even if it reproduces a physical property of the hammer For example increasing the damping of the hammer will make...

Page 34: ...l rules can however be followed As the force applied by the bow on the string is increased the tone becomes more scrubby The friction between the bow and the string usually determines the length of the attack the greater the friction the faster the string can be set into motion Finally the velocity is related to the amplitude of the sound Force Velocity String Bow Figure 20 Excitation of a string ...

Page 35: ...is can be helpful when trying to adjust the signal level at the input of the Distortion module or the other effect modules The color of the LED gives a rough indication of the sound level when it is green the signal from the body is faint when it is orange the level is in the middle range while when it is red the signal level is high Note that the Body module is made inactive or bypassed by select...

Page 36: ...rame ters of the Finger can be varied with both the Stiff and Force knobs which fix respectively the stiffness of the termination and the force it applies on the string Note that the Force parameter can be modulated by both the pitch and velocity signal from the Keyboard module The termination can further be character ized by the stiffness of the fret on which the string pushed by the finger is ap...

Page 37: ...osition knob This type of geometry is found in instruments such as the piano where hammers excite strings at about 1 7 of their length Note that both the excitator and damper position can be modulated with the pitch signal or velocity signal received from the keyboard The modulation will be relative to the value set by the excitator or damper Position knobs 4 8 The Pickup module The Pickup module ...

Page 38: ...module is located after the Distortion module in the signal chain and is composed of a low shelf filter a bandpass filter and a high shelf filter in series The functioning of the low shelf filter is illustrated in Figure 23 The filter applies a gain factor to frequency components located be low a cutoff frequency while leaving those above unchanged The cutoff frequency of the filter is adjusted us...

Page 39: ...er has been inserted between the String and Body modules This multi mode filter includes a res onant low pass band pass high pass notch and a formant filter which can be selected using the Type drop down menu The order of the filter can be adjusted to 2 12 dB oct for low pass and high pass and 6 db oct for band pass or 4 24 dB oct for low pass and high pass and 12 db oct for band pass with the hel...

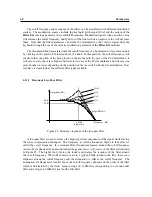
Page 40: ...position of the inv switch with the Env modulation Now let s have a closer look at the different filter types available 4 11 1 Resonant Low Pass Filter Amplitude dB Frequency Hz Q 10 Q 4 Q 2 Q 1 Cutoff Frequency 0dB 3dB Slope dB Oct Figure 25 Frequency response of the low pass filter A low pass filter is used to remove the higher spectral components of the signal while leaving the lower components...

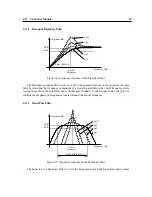
Page 41: ...g the frequency component of a signal located below the cutoff frequency while leaving those above the cutoff frequency unchanged Similarly to the low pass filter the Q factor controls the emphasis of frequencies located around the cut off frequency 4 11 3 Band Pass Filter Amplitude dB Frequency Hz 0dB 3dB Center Frequency Q 10 Q 4 Q 2 Q 1 Band Width Q 1 Figure 27 Frequency response of the band pa...

Page 42: ...re 28 The Cutoff knob is used adjust the center frequency and the Q knob sets the bandwidth of the notch Note that the center frequency is totally removed from the spectrum of the output signal of the filter 4 11 5 Formant Filter The formant filter reproduces the filtering effect of the vocal tract in the human voice By changing the position of the tongue the opening of the mouth and opening or cl...

Page 43: ...e the intensity of this effect being controlled using the modulation knob below of the A knob When the knob is in its leftmost position the attack is only determined by the value of the A knob turning the knob clockwise will increase the influence of the velocity signal until the attack time is strictly determined by the inverse of the velocity signal when V reaches its maximum value The decay tim...

Page 44: ...the Shape drop down menu The possible values are Sine for sinus Tri for triangular Rect for rect angular and Rdm1 and Rdm2 for the two random modes When the Shape control is set to Rdm1 the LFO outputs random values at the rate determined by the Sync control or the Rate knob In this case the output value from the LFO remains constant until a new random value is introduced The Rdm2 mode reacts almo...

Page 45: ... the Rate knob has no effect 4 13 3 Fade In One more feature of the LFO module is the possibility to add a fade in effect to its output signal or in other words to set the amount of time necessary for the amplitude of the LFO signal to grow from zero to its maximum value The duration of this fade in can be adjusted within the range of 0 to 5 seconds as determined by the Fade knob Turning this knob...

Page 46: ... Turning the knob to the left shrinks the interval while turning it to the right increases it The main effect of the Stretch control is that when it is not in the center position an interval of one octave will not sound perfectly in tune and therefore beating will be heard when playing perfect octaves The Error knob adds a random error to each note played the more the knob is turned clockwise the ...

Page 47: ...tamento is on the slide effect occurs between every note Clicking on the Legato button will switch the module into legato mode and the sliding between two notes will only occur if the second note is played before the first one is released When a note is played staccato or in other words if a key is released before the next one is depressed there will be no portamento effect Note that even though t...

Page 48: ... produce a wide range of arpeggios and rhythmic patterns and to sync the effects to the tempo of an external sequencer 4 17 1 Arpeggio Patterns The arpeggio pattern is set by the combination of the value of the Range Span and Order controls The Range control is used to select the number of octaves across which the pattern will be repeated When the range is set to 0 there is no transposition and on...

Page 49: ...l only be effective when the Sync control is set to Off When the Sync control in on the rate is fixed relative to the frequency tempo of the master clock see 4 18 1 and the value displayed in the Sync control Sync values range from 1 8 of a quarter note a thirty second note to 16 quarter notes 4 whole notes where the duration of the whole note is determined by the value in BPM appearing in the Tem...

Page 50: ...nu is used to choose between different chorus and flanger algorithms The effect can be synchronized to the Clock module with the Sync drop down menu Sync values range from 1 8 of a quarter note a thirty second note to 16 quarter notes 4 whole notes where the duration of the whole note is determined by the value in BPM appearing in the Tempo display of the Clock module The effect can also be synced...

Page 51: ...pace to the sound and make it warmer deeper as well as more realistic since we always listen to instruments in a room and thus with a room effect The Reverb drop down menu is used to choose between different reverb algorithms representing different types of rooms or halls Each algorithm can be adjusted with the knobs located at the bottom of the module The Mix knob is used to set the relative amou...

Page 52: ...the of Panel A and Panel B The overall level is adjusted with the Level knob The best dynamic range is obtained when the level meters are around 0 dB for loud sounds 4 18 7 The Recorder Module This module is used to record the output of String Studio to a stereo 16 bit wave or aiff file The File display is used to choose the name and location of the destination file One should always use this befo...

Page 53: ... that have been applied 5 2 MIDI map Displays the name of the currently opened MIDI map For more information on MIDI maps please refer to Section 6 2 5 3 Polyphony Combo Box Displays the number of voices of polyphony 2 to 32 The number of voices can be adjusted with the drop down menu from the combo box 5 4 MIDI Channel combo box Displays the current MIDI channel on which String Studio is receivin...

Page 54: ...o This is very useful to see if String Studio is receiving MIDI signal from your keyboard or other controllers If the LED does not blink when you play your keyboard check your connections and the transmit receive channels you are using or the MIDI settings of String Studio as explained in Section 6 2 ...

Page 55: ... device used by String Studio Go to the Edit menu choose Preferences and then MIDI Settings On Mac OS the same command is under the String Studio menu A list of the MIDI devices installed on your computer will appear in the MIDI Configuration window Select the MIDI device you want to use and click on the OK button 6 2 2 Creating MIDI Links Every control on the String Studio interface can be manipu...

Page 56: ... also use the Edit MIDILinks command from the Edit menu Click on the MIDI link you wish to modify and then on the Edit button to launch the EDIT MIDI Link window Choose the parameter controlled by the current MIDI link from the Parameter drop down menu which lists all the parameters of the current module Specify the MIDI controller number and MIDI channel of the physical controller you wish to lin...

Page 57: ...g to different MIDI controllers can thereby be saved for String Studio A MIDI map can be loaded by double clicking on the corresponding MIDI connector icon that appears in the browser when a MIDI map is saved Furthermore a MIDI map can be loaded automatically when an instrument is launched To assign a default MIDI map right click Ctrl click on the MIDI map icon and choose the MIDI Link Info comman...

Page 58: ...xample when you hit a key on your MIDI keyboard and the moment when you hear the effect Roughly the latency will be equal to the duration of the buffers used by the application and the sound card to play audio and MIDI To calculate the total time required to play a buffer just divide the number of samples per buffer by the sampling frequency For example 256 samples played at 48 kHz represent a tim...

Page 59: ...tio of resources devoted to the calculation of graphics for the interface in favor of audio related calculations To adjust this ratio choose the General command under Preferences in the Edit menu on Windows or String Studio menu on Mac OS and adjust the Per formance slider to the desired value between better audio performance and smoother graphics ...

Page 60: ...ize of the String Studio window is fixed as in the standalone version It is possible however to gain some space on the screen by using the Hide Browser command from the View menu in order to hide the browser 7 2 Synchronization to the Host Sequencer To synchronize String Studio with the clock of a host sequencer select the External Source option in the Source drop down menu of the Clock module and...

Page 61: ...changes are supported in the plug in versions of String Studio Note that with the VST format the list of program changes is available in the host program s VST program list and the Edit Program Changes command is not available 7 9 Performance Using a plug in in a host sequencer requires CPU processing for both applications The load on the CPU is even higher when multiple instances of a plug in or ...

Page 62: ...pen Preset Ctrl O Apple Option O Open the selected preset Save Preset Ctrl S Apple S Save the current preset Save Preset As Save the current preset under a new name Save MIDI Links Ctrl Shift S Apple Shift S Save the current MIDI links Save MIDI Links As Save the current MIDI links under a new name Import Import a axf file Export Export a axf file Exit Quit on Mac Quit the application ...

Page 63: ... all items Get Info Ctrl I Apple I Edit information about a selected item browser Compare Compare modified preset with original settings Learn MIDILink Enter MIDI link learn mode player Forget MIDILink Drop a MIDI link player Set MIDILink Minimun Value Limit the value of a MIDI link to a minimum value Set MIDILink Minimun Value Limit the value of a MIDI link to a maximum value Edit MIDIlinks Displ...

Page 64: ...o Settings window MIDI Settings Display the MIDI Settings window Audio Control Panel Display the Latency Settings window View Menu Command Windows Mac OS Description Show Hide Browser Apple B Show Hide the browser panel Locate Ctrl L Apple L Locate the current preset in the browser and select it Help Menu Command Windows Mac OS Description Manual F1 Display the user manual About String Studio Disp...

Page 65: ...er arrangement to users not individually licensed by AAS other than as expressly permit ted by the terms of this license The Software is licensed to you as a single product Its component parts may not be separated for use on more than one computer 3 OWNERSHIP AAS retains title to the Software including but not limited to any titles computer code themes objects dialog concepts artwork animations so...

Page 66: ...o have a valid license which is in effect at the time of receipt of each such update or new release This License shall remain in effect until terminated The Licensee may terminate this Agreement at any time upon notification to AAS This Agreement will terminate immediately without notice from AAS if the Licensee fails to comply with any provision of this License Any such termination by AAS shall b...

Page 67: ...of any quote order acknowledgement or similar communication between the parties during the term of this Agreement except as otherwise expressly agreed by the parties No modification to the Agreement will be binding unless in writing and signed by a duly authorized representative of each party 10 NON WAIVER No delay or failure to take any action or exercise any rights under this Agreement shall con...

Page 68: ...re 22 contact 19 damper 35 default preset 23 delay 49 50 display 29 distortion 38 documenting presets 22 driver 58 edit 22 effect 49 envelope 27 EQ 38 excitator 32 bow 33 hammer 33 plectrum 32 export 23 factory presets 18 fade in 45 filter 39 43 band pass 41 band pass filter 39 formant 42 formant filter 39 high pass 41 high pass filter 39 low pass 40 low pass filter 39 notch 42 notch filter 39 fin...

Page 69: ...r 39 notch filter 39 42 output effect 28 output effect stage 49 chorus 50 delay 50 level 52 master clock 50 recorder 52 reverb 51 topology 51 parameters 29 performance 7 pickup 37 plectrum 32 plug in 19 audio parameters 60 automation 60 MIDI channel 61 MIDI parameters 60 MIDI program change 61 multiple instances 60 performance 61 saving projects 61 synchronization 60 window size 60 polyphony 8 53 ...

Page 70: ... soundboard 34 standalone mode 17 string 31 sustain pedal 46 synchronization 49 50 system requirements 7 termination 36 toolbar 53 transposition 46 tuning 46 undo 22 unlocking 8 Mac OS 12 Windows 9 user library 19 vibrato 27 47 website 19 ...

Reviews: