3. INSTALLATION
Please follow the instructions and the diagram below to set up the system.
3.1 Basic Connection
CONNECTING WITH 1 to 4 CAMERAS
Camera
Monitor
Camera
Camera
Camera
SD Card
RS-232
ALARM
DC12V
RS-485
hi-z
75
AUDIO
IN
IN
OUT
OUT
MONITOR
I/O
ATTACHING AN EXTERNAL DEVICE TO DVR
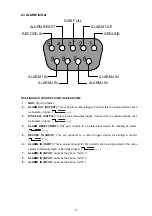
Connect an alarm out, alarm input, and a peripheral device as shown in the diagram below.
Alarm In -> Alarm1 In, Alarm2 In, Alarm3 In, Alarm4 In
SD Card
RS-232
ALARM
DC12V
RS-485
hi-z
75
AUDIO
IN
IN
OUT
OUT
MONITOR
I/O
1
2
3
4
5
6
7
8
9
Alarm Reset
(Normally Open)
(Normally Open)
Alarm1 in
(Normally Open)
Alarm2 in
(Normally Open)
Alarm3 in
(Normally Open)
Alarm4 in
Ground
Trigger Out
3.2 Hard-Disk Drive Installation
The DVR is equipped with two compartments of hard-disk drive. The unit usually comes with one
hard-disk drive installed in the compartment HD1, which is default-configured as a master. If you need
a second hard-disk drive to be installed in the compartment HD2 (Mobile), please contact your
distributors or installers for specific instructions on how to install it. Please don’t serve yourself before
consulting your installers. If there is only one hard-disk drive in the mobile compartment, please set the
HD2 USAGE
option to
REC
(refer to section 5.5) before proceeding with the recording function. Serial
ATA (SATA) interface disk drives are designed for easy installation. It is not necessary to set any
jumpers, terminators, or other settings on this drive for proper operation. The compatible hard-disk
drives (Table 3.2), which can be used with the unit, are shown in the tables below.
10
Summary of Contents for DVR-3014ST
Page 2: ......

