background image


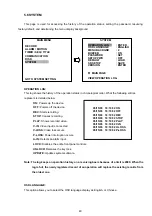
5.1 REC SETTING   


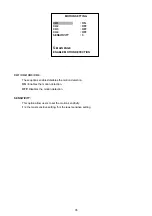
This page allows you to set the recording rate and recording quality, and enables you to continue 

recording when the disk is full. 

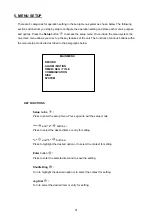
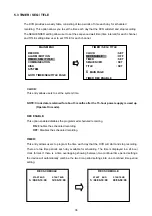
MAIN MENU 


RECORD                   
ALARM / MOTION 
TIMER / SEQ / TITLE 
COMMUNICATION 
DISK 
SYSTEM 
 
 
GOTO REC PAGE


      REC SETTING 
 
REC RATE        : 10 F/S 
REC QUALITY   

: BEST 

DISK FULL 


: REWRITE

AUDIO 

  : 

OFF 


MAIN PAGE 

SET REC RATE 


REC RATE:


This option is for adjusting the number of pictures recorded every second into a storage disk. The 

recording rate controls the frequency at which the number of video pictures can be recorded.   

● 

For a NTSC unit, there are 11 different recording rates you can select from: 

30F/S (30 frames 

per second), 15F/S, 10F/S, 6F/S, 2.7F/S, 1.2F/S, 0.61F/S, 0.35F/S, 1F/8S, 1F/12S, 

and 

1F/16S.


● 

For a PAL unit, there are 11 different recording rates you can select from: 

25F/S (25 frames per 

second), 12.5F/S, 8.3F/S, 5F/S, 2.7F/S, 1.4F/S, 0.76F/S, 0.44F/S, 1F/8S, 1F/12S, 

and 

1F/16S.


Please refer to the table in section 4.1 for details. 


NOTE:  The 30 F/S (25 F/S for a PAL unit) recording rate can only function in a 352x240 (352x288 

for a PAL unit) resolution 


REC QUALITY:   

This option determines the image quality to be recorded. The DVR stores images in the 

compressed format and allows the image quality to be altered by the image size. There are 4 

levels of image quality you can select from: 

BEST

HIGH, STANDARD, 

and 

BASIC

. Selecting 

the BEST image for use provides higher-resolution recorded images, and normally takes up 

more storage space than a HIGH, STANDARD or BASIC image does. 


DISK FULL:

 This option determines the way to utilize storage media in case of a full disk


REWRITE:

 When the hard-disk is full, the device continues recording by displacing the old data. 


STOP:

 When the hard-disk is full, the device will stop recording. 


AUDIO:

 This option determines the way to record sound if necessary.


ON:

 Enables AUDIO recording. 


OFF:

 Disables AUDIO recording. 


NOTE: Audio function can only be activated in the following refresh rate in NTSC(PAL): 10(8.3), 

6(5), 2.7(2.7), 1.2(1.4), 0.61(0.76), 0.35(0.44) frames/sec


32

Summary of Contents for DVR-3014ST

Page 1: ...Before trying to connect or operate this product please read this manual complete INSTALLATION OPERATION MANUAL Digital Video Recorder DVR 3014ST ...

Page 2: ......

Page 3: ...model of DVR for you will lose the data you have stored in the hard disk s if you do so You are free to use the same hard disks between DVRs belonging to a single model Danger of explosion if the Lithium battery RTC Battery is incorrectly replaced Danger of explosion if battery is incorrectly replaced Replace only with the same or equivalent type recommended by the manufacturer Dispose of used bat...

Page 4: ...nformation and channel selection 12 3 4 Updating System Software 14 4 BASIC OPERATIONS 15 4 1 Configuring Recording Settings 15 4 2 Recording Operations 17 4 3 Playback Operations 22 4 4 Search Operations 24 4 5 Backup Operations 27 4 6 Key Lock Operation 30 5 MENU SETUP 31 5 1 REC SETTING 32 5 2 ALARM MOTION SETTING 33 5 3 TIMER SEQ TITLE 36 5 4 COMMUNICATION 38 5 5 DISK SETTING 39 5 6 SYSTEM 40 ...

Page 5: ...7 SATA HARD DISK INSTALLATION 46 7 1 Built in hard disk 46 7 2 Mobile Rack 47 8 SYSTEM DEFAULT 49 9 O S D MESSAGE 51 10 INDEX TABLE 52 11 SPECIFICATIONS 53 3 ...

Page 6: ...Time lapse VCR 1 2 Product Features Stores video in hard disk drives instead of VCR tapes Maximum 2 hard disk drive capability One removable Hard disk drive hot swapping capability Pre alarm image recording Time lapse and real time recording Refresh rate up to 30 IPS 25 IPS for PAL Image quality selectable at 4 different levels for recording Event Timer Alarm recording mode Quick search by time al...

Page 7: ...the compartment before you remove the hard disk from the slot without turning off the device PAUSE button In a playback display press this to freeze the display During the freeze press to display one frame of a picture at a time in the forward direction Illuminate green in PAUSE mode PLAY button Press to play back a recorded video from the hard disk Illuminate green in PLAY mode STOP button Press ...

Page 8: ...ording to the sequencer setting in setup menu In SD card backup mode press to save the desired still image to SD card T rec Indicator This indicator of the timer recording mode lights up to signal the scheduled record setting is on A rec Indicator This indicator of the alarm recording mode lights up to indicate the alarm record setting is on DISK Indicator The indicator shows the operation status ...

Page 9: ...The orange light signals the hard disk drive is power stand by Mobile Rack Power LED Indicates the power status of the Mobile Rack The green light indicates the Mobile Rack is activating Mobile Rack HDD LED Indicates the HDD status of the Mobile Rack The orange light indicates the HDD is storing or retrieving data 7 ...

Page 10: ...osite video to a display device AUDIO OUT This connector is used to link the device s audio input AUDIO IN Connector This connector is used to connect the audio output from a camera or other devices to the DVR RS 485 Port The RS 485 communication ports function as connectors when two or more units are serially connected to an external control device ALARM I O This is a 9 PIN D SUB connector includ...

Page 11: ... trigger Connect this to external devices such as buzzers or lights 5V 0V Active 4 ALARM RESET INPUT This pin connects to an alarm clear device for clearing an alarm 5V 0V Active 5 RECORD IN INPUT This pin connects to a record trigger device for starting a record 5V 0V Active 6 ALARM4 IN INPUT This is an alarm input for CH 4 which can be programmed in the menu system to Normally Open or Normally C...

Page 12: ...allation The DVR is equipped with two compartments of hard disk drive The unit usually comes with one hard disk drive installed in the compartment HD1 which is default configured as a master If you need a second hard disk drive to be installed in the compartment HD2 Mobile please contact your distributors or installers for specific instructions on how to install it Please don t serve yourself befo...

Page 13: ... 7200 RPM 8M WD1200AABS 120G 7200 RPM 2M WD1200AAJS 120G 7200 RPM 8M WD1200AAKS 120G 7200 RPM 16M WD1600AABS 160G 7200 RPM 2M WD1600AAJS 160G 7200 RPM 8M WD1600AAKS 160G 7200 RPM 16M WD2500AABS 250G 7200 RPM 2M WD2500AAJS 250G 7200 RPM 8M WD2500AAKS 250G 7200 RPM 16M WD3200AABS 320G 7200 RPM 2M WD3200AAJS 320G 7200 RPM 8M WD3200AAKS 320G 7200 RPM 16M WD4000AAJS 400G 7200 RPM 8M WD4000AAKS 400G 720...

Page 14: ...button displays a different message detailed in the following example By default the unit displays titles time and date on a monitor as shown next Default display CH 1 CH 2 CH 3 CH 4 09 05 2003 16 13 02 CH1 CH2 CH3 CH4 are titles for each channel changeable in Setup menu Capacity Status 09 05 2003 16 13 02 System Data Time Press the Display button once the DVR will display the following sample mes...

Page 15: ... Indicate which HDD is activated 9K The image file size HD Hard disk Compartment P Y Hard disk installed No hard disk installed SIZE 20G The capacity of the installed hard disk POS Percentage of system R Recording P Playback External signal x Cannot operate at now 3 3 2 Channel Selection The CH1 CH2 CH3 CH4 Quad and Seq Save button are used to select video channel and zoom in factor The following ...

Page 16: ...ake approximately 90 seconds to process 5 Restart the unit by turning off the POWER button when the device sounds a tone twice and displays the message PLEASE RESTART Then turn on the POWER button again The process is complete If you have already followed procedures 1 5 and the unit is still not able to turn on then please first check if the SD card you are using is functioning and the file is int...

Page 17: ...ill be filled in 3 7 hours See the gray area in the table If the total capacity of 80GB hard disk drives is in use under the same refresh rate and picture quality it will be filled in 14 8 hours 4 times the rate of a 20GB hard disk drive NTSC Audio OFF Possible Recording Time HDD 20GB hour BEST 3 7 6 9 15 33 1 75 3 147 6 256 1 726 3 1088 1449 7 HIGH 4 5 7 2 10 8 18 39 7 90 4 177 2 307 4 871 6 1305...

Page 18: ...47 6 86 7 137 0 HIGH 10 6 17 6 31 0 56 3 101 4 158 0 STANDARD 13 2 21 8 38 3 69 0 122 2 186 7 Image Quality BASIC 16 7 27 4 47 7 84 9 147 4 219 9 Refresh Rate Frame Sec 25 12 5 8 3 5 2 7 1 4 0 76 0 44 1 8 1 12 1 16 REC Time Mode 3 hr 6 hr 9 hr 12 hr 24 hr 48 hr 96 hr 168 hr 480 hr 720 hr 960 hr NOTE 1 Recording times on the tables above are estimated For actual available recording time of a record...

Page 19: ... following steps to program the scheduled recording 1 Press the Setup button to enter the MAIN MENU 2 Select the TIMER SEQ TITLE and press the Enter button to enter the TIMER SEQ TITLE page 3 Select the TIMER SET 4 Press the Enter button to enter the REC SCHEDULE table 5 You can set up by using the button and the button to locate the specific day hour minute and use the button and the v button to ...

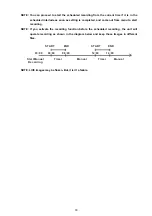
Page 20: ...om menu to start recording NOTE If you activate the recording function before the scheduled recording the unit will operate recording as shown in the diagram below and keep those Images in different files 03 00 06 00 08 00 12 00 14 00 START END START END Start Manual Recording Timer Manual Timer Manual NOTE LIVE images may be frozen But it isn t a failure 18 ...

Page 21: ...D START END S 00 00 00 00 00 00 00 00 M 00 00 00 00 00 00 00 00 T 00 00 00 00 00 00 00 00 W 00 00 00 00 00 00 00 00 T 00 00 00 00 00 00 00 00 F 00 00 00 00 00 00 00 00 S 00 00 00 00 00 00 00 00 OK CANCEL TO MOVE TO CHANGE MAIN MENU RECORD ALARM MOTION TIMER SEQ TITLE COMMUNICATION DISK SYSTEM GOTO TIMER SEQ TITLE PAGE TIMER SEQ TITLE CLOCK SET REC ENABLE ON TIMER SET SEQUENCER SET TITLE SET MAIN P...

Page 22: ...ATION to ON To deactivate it set ALM OPERATION to OFF MAIN MENU RECORD ALARM MOTION TIMER SEQ TITLE COMMUNICATION DISK SYSTEM GOTO ALARM MOTION PAGE ALARM MOTION ALM OPERATION ON REC RATE 10F S REC QUALITY BEST AUDIO OFF ALM TYPE NO ALM DURATION 0 SEC PRE ALARM OFF MOTION SETTING MAIN PAGE ALARM REC ENABLE 5 To active the motion alarm recording Select MOTION SETTING and press the Enter button to e...

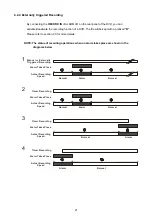
Page 23: ...more details NOTE The status of recording operations when an alarm takes place are shown in the diagrams below 1 2 3 4 Manual or Externally Triggered Recording Alarm Takes Place Actual Recording Speed Normal Alarm Normal Timer Recording Actual Recording Speed Alarm Takes Place Timer Recording Actual Recording Speed Alarm Takes Place Timer Recording Actual Recording Speed Alarm Takes Place Normal A...

Page 24: ...TOP PLAY Play the file from the stop position B Search to play back a particular recorded video Search PLAY Play a selected file Play to the end of the file Show the ending message Search again or rewind to replay the file if required STOP PLAY Play the file from the stop position C Play Back From The Oldest Data Stop Press the STOP button for three seconds PLAY play back from the beginning of the...

Page 25: ...utton for the picture by picture mode 2 There are two ways by PAUSE button or by JOG available to play in the picture by picture mode but the PAUSE button can only function in a forward direction the other JOG dial can act in both a forward and a backward direction as well as picture by picture By PAUSE button Press the PAUSE button to display one frame of a picture at a time in the forward direct...

Page 26: ...2 20 23 10 1M A 2 11 18 02 13 30 16 2 34M 3 12 02 03 14 20 25 2 05M 4 01 02 03 17 20 46 5 32M R 5 02 14 03 16 11 55 24 2M T 6 02 17 03 13 30 22 36 6M 7 02 20 03 18 33 54 6 41M 8 02 27 03 19 21 12 92 3M NOTE 1 T Timer recording R External trigger recording A Alarm recording 2 The maximum number of lists for a respective HDD is 3000 4 4 2 Alarm list Search Take the following steps to proceed with th...

Page 27: ...eps 3 and 4 again for another search SEARCH FULL LIST ALARM LIST TIME SEARCH THUMBNAIL SD CARD TIME SEARCH MM DD YEAR HH MM 06 20 2003 00 00 4 4 4 THUMBNAIL Search Take the following steps to proceed with the thumbnail search function 1 Press the Search button to enter the search mode 2 Select the THUMBNAIL and press the Enter button to access the thumbnail page 3 Set the date you wish to search f...

Page 28: ...sert a SD Card into the SD card slot of the rear unit 2 Press the Search button to enter the search mode 3 Select the SD CARD and press the Enter button to access the complete list of JPG files 4 Highlight the specific JPG file of your requirement and press the Enter button to display the image 5 If you need another please return to the SD card JPG file list page and repeat steps 3 and 4 again for...

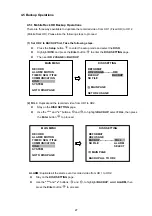
Page 29: ...MUNICATION DISK SYSTEM GOTO DISK PAGE DISK SETTING REFORMAT HD 2 USAGE REC BACKUP BACKUP SD FILE 2 FULL Duplicate all the recorded video from HD1 to HD2 Stay on the DISK SETTING page Use the and v buttons and to highlight BACKUP select FULL then press the Enter button to proceed MAIN PAGE SET HD2 USAGE DISK SETTING REFORMAT HD2 USAGE MAIN MENU RECORD ALARM MOTION TIMER SEQ TITLE COMMUNICATION BACK...

Page 30: ...clip and press the Search button to mark it After completing the selection press the Enter button to proceed MAIN MENU RECORD ALARM MOTION TIMER SEQ TITLE COMMUNICATION DISK SYSTEM GO TO DISK PAGE DISK SETTING REFORMAT HD2 USAGE BACKUP FULL SD FILE ALARM SELECT MAIN PAGE BACKUP PART TO HD2 HD1 A 1 2001 02 01 12 20 TOTAL 41 M READY TO GO NOTE If the capacity of HD 2 is not sufficient to store all s...

Page 31: ...nto SD Card Please take the following steps to archive a critical video in an SD card 1 Insert an SD Card into the SD card slot of the rear unit 2 Start playing back the recorded video 3 Press the PAUSE button to freeze the desired pictures 4 Press the Seq Save button to save the video in the SD Card The quantity of video that can be stored depends on the SD card s capacity The image is stored in ...

Page 32: ...to enter the SYSTEM SETTING page Then set SD SETUP to LOAD 4 Updating System Software please refer to section 3 4 for more details 4 6 Key Lock Operation The Key lock operation protects the unit against unauthorized use by disabling the entire front panel controls Press the Enter button as shown below for at least 3 seconds to lock the unit to release the Key Lock press the button again Power Disp...

Page 33: ...s within the menu setup mode are described in the paragraphs below MAIN MENU RECORD ALARM MOTION TIMER SEQ TITLE COMMUNICATION DISK SYSTEM KEY FUNCTIONS Setup button Press to enter the setup menu Press again to exit the setup mode and v buttons Press to select the desired item or entry for setting and buttons Press to highlight the desired option or to select the context for setting Enter button P...

Page 34: ...to the table in section 4 1 for details NOTE The 30 F S 25 F S for a PAL unit recording rate can only function in a 352x240 352x288 for a PAL unit resolution REC QUALITY This option determines the image quality to be recorded The DVR stores images in the compressed format and allows the image quality to be altered by the image size There are 4 levels of image quality you can select from BEST HIGH ...

Page 35: ...alarm input is activated For a NTSC unit there are 5 different record speeds you can select from 30F S 30 frames per second 15F S 10F S 6F S and REMAIN For a PAL unit there are 5 different record speeds you can select from 25F S 25 frames per second 12 5F S 8 3F S 5F S and REMAIN If you select REMAIN for use the device will record images at the same speed as set on the REC page REC QUALITY This op...

Page 36: ...Recording may be interrupted at the time of Alarm in or Alarm out LIVE images may be interrupted at the time of Alarm out PRE ALARM This option determines that images prior to an alarm occurs will be recorded in the hard disk drive When an alarm is triggered the device will record the image prior to the alarm for 5 seconds 10 frames sec ON Enables this function OFF Disables this function NOTE If t...

Page 37: ...ION DETECTION CH1 CH2 CH3 CH4 These options enables disables the motion detection ON Enables the motion detection OFF Disables the motion detection SENSITIVITY This option allow users to set the motion sensitivity 1 is the most sensitive setting 5 is the least sensitive setting 35 ...

Page 38: ... to set the system time NOTE Clock data is retained for about 3 months after the 15 hour power supply is used up Operate On mode REC ENABLE This option enables disables the programmed scheduled recording ON Enables the scheduled recording OFF Disables the scheduled recording TIMER This entry allows users to program the time each day that the DVR will start and stop recording There are two time per...

Page 39: ...n live mode press the Seq Save button to switch the screen to the sequential jumping mode TITLE This entry allows users to set the titles for each video source or camera in live or recording mode press the DISPLAY button can switch the display status to show the titles The maximum length for each title is 12 SEQUENCER CHANNEL 1 2 3 4 DWELL 03 03 03 03 03 TITLE CH1 FRONT DOOR CH2 KITCHEN CH3 BACKYA...

Page 40: ...s the COMM ID in which case the particular command can be accept RS 232 The RS 232 communication port can be either in an importing or exporting mode according to your applications ON Enables the RS 232 communication port When you wish the unit to be controlled by an external device please select this entry for use OFF Disables the RS 232 communication port RS 485 The RS 485 communication port can...

Page 41: ...only which will not be part of regular recording hard disk drive REC Used for the regular recording hard disk drive NOTE When you wish to play back a recorded video from a HD2 this option must be set to REC For more details please refer to section 4 3 4 BACKUP This function allows you to duplicate data from HD 1 to HD 2 Please set HD 2 as BACKUP first For operation details please refer to section ...

Page 42: ... 03 18 19 32 OFF 05 15 03 18 19 32 REC ON Powers up the device OFF Powers off the device REC Starts recording STOP Ceases recording 05 15 03 18 19 32 STOP 05 15 03 18 19 32 PLAY 05 15 03 18 19 32 V IN 05 15 03 18 19 32 V LOSS 05 15 03 18 19 32 P LOSS PLAY Shows recorded video V IN Video input is connected V LOSS Video loss occurs P LOSS Power interruption occurs A IN Detects an alarm input LOCK Di...

Page 43: ...operation complete Timer activate deactivate Recording switching between HDD PASSWORD This option allows you to set a password to prevent any unauthorized re formatting of the hard disk drives The standard password is 9999 OLD PASSWORD Enter the pre set password or the standard password if this is the initial setting to access the password setting system NEW PASSWORD Enter a 4 digit number passwor...

Page 44: ...vices with the same settings he can save the whole settings to a SD card then transfer to another DVR SAVE Saves the whole setting to the SD card LOAD Loads the whole setting to the SD card VERSION This item is in the setup menu reveal BIOS version and software version and last updated date BIOS 1 03 SW 1 00 DATE Mar 10 2003 42 ...

Page 45: ...etup menu 6 1 3 Set the PC communication parameters 9600 bps No Parity 8 Data Bits 1 Stop Bit 6 2 Communication Protocol 6 2 0 General Command Format Lead Code 0x41 Dest ID Src ID Main category Second category Number of parameters Parameter 1 Parameter 2 End Code 0x4f Lead Code 0x41 Dest ID 0x01 Src ID 0x20 Main Category 0x01 Keys and Signals 0x02 Command Second Category 0x01 Handshake 0x02 Reques...

Page 46: ...SIGNAL_ALARM_RESET 165 SIGNAL_REC_OUT 169 SIGNAL_ALARM_IN 189 SIGNAL_ALARM_OUT 209 6 2 2 COMMAND Types 6 2 2 0 Command Main Category 0x02 6 2 2 1 Handshake Second Category 0x01 PC Request 0x41 0x01 0x20 0x02 0x01 0x00 0x4f DVR Response 0x41 0x20 0x01 0x02 0x08 0x00 0x4f 6 2 2 2 Request Time Second Category 0x02 PC Request 0x41 0x01 0x20 0x02 0x02 0x00 0x4f DVR Response 0x41 0x20 0x01 0x02 0x02 0x0...

Page 47: ...x4f 48 Bytes Data 4 HDD Status Primary Master Slave Secondary Master Slave Every HDD use 12 Bytes 0 HDD Exist if 1 1 Active HDD if 1 2 Current HDD for REC if 1 3 Current HDD for PLAY if 1 4 7 Capacity 8 11 REC PLAY Position 6 2 2 7 Request REC Position Second Category 0x11 PC send 0x41 0x01 0x20 0x02 0x11 0x00 0x4f REC Mode DVR Response 0x41 0x20 0x01 0x02 0x11 0x08 HDD 0x0 4 Bytes REC Position 2 ...

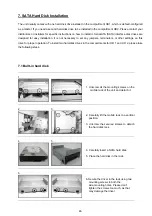
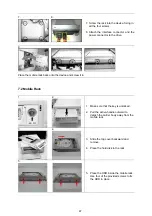
Page 48: ...rs terminators or other settings on this drive for proper operation To install two hard disk drives in the compartments for HD 1 and HD 2 please take the following steps 7 1 Built in hard disk 1 1 Unscrew all the mounting screws on the mobile rack of the unit and detach it 2 3 2 Carefully lift the mobile rack to a vertical position 3 Unscrew the secured screws to detach the hard disk rack 4 5 4 Ca...

Page 49: ...k back onto the device and screw it in 7 2 Mobile Rack 1 2 1 Make sure that the key is unlocked 2 Pull the active handle outward to detach the carrier body away from the mobile rack 3 4 3 Slide the top cover backward and remove 4 Place the hard disk in the rack 5 5 Place the HDD inside the mobile rack Use four of the provided screws to fix the HDD in place 47 ...

Page 50: ...k on the carrier body by sliding it forward 7 Slide the carrier body back in the mobile rack 8 9 8 Push the carrier body further into the mobile rack until it is fully inserted 9 Push the active handle inward 10 10 Lock the Key 48 ...

Page 51: ... TIMER SEQ TITLE ALARM MOTION ALM OPERATION OFF REC RATE 10 F S REC QUALITY BEST AUDIO OFF ALM TYPE NO ALM DURATION 0 SEC PRE ALARM OFF MOTION SETTING COMMUNICATION DISK SYSTEM GOTO ALARM MOTION PAGE MAIN PAGE ALARM REC ENABLE MAIN MENU RECORD ALARM MOTION TIMER SEQ TITLE CLOCK SET REC ENABLE OFF TIMER SET SEQUENCER SET TITLE SET TIMER SEQ TITLE COMMUNICATION DISK SYSTEM GOTO TIMER SEQ TITLE PAGE ...

Page 52: ... COMMUNICATION DISK SYSTEM GOTO DISK PAGE DISK SETTING REFORMAT HD 1 2 HD 2 USAGE REC BACKUP FULL SD FILE JPEG MAIN PAGE DISK REFORMAT CLEAR SYSTEM MAIN MENU RECORD ALARM MOTION TIMER SEQ TITLE COMMUNICATION DISK SYSTEM GOTO SYSTEM SETTING OPERATION LOG ENTER OSD LANGUAGE ENGLISH MENU BACKGND 2 BUZZER ON PASSWORD SET SETUP PWD OFF DEFAULT LOAD SD SETUP SAVE VERSION ENTER MAIN PAGE VIEW OPERATION L...

Page 53: ...7 SET TO NTSC PLS RESTART System has to be set to NTSC please reboot PAL is similar 18 SOFTWARE UPDATE Software update 19 PLEASE RESTART The system should be rebooted after the software has been updated 20 NO DISK The user has pressed the Save key without putting in a SD card or there is a disk error 21 DATA NOT CONTINUOUS The system finds data in installed HDs cannot be used contiguously Suggest ...

Page 54: ...dest data will be kept in the index of the corresponding oldest data For any newly recorded data this approach will be applied until the disk becomes full HD1 HD1 1 12 02 02 12 20 55 1 12 02 02 12 20 55 2 12 02 02 13 30 33 2 01 30 03 16 00 34 3 01 30 03 16 00 34 2999 02 03 03 16 00 56 3000 LISTS 3000 02 03 03 16 00 56 3000 02 08 03 17 30 58 3000 LISTS In the rewrite recording mode when the archive...

Page 55: ...ording Event Pre Alarm Post Alarm Pre Alarm Recording 50 pictures Playback Speeds Frame Stepping 1 16x 1 8x 1 4x 1 2x 1x 2x 4x 8x 16x 30x 100x Record Search Alarm Time Event list Filter thumbnail SD card OSD Language English Chinese T Motion Detection Yes Set up Menu Multi layer Log list 2000 records Alarm In Out 4 Alarm Input 1 Alarm Output Built in Buzzer Yes Communication Port RS 232 and RS 485...

Reviews: