15
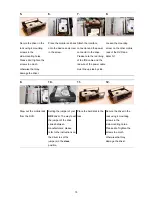
5.
Secure the driver in the
rack using 4 mounting
screws in the
side-mounting holes.
Please don’t tighten the
screws too much,
otherwise that may
damage the driver.
6.
Place the mobile rack back
onto the device and screw
in the screw.
7.
Attach the interface
connector and the power
connector to the drive.
Please note the red lining
of the IDE cable and the
red wire of the power cable
must line up side by side.
8.
Loosen the mounting
screw on the other mobile
rack of the DVR and
detach it.
9.
Draw out the mobile rack
from the DVR.
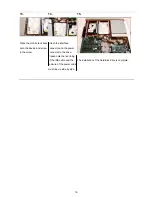
10.
Setting the jumper of your
HD2
driver: The way to set
the jumper of the drive
varies between
manufacturers; please
refer to the instructions on
the driver to set the
jumpers in the
slave
position.
11.
Place the hard disk in the
rack.
12.
Secure the driver in the
rack using 4 mounting
screws in the
side-mounting holes.
Please don’t tighten the
screws too much,
otherwise that may
damage the driver.
Summary of Contents for DVR-3016, DVR-3016D
Page 2: ......
Page 100: ...98 Figure 7 RMN040200255 V5 2 ...

