background image


59

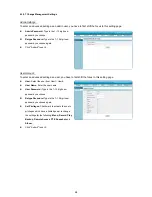
6.2.2.3 Change Record Settings 

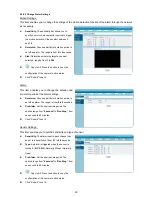
Record Settings: 


This item enables you to set the resolution and audio function of recording.


Resolution:

 The higher the resolution, the clearer 

is the image. The resolution options from low to 

high are: 

CIF

2CIF

 and 

D1


Audio: 

Select to activate (

On

) or deactivate (

Off

the audio function. 


Click "Submit" to set it. 


Normal Record Rate: 


This item enables you to set the recording rate and quality of normal recording.


Rate:

 Click on the drop-down list to choose the 

speed rates between 

2

 IPS and 

30

 IPS. 


Quality:

 Similarly enter and set each channel to 

record an alarm at qualities ranging from 

Best

High

, and 

Standard

 to 

Basic


Copy to All: Press the button to copy the 

configuration of the camera to all cameras.


Click "Submit" to set it.


Alarm Record Rate: 


This item enables you to set the recording rate and quality of normal record.


Rate:

 Click on the drop-down list to choose the 

speed rates between 

2

 IPS and 

30

 IPS. 


Quality:

 Similarly enter and set each channel to 

record an alarm at qualities ranging from 

Best

High

, and 

Standard

 to 

Basic


Copy to All: Press the button to copy the 

configuration of the camera to all cameras.


Click "Submit" to set it.


Summary of Contents for DVR-3254S

Page 1: ...Before trying to connect or operate this product please read this manual completely INSTALLATION OPERATION MANUAL Digital Video Recorder DVR 3254S ...

Page 2: ......

Page 3: ... operation The maximum temperature for rack mounted units is 40 C Avoid uneven loading or mechanical instability when rack mounting units Check product label for power supply requirements to assure that no overloading of supply circuits or overcurrent protection occurs Mains grounding must be reliable and uncompromised by any connections WARNING THIS EQUIPMENT HAS BEEN TESTED AND FOUND TO COMPLY W...

Page 4: ...allation 14 3 4 Updating System Software 15 4 Basic Operations 16 4 1 Recording Operations 16 4 1 1 Manual Recording 16 4 1 2 Timer Recording 16 4 1 3 Alarm Recording 18 4 1 4 Possible Recording Time 19 4 2 Playback Operations 22 4 2 1 Fast Forward Reverse 22 4 2 2 Playback Picture by picture 22 4 3 Search Operations 23 4 3 1 RECORD LIST 23 4 3 2 ALARM LIST 24 4 3 3 ALARM FILTER SEARCH 24 4 4 Back...

Page 5: ... 2 PTZ Settings 34 5 4 Record Settings 36 5 5 Alarm Settings 38 5 6 Schedule Settings 42 5 7 Net Settings 43 5 8 Storage Settings 46 5 9 User Management 47 5 10 System Settings 50 6 Using a Web Browser 53 6 1 Connecting to the DVR 53 6 2 Browsing Images from the DVR 53 6 2 1 Live Video 53 6 2 2 Setup 57 7 Specifications 65 APPENDIX 1 Instructions for the DDNS Functions 67 ...

Page 6: ...his enables a rapid setup of the DVR In addition the device provides the RS 485 protocol to control the PTZ Dome camera It also supports the whole network protocol enabling remote viewing and remote capability The winner of numerous certifications attesting to its excellence this 4 channel DVR offers the most complete array of state of the art specifications and functions in its field in the entir...

Page 7: ...o halt both the selected image and the image recording process 4 PLAY button Press to play back a recorded video from a hard disk 5 REC button Push to start recording video onto a hard disk while in the live display mode Press again for at least 3 seconds to stop the recording 6 REW Press to play a recorded video in the reverse direction at speeds faster than the recorded speed 7 FF Press to play ...

Page 8: ...nd save any new settings in the menu setup mode 14 Indicators ALARM Indicator Indicates the status of the unit s working mode The green light indicates the system is working normally When flashed red indicates the alarms are triggered NETWORK Indicator Indicates the status of the unit s network When the LED is switched off it means the network link is down The green light indicates that the networ...

Page 9: ... These BNC connectors are used to connect to the video output from the cameras 6 VIDEO OUT connector This BNC connector provides a video signal controlled by the control buttons in the front panel to the main monitor This connector transmits the video display in full screen format multi screen format and sequential format 7 AUDIO IN AUDIO OUT The audio in connector is used to connect the audio out...

Page 10: ...tus Description Green On System working normally Alarm Green Red Red Flash Alarm triggered Off Network link down On Network link up Network Green Flash Network traffic Off H D D working normally Green Flash H D D recording Per device Link Active H D D Green Red Red H D D error ...

Page 11: ...ing charge in the batteries Check if the IR controller IR receiver is masked or not Check the IR controller s ID code number Please change another IR controller to try again If the problem persists please contact your administrator Index Name Description 1 ID Enables IR remote controller 2 STOP 1 Same as STOP key of front panel 2 Click the button to control the Focus setting to focus near 3 PAUSE ...

Page 12: ...is to external devices such as buzzers or lights 5V 0V Active 5 ALM OUT NO This is an alarm output trigger Connect this to external devices such as buzzers or lights 5V 0V Active 6 ALM IN 4 This is an alarm input that can be programmed in the menu system to Normally Open or Normally Closed 5V 0V Active 7 ALM IN 3 This is an alarm input that can be programmed in the menu system to Normally Open or ...

Page 13: ...t the mouse to the USB mouse port at the back panel 2 Reboot the unit 3 2 1 The Main Control Panel Click on the mouse right key to bring up the mouse control panel with 9 function buttons Click twice to close the panel 1 The Menu button Please refer to chapter 5 Menu Setup for more details 2 The Search button Please refer to section 4 3 Search Operations for more details 3 The Information button C...

Page 14: ...lick to bring up the PTZ control panel 1 The direction keys 2 Zoom In Zoom Out Click on the buttons to control the Zoom setting on the PTZ control panel 3 Focus Near Focus Far Click on the buttons to control the Focus setting on the PTZ control panel 4 Iris Open Iris Close Click on the buttons to control the Aperture setting on the PTZ control panel 5 Set Preset Goto Preset Click the Set Preset bu...

Page 15: ...ick on the mouse right key twice to bring up the second control panel Click once to close the panel 1 The Channel 1 button Click to view the live video of channel 1 2 The Channel 2 button Click to view the live video of channel 2 3 The Channel 3 button Click to view the live video of channel 3 4 The Channel 4 button Click to view the live video of channel 4 5 The Quad button Click to display the c...

Page 16: ...320GB 7200 RPM WD3200YS 320GB 7200 RPM WD WD1600AVJS 160GB 7200 RPM WD10EAXS 1TB 7200 RPM WD5002ABYS 500GB 7200 RPM WD800AAJS 80GB 7200 RPM WD2502ABYS 250GB 7200 RPM WD1600AAJS 160GB 7200 RPM ST380815AS 80GB 7200 RPM ST3160815AS 160GB 7200 RPM Seagate ST3250820SV 250GB 7200 RPM NOTE Hard disk drives not shown on this list have not been tested by our engineering team and are not recommended for use...

Page 17: ...n remove the USB device 5 Turn off the DVR 6 Insert the USB device into the built in USB port on the front panel of the DVR 7 Hold down the STOP and REC buttons simultaneously and then turn on the unit 8 Now the DVR is updating the system software and displays the message System Is Updating 9 After displaying Update Success please press any key to restart the system The process is complete 10 Veri...

Page 18: ...st recorded video please refer to section 5 4 Record Settings for more details 4 1 2 Timer Recording Timer recording provides eight schedules in a weekly table which programs the DVR to turn on and off at specified times This way the DVR will start and stop recording according to the programmed schedule Please take the following steps to program the scheduled recording 1 Press the Mode button or u...

Page 19: ...ng NOTE If you activate the recording function before the scheduled recording the unit will operate recording as shown in the diagram below and keep those Images in different files 03 00 06 00 08 00 12 00 14 00 START END START END Start Manual Recording Timer Manual Timer Manual ...

Page 20: ...ings 6 Select the Alarm Record Settings Menu Record and enter the Alarm Record Settings page 7 Set the alarm record quality and rate Please refer to section 5 4 for more information 8 Go back to the Alarm settings page 9 Select the Alarm Input Link and enter the Alarm Input Link page Set each camera to activate ON or deactivate OFF the three modes of Motion Sensor and V VIDEO Loss 10 Select the Al...

Page 21: ... 98 95 91 88 85 82 80 High 879 699 584 501 437 389 349 318 292 269 250 233 218 206 194 184 174 166 159 152 145 139 134 129 124 120 116 112 109 Standard 1218 969 804 693 604 539 484 439 404 372 346 323 302 285 269 255 242 230 220 210 202 193 186 179 173 167 161 156 151 Basic 1609 1292 1079 927 804 716 646 588 539 495 461 430 404 380 358 339 323 307 294 280 269 258 248 239 230 222 215 208 202 Resolu...

Page 22: ...o Off HDD 160G 0 4 8 12 16 20 24 28 32 36 40 44 48 50 Best 355 284 236 203 177 157 142 129 118 109 101 98 High 487 389 324 277 243 216 194 176 162 149 139 134 Standard 671 536 446 382 334 298 268 243 223 206 191 185 Basic 888 710 592 507 444 394 355 323 296 273 253 245 Resolution CIF Audio Off HDD 160G 0 4 8 12 16 20 24 28 32 36 40 44 48 52 56 60 64 68 72 76 80 84 88 92 96 100 Best 533 426 355 304...

Page 23: ...o On HDD 160G 0 4 8 12 16 20 24 28 32 36 40 44 48 52 56 60 64 68 72 76 80 84 88 92 96 100 Best 355 304 266 236 213 193 177 164 152 142 133 125 118 112 106 101 96 92 88 85 82 78 76 73 High 432 377 334 300 271 248 229 212 198 185 174 164 155 148 140 134 128 123 118 113 109 105 101 98 Standard 516 458 412 374 341 314 292 272 255 239 226 214 203 193 184 176 169 162 156 150 144 139 135 130 Basic 592 53...

Page 24: ...ard direction at a speed faster than the recorded speed Press the button to increase the forward rate as 2x 4x 8x 16x 32x and 100x Reverse Press the button to view the recorded video in the reverse direction at a speed faster than the recorded speed Press the button to increase the forward rate as 2x 4x 8x 16x 32x and 100x Normal Press the button to return to the normal speed of playback 4 2 2 Pla...

Page 25: ...ntains the recorded video files will be marked in red color on the Search calendar 4 3 1 RECORD LIST Take the following steps to proceed with the record list search function 1 Press the Search icon to enter the search mode 2 Select the date on the Search calendar you wish to search for the recorded video 3 Select the Record List to access the Record List page 4 Highlight the specific recorded vide...

Page 26: ...r you wish to search for the recorded video 3 Select the Alarm List to access the Alarm List page 4 The Alarm Filter can search two modes namely Channel Filter and Alarm Type Filter 5 In the Channel Filter column checkmark the box which follows the headline Channel Filter to select the channel numbers as you require Select the Search item to start searching and displaying the concerned image 6 In ...

Page 27: ...ss the icon to open the Backup menu page when you find a desired picture The Backup menu page 2 Channel Set the backup sources from the desired channel 3 Duration Select the time length of your saved recording 00 00 expresses minute s and second s 4 Storage The storage device is the USB disk It will detect and show the capacity of the USB 5 Audio Checkmark if you want to backup the audio at the sa...

Page 28: ...Click the Album icon to enter the Album page Select the still image s you want then click the Backup item to start to backup the image s into the USB device NOTE The quantity of pictures that can be stored depends on the USB flash memory capacity How many pictures can be stored depends on the USB flash memory capacity You can have the saved images printed out in any computer The image is stored in...

Page 29: ...ol Panel to enter the Menu page 3 Highlight System to enter the System page 4 Select Save Settings To USB Disk and press the Enter button to enter the saving mode 5 Select and press Yes Then the default setting info will auto save into the USB disk Transfer the default setting info of a DVR to another 1 Insert the USB disk which has stored the default setting info into the DVR 2 Press the Menu but...

Page 30: ...he various buttons within the menu setup mode are described in the paragraphs below Key Functions Menu button Press to enter the main Menu page You can also use this button to return directly to the main Menu page from any other page After returning to the main Menu page you can push the ESC button again and then enter to exit the menu system page and buttons Press to select a desired item and but...

Page 31: ...me Format You have a choice between using a 12 HR mode or a 24 HR mode 12 HR Shows the time in the a m and p m modes in the setting 24 HR Gives a 24 hour reading 2 Time Change the system time here 3 Date Format Gives a date in terms of months days or years in the following 3 alternative formats MM DD YYYY DD MM YYYY and YYYY MM DD 4 Date Change the system date here 5 Time Zone Press Enter to enter...

Page 32: ...ll affect the date and time that will be stamped on your image files Setting an incorrect time zone will give you incorrect time and date stamps 6 SNTP Enable Activate OFF or ON This option enables or disables the SNTP communication function 7 SNTP Address The SNTP server address may be manually edited 8 Save Cancel Go back to the previous Time Date Settings page by saving Save or without saving C...

Page 33: ...channel Go back to the previous Display page by saving Done or without saving Cancel 5 Title Display Activate OFF or ON This option enables or disables the title display function Press to Save or Cancel the setting 6 VGA Settings Here the options are 800 600 60Hz 1024 768 60Hz 1280 1024 60Hz and 1440 900 60Hz This mode is operable in a monitor at a resolution of 4 3 resolution such as 800 600 or 1...

Page 34: ...sequence page where you want to set the duration 2 Screen When selecting the page from the Page item above see displayed here the corresponding type of the result display screen that will show on the monitor at the same time Ch1 Ch2 Ch3 Ch4 Quad then loop back 3 Duration Set the desired time period The options range from Disable to 60 SECS Press to Save or Cancel the setting NOTE To activate the S...

Page 35: ...re color Range 0 99 Default 50 Press to Save or Cancel the setting 4 Hue Adjust the picture hue Range 0 99 Default 50 Press to Save or Cancel the setting 5 Contrast Adjust the picture contrast Range 0 99 Default 50 Press to Save or Cancel the setting 6 Covert Press Enter to enter the selected channel The DVR provides 4 programmable independent zones for manual setting After setting press the right...

Page 36: ...lso copy the current settings to ALL the cameras or another signal camera between Ch1 and Ch4 5 3 2 PTZ Settings You can change or adjust the PTZ properties here 1 Select Channel Please select one channel between Ch1 and Ch4 ...

Page 37: ...STRAX or LILIN 4 PTZ ID Set the ID of the dome camera between 001 and 255 5 Copy To You can also copy the current settings to ALL the cameras or another signal camera between Ch1 and Ch4 NOTE Click on the PTZ button on the Main Control Panel to change the latter into the PTZ control panel Use the mouse to select the PTZ control options The PTZ Control Panel ...

Page 38: ...dio function 3 Normal Record Rate Press Enter to enter the Normal Record Rate setting page 1 Quality Similarly enter and set each channel to record an alarm at qualities ranging from BEST HIGH and STANDARD to BASIC 2 Record Rate We provide many different speed rates ranging from 2 3 4 5 6 7 8 9 10 11 12 13 14 to 15 images per second of each camera IPS The total record rate of the 4 channels will b...

Page 39: ...e of a single channel is 30 NTSC 25 PAL 4 Alarm Record Rate Press Enter to enter the Alarm Record Rate setting page 1 Quality Similarly enter and set each channel to record an alarm at qualities ranging from BEST HIGH and STANDARD to BASIC 2 Record Rate We provide many different speed rates ranging from 2 to 23 images per second of each camera IPS Press to Save or Cancel the setting NOTE In the al...

Page 40: ... images prior to an alarm will be recorded in the hard disk drive When an alarm is triggered the device will record the images prior to the alarm for 5 seconds Activate ON or deactivate OFF ON Enables the function OFF Disables the function 3 Motion Press Enter to enter the Motion setting page 1 Channel Select Please select one channel between Ch1 and Ch4 2 Sensitivity The sensitivity allows you to...

Page 41: ...el s target zone if motion detection is desired only in part of the viewing area represented by the 22Wx18H 396 checked area on the lower right quadrant of the screen While selecting the checks you want to target the effective checks are highlighted the red areas After selecting the target the effective checks are cleared the area with the translucent color is not covered NOTE You can use the mous...

Page 42: ... current setting to All the cameras or another single camera between Ch1 and Ch4 5 Alarm Input Link Select a camera to activate or deactivate the three modes of Motion Sensor and V video Loss 1 Motion Alarms which are activated while the motion detection function is operating Activate ON or deactivate OFF 2 Sensor The alarm input in each channel can be set to a sensitivity between 0 1 to 0 8 secon...

Page 43: ...e other motion settings Turn on Motion mode in Alarm Input Link 1 Click the Alarm settings and enter 2 Select item 5 Alarm Input Link and press the Enter button 3 Select the channel for motion detection go to the Motion column and set the mode to ON Repeat the previous steps for each of the channels Press to Save or Cancel the setting 4 Return to the Alarm menu Turn on Start Record mode in Alarm O...

Page 44: ...s or delete the schedules 1 Set Schedule To set a schedule please set the Set Schedule to ON While selecting the checks you want to target the effective checks are highlighted in red color After selecting the target the effective checks are marked yellow Press to Save or Cancel the setting 2 Delete Schedule To delete the schedule please set the Delete Schedule to ON During selecting the checks you...

Page 45: ...tem to on Press to Save or Cancel the setting 2 IP Address When setting the DHCP item to Off the IP address may be manually edited 3 Subnet Mask When setting the DHCP item to Off the IP mask may be manually edited 4 Gateway When setting the DHCP item to Off the gateway may be manually edited 5 DNS Address The DNS IP address may be manually edited 6 DDNS Press Enter to enter the DDNS setting page D...

Page 46: ...ur Internet Service Provider If the DVR is behind a router or a gateway you do not need to configure this setting 1 PPPoE Activate ON or deactivate OFF 2 User Name Enter the PPPoE User Name Press to Save or Cancel the setting 3 Password Enter the PPPoE Password Press to Save or Cancel the setting 8 IP MAC Filter Press Enter to enter the IP MAC Filter setting page Set the allow IP Address MAC addre...

Page 47: ...R Activate ON then set the IP addresses 3 MAC 1 4 Verify the MAC address that allows or does not allow access to the DVR Activate ON then set the MAC addresses NOTE If there are any conflicts between the Allow IP MAC address and the Deny IP MAC address the access of the Deny IP MAC address has the higher priority over the Allow IP MAC address ...

Page 48: ...DD 2 Rewrite When the hard disk is full the device continues recording by displacing the old data Activate ON or deactivate OFF 3 HDD Clear This option allows you to clear out all the data in the HDD Press Enter to open the HDD Clear dialog box Press Yes to clear or press No to cancel NOTE Besides clearing out all the data in the HDD the HDD Clear function will wipe out all the snapshots in the Al...

Page 49: ... password function is off 2 Admin Settings The user who accesses with the admin name and password has the full power to even change the settings of the DVR To enter an advanced setting as an admin user you have to first shift the focus to this item Instantly the screen shows the following entry NOTE The default setting of the user name and its password User Name Password Admin 0000 User1 1111 User...

Page 50: ... in the 1 12 digit new password you choose 3 Verify New Admin Password Re type your advanced password in order to check it 3 User Settings The user who accesses with the operator name and password has the limited power to change the settings of the items in the main menu To enter an advanced setting as a user you have to first shift the focus to this item Instantly the screen shows the following e...

Page 51: ...h asterisks here 4 New Password Type in the 1 12 digit new password you choose 5 Verify New Password Re type your advanced password in order to check it 6 Set Privileges Activate ON or deactivate OFF the user s privileges which has limited power to change the settings for the following Menu Manual Record Play Back Up Remote Access PTZ Snapshot and Album ...

Page 52: ...ter any particular item press the Enter button Press to Save or Cancel the setting 1 Device Name The default device name is DVR 2 Device ID Set the ID of the DVR between 1 and 16 3 System version This item is on the page where you can find the firmware version and MAC address 4 Operation Log ...

Page 53: ...e play function starting a recording setting the alarm and signaling a full hard disk 5 Load Default Settings This item enables you to reload the factory default settings 6 Save Installer Settings This item enables you to save the settings in the buffer of the device 7 Load Installer Settings In case of alien tampering or its possibility this item allows you to return to your selected settings wit...

Page 54: ... wish to set up many DVR units quickly with the same settings you can save all the settings to a USB Disk 9 Load Settings From USB Disk This item allows you to load your entire settings and transfer them to another DVR by using a USB Disk ...

Page 55: ... the Enter button to enter the login page The default administrative User Name and Password are admin and 0000 respectively 3 Enter the user name 4 Fill in the password Select the Remember Password checkbox to save this password in your Windows operating system password list 5 Click on the OK button and enter the home page of the DVR both the user name and password must be correct Click on the Can...

Page 56: ...re by picture FWD Click to play a recorded video in the forward direction at speeds which are faster than the recorded speed Audio Switch Title Click on the button to show the titles of the channels Bandwidth To avoid the bandwidth restriction the user can tick it to just view the key frames Set Storage Path Click on the button to set a storage folder for saving a snapshot and video clips Snapshot...

Page 57: ...desired single camera Preset No Preset Position number There s a drop down list here from which you can choose the preset position you want Preset Click this button to save the preset position Preset Goto Click this button to automatically view the preset position number you have selected Preset Clear Choose any one preset position and click this button to delete your choice Click on the button an...

Page 58: ...The record s continuance in time Page up Page down Enables you to scroll up and down the list Click on the button and the Time Search panel will appear on the left side of the Live View page This allows you to search a recorded video stored in the HDD of the device Select the Month Date Year you wish to search Enter the HOUR MINUTE you wish to search and click the button to proceed Time Search pla...

Page 59: ... date here SNTP Settings Enables or disables the SNTP communication function here Daylight Saving Setting This entry allows users to set the daylight saving time Click Submit to set it Title Settings This item enables you set the camera titles Fix a desired title After entering this page you can choose any particular camera s title and make any changes Copy to All Press the button to copy the conf...

Page 60: ...e camera s image to be blocked excluded from recordings and snapshots Click Submit to set it Dome Settings This item enables you to set the details of the live picture of each channel ID Choose an ID between 1 and 99 This ID is the identifier for each RS 485 device Protocol Select one protocol type from the pull down menu Speed Choose between 1200 and 19200 bps This is a speed measurement for comm...

Page 61: ... the speed rates between 2 IPS and 30 IPS Quality Similarly enter and set each channel to record an alarm at qualities ranging from Best High and Standard to Basic Copy to All Press the button to copy the configuration of the camera to all cameras Click Submit to set it Alarm Record Rate This item enables you to set the recording rate and quality of normal record Rate Click on the drop down list t...

Page 62: ...is item enables you to change the duration and pre alarm period of the alarm settings Duratuion Choose a particular duration period to set off an alarm The range is from 0 to 5 seconds Pre Alarm Set the desired time period The options range from 0 second to Non Stop from one second to 60 minutes Click Submit to set it Sensor Settings This item enables you to set the sensitivity and type of sensor ...

Page 63: ...arm output modes of Sensor V video Loss and Motion for the following Alarm Out Buzzer Log Display Start Recording and Full Screen Click Submit to set it 6 2 2 5 Change Schedule Settings The user can manually set the schedule For the checked area of the setting page you can set the schedules or delete the schedules Check uncheck any all of the boxes set in the Schedule page to enable disable the pr...

Page 64: ...s into IP addresses e g 192 168 0 20 The address can be obtained from your ISP or network gateway Click Submit to set it DDNS Settings The DDNS Dynamic Domain Name Server will hold a DNS host name and synchronize the public IP address of the modem when it has been modified The user name and password are required when using the DDNS service DDNS Select On to activate the function DDNS Host Name Ent...

Page 65: ... does not allow access to the DVR Checkmark to On then set the IP addresses MAC 1 4 Verify the MAC address that allows or does not allow access to the DVR Checkmark to On then set the MAC addresses Click Submit to set it PPPoE Settings If you use the DVR to connect directly to the Internet you will need to enter the username and password which were given to you when you set up your account with yo...

Page 66: ...r Account To enter an advanced setting as a user you have to first shift the focus to this setting page User Select the user from User1 User8 User Name Enter the user name User Password Type in the 1 12 digit new password you choose Retype Password Type in the 1 12 digit new password you choose again Set Privileges Checkmark to activate the user s privileges which have a limited power to change th...

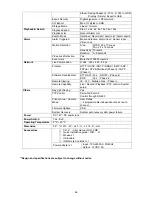
Page 67: ... Following are the compliant standards IEEE 802 3 compliance IEEE 802 3u compliance Alarm I O Connector 8 pin terminal block connector Alarm 4 in 1 out Max 4 x ALARM1 IN INPUT ALARM OUT OUTPUT NO COM NC 3pins 1 x GND RS 485 D D 2 pin terminal block connector Controls PTZ Rear USB Connector USB A type 1 1 x1 For the mouse to control a DVR Software Platform Linux kernel Mode Triplex REC PLAY Live Ne...

Page 68: ...S ICMP ARP PPPoE RTP Multicast Phase II 3GPP Phase II HTTP API Yes ONVIF Phase II Software Development SDK Yes Phase II Remote Viewing IE VLC Mobile phone Phase II Network Remote Capability Live Record Playback PTZ control System setup Day Light Saving Yes PTZ Control Pelco D Pelco P Control through RS 485 Privacy Area Camera Mask User Define 4 programmable independent zones each channel Firmware ...

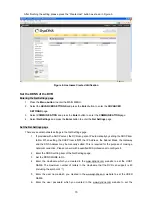
Page 69: ...as shown in Figure 1 Figure 1 DynDNS Home Page Create an account After clicking Create Account you will enter the Create Account page Please complete the form at the bottom of the page to create your account You will receive an e mail containing instructions to activate your account If you do not follow the directions within 48 hours you will need to recreate your account Set up the DDNS After cre...

Page 70: ...item which is below the My Hosts item as shown in Figure 4 Click Add Host Services and its service items will appear The Add New Hostname page helps to add a new DDNS Each member may have only one free account and one free account can have only five Dynamic DNS hosts Click Add New Hostname to enter the DDNS setting page as shown in Figure 5 ...

Page 71: ... item The user can choose a Sub Hostname as s he likes from the right hand side of the Hostname s drop down list Then select the Service Type Host with IP address NOTE You don t have to set the IP Address in the same format as the 16 channel DVR s IP Address The 16 channel DVR will renew the IP Address automatically ...

Page 72: ...d with a DHCP server the DVR can get an IP automatically by setting the DHCP item to On When setting the DHCP item to Off the IP Address the Subnet Mask the Gateway and the DNS Address may be manually edited This is required for the purpose of making a network connection Please consult with a qualified MIS professional to configure it 2 Enter the DDNS setting item of the Net Settings page 3 Set th...

Page 73: ...pital letters or lowercase letters in the user name PASSWORD ddns password 211 21 20 2 api htm ddns password 89921177 After each item it set the page will display the corresponding message Notice 1 When using the Hub with the DNS function the user has to choose either the DDNS function of the DVR or the DNS function of the Hub It won t work if you choose the DDNS function of the DVR and the DNS fu...

Page 74: ...72 Figure 7 Verifying IP Address of DVR RMN0400372 V1 2 ...

Reviews: