For more information on
Apricorn’s Velocity Solo
and other innovative
Apricorn products visit our web site at
www.apricorn.com
or call 1-800-458-5448
©2011 Apricorn, Inc. Corporate Offices: 12191 Kirkham Rd., Poway, CA. 92064
*One gigabyte (GB) = one billion bytes; accessible capacity will be less and actual capacity depends on the operating environment and formatting.
Features
Compatible with 2.5” SATA III SSD (& HDD)
Uses a single PCIe 2.0 x1 slot (Also compatible with PCIe 1.0)
Auxiliary SATA III port for additional expansion
Backwards compatible with SATA II and SATA I SSDs
Ideal for use as a boot disk or scratch disk
Includes Apricorn’s EZ Gig Cloning Software with Data
Select
TRIM Compatible and can access capacities in excess of
2.2TB (if the Operating System supports TRIM)
PC: Supports Win XP, Vista, 7
Target applications:
• Scratch Disks for Design Applications
• High resolution image editing and manipulation
• Photo editing and retouching
• Video editing and post processing
• Gaming
Specifications
Box Contents
Velocity Solo
Quick Start Manual
Data Transfer Rates
SATA III speeds up to 6Gb/s
Interface
SATA III (SATA II backwards
compatible)
Dimensions
5.25 x 4.75 x 0.67 in
13.2 x 11.9 x 17 mm
Warranty
1 year limited / 30 day money
back guarantee
System Requirements
Desktop system with
PCIe 2.0 X1 slot (PCIe 1.0 X1 slot)
Options Available
May be bundled with an SSD
Ordering info
Ordering Information
Apricorn Part Number:
VEL-SOLO
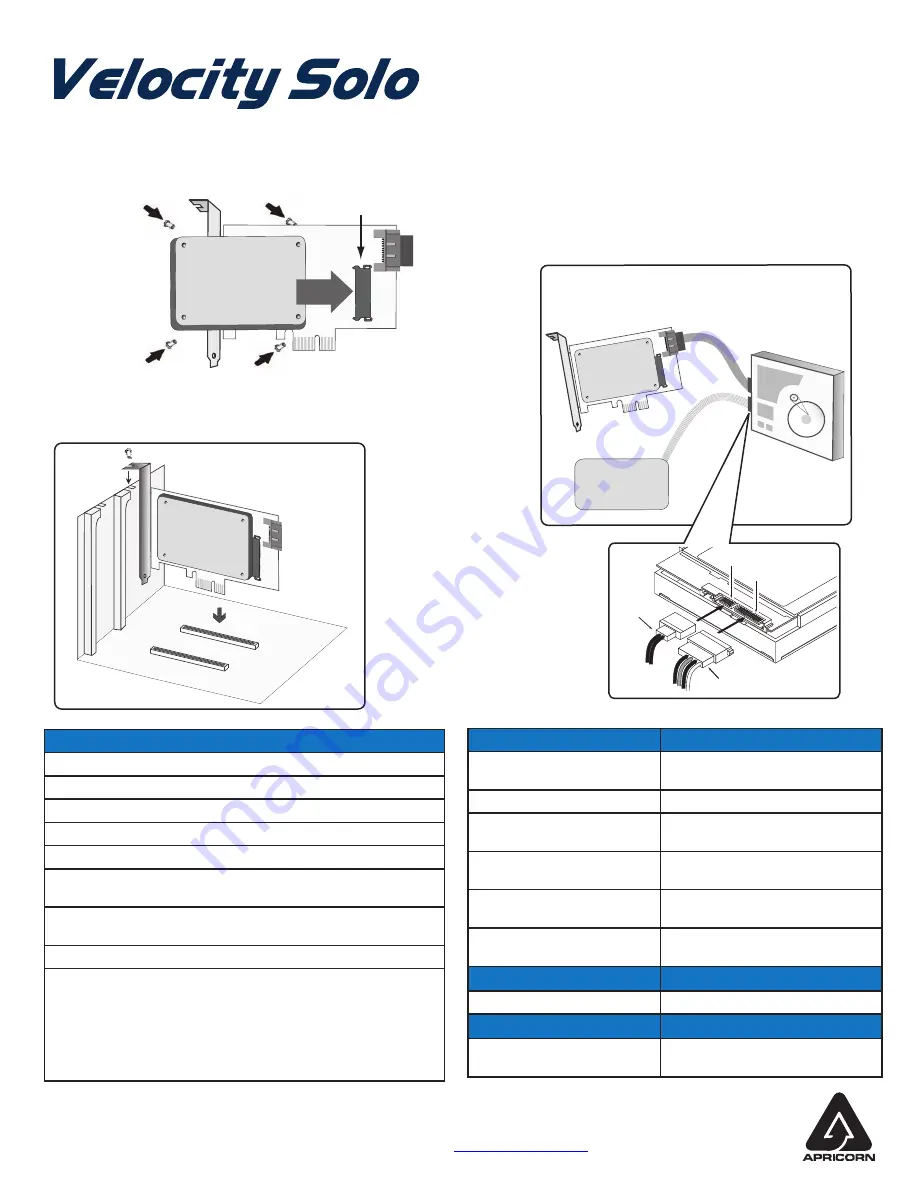
Connecting your SSD to the
Ve
locity Solo Card
Slide your SSD
onto the SA
TA
connector on the
Ve
locity Solo Card.
Use mounting
screws to secure
the drive in place.
SATA connector
Figure 2. Connecting the Velocity Solo
to a HDD or SSD
SATA
Data Cable
SATA III Connector for expansion
to another S
ATA
driv
e
Connect to
y
our
computer’s
power supp
ly
P
ower cable
An
y
SATA Dri
v
e
2.5” or 3.5”
/
H
DD or SSD
Dis
k
Dr
iv
e
Power cabl
e
SATA cable
SATA connector
Power connector
Optional
-
Connecting an additional
drive to the
Ve
locity Solo SA
TA III
connector
P
CIe Gen
1
/
Gen 2
(
x1, x2, x
4 or x8 s
lot
)
Figure 1. Installing the Velocity Solo
on PCIe Gen 1 / Gen 2 slot


