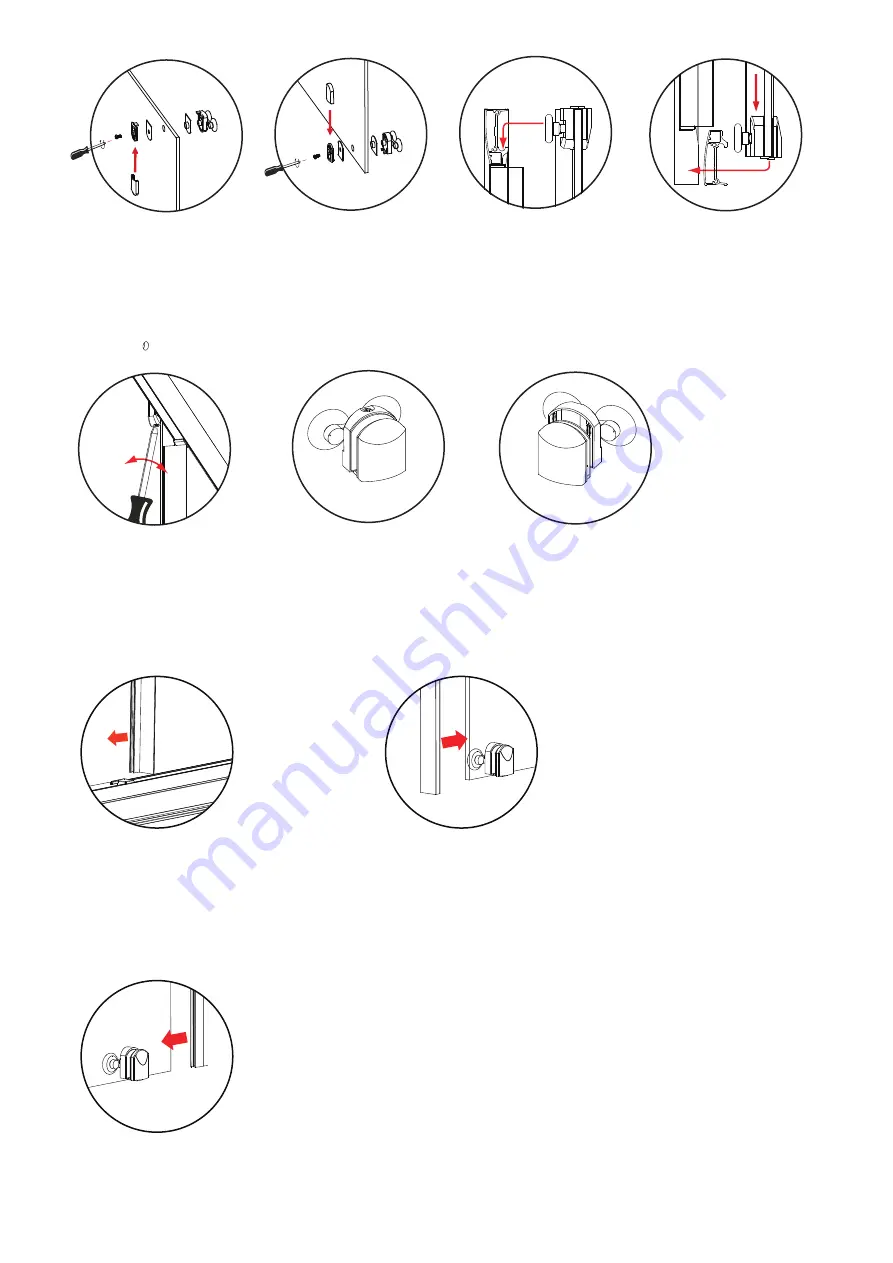
background image

6

Step 9.

If the wheels do not fit into the profile, or the door can not be closed satisfactorily, the top roller can be adjusted using

the adjustment screw in the top rollers (

No.19

) as shown. 

Step 10.

10.1

 Remove any excess silicone from Step 1

10.2

 Push the shorter vertical seal (

NO.24

) onto the fixed glass panels (

No.6,7

).

10.3

 Push the longer vertical seal (

NO.25

) onto the back edge of the moving glass panels (

No.8

) as shown.

Step 11.

Push the magnetic strip (

NO.26

) onto the front edge of the moving glass panels (

No.8

) as shown.

Step 10.2

Step 10.3

Step 11

Step 9

Step 8.

8.1 

Fix the top and bottom rollers onto the door panel then hang the door onto the frame, start by lifting the door up and

guiding the top rollers (

No.19

) into the top horizontal profile (

No.4

).

8.2 

Then using the quick release mechanism on the bottom rollers (

No.20

) guide them into the bottom horizontal profile

(

No.5

) as shown.

Step 8.1

Step 8.2

Step 8.1

Step 8.1

Top Roller

Bottom Roller

Summary of Contents for identiti U Shape Quadrant

Page 1: ...ll Terms Conditions To activate your Product Guarantee please visit www aprilproducts co uk and complete the online form U Shape Quadrant This product should be installed by a suitably qualified and proficient person The fitting instructions should be followed carefully to ensure a proper and safe installation Failure to follow these instructions could result in future injury These instructions an...

Page 2: ...ap 2 10 ID2FT008 Wall Profile Cap LH 1 11 ID2FT009 Wall Profile Cap RH 1 12 ID2FT024 End Cap A L 2 13 ID2FT025 End Cap A R 2 14 ID2FT028 Glass Edge Cover L 2 15 ID2FT029 Glass Edge Cover R 2 NO Code Descrip on Qty 16 ID2FT032 Roller Buffer L 4 17 ID2FT033 Roller Buffer R 4 18 ID2FT001 Top roller 4 19 ID2FT002 Bo om roller 4 20 ID2FT040 Handle 2 21 ID2SL008 Gasket for fixed glass panel A 2 22 ID2SL010 G...

Page 3: ...ld be effectively sealed at tray edges 3 Tiles should extend at least to the corner of the tray and a minimum of 1 9 metres from the top of the tray FIXING KIT COMPONENTS SITE CONDITIONS Screw Cap A 2 FIXING KIT Horizontal Profile End Cap A 4 Wall Profile Top Cover Cap 2 Upright Profile Top Cover Cap 2 Wall Plug 8 pcs Round Head Tapping Screw 4 0 30 16 pcs Round Head Tapping Screw 4 0 12 8 pcs Han...

Page 4: ...o the groove of the raill profiles along with the pre fitted seal then push the top and bottom profiles No 4 5 into the fixed glass panels No 6 No 7 make sure the fixed glass panels No 6 No 7 are pushed into the gaskets No 22 23 fully as shown A Note Put a little bit of silicone in the corner of the profile cap and the horizontal profile as shown in diagram B the other side needs sealing in the sa...

Page 5: ...h the wall profiles No 1 onto the frame 3 2 Place the assembled frame onto the tray 3 3 Level the frame using a spirit level 3 4 Once you are happy that the frame sits on the tray correctly mark the wall through the 4 pre drilled screw holes in the wall profiles NOTE You may find it easier to mark and drill the wall if you apply masking tape to it first Step 3 4 Step 3 1 ...

Page 6: ...he frame to ensure that it is central between the wall profiles and level against the shower tray at the base Step 7 7 1 Drill 4 equally spaced holes with a 3mm drill bit through the wall profiles into the frame 7 2 Fix the frame to the wall profiles using the screws ST3 5 10 No 28 4 per wall profile Step 5 Step 6 Step 7 1 ...

Page 7: ...ck edge of the moving glass panels No 8 as shown Step 11 Push the magnetic strip NO 26 onto the front edge of the moving glass panels No 8 as shown Step 10 2 Step 10 3 Step 11 Step 9 Step 8 8 1 Fix the top and bottom rollers onto the door panel then hang the door onto the frame start by lifting the door up and guiding the top rollers No 19 into the top horizontal profile No 4 8 2 Then using the qu...

Page 8: ...Step 15 Step 15 To finally seal the installation plug the small holes at the end of the fixed glass panel with a little bit of silicone and insert the glass clips as illustrated Step 12 Step 13 Once you are happy that the installation is correct Push the cover strip onto the wall profile as shown above ...

Page 9: ...tom on the INSIDE between the wall profile and the wall IMPORTANT Do not apply sealant on inside of the tray Sealing Outside Seal from the top of the wall profile to the bottom between the wall profile and tiles on both sides Also seal along the bottom where the frame meets the tray Seal the joints between the bottom profile and any upright profiles ...

Page 10: ... long as basic manufacturer maintenance recommendations are followed and no harsh or abrasive cleaners are used It is important to clean your April shower enclosure after every use Please wipe down all glass and metal parts with a clean soft cloth Ensure that all residual water on the glass is removed after every use For reliable watertight performance from your April enclosure your shower head sh...

Reviews:

Related manuals for identiti U Shape Quadrant