ENGINE
RSV mille
3
- 91
a
CAUTION
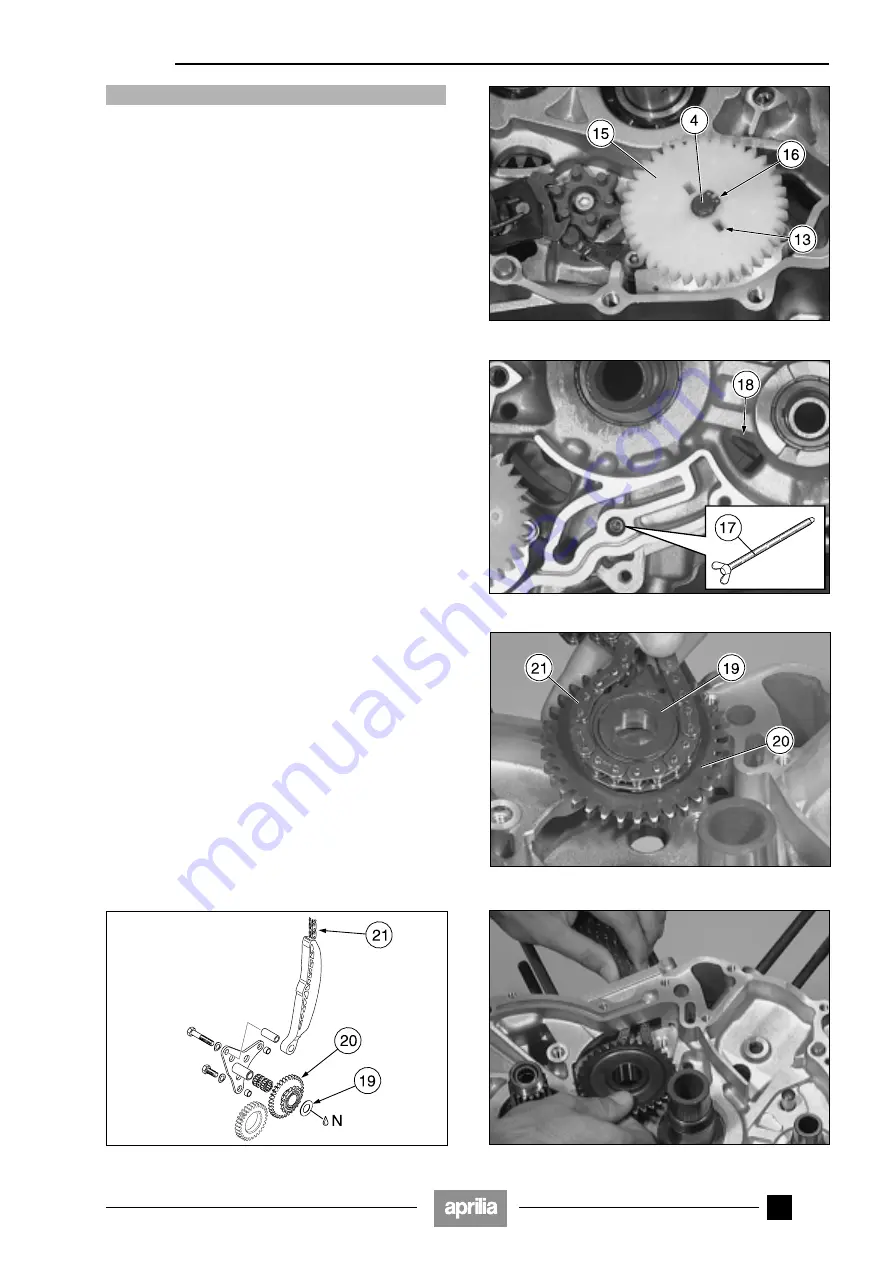
Once disassembled, the oil pump gear must always
be replaced.
◆
Fit a new oil pump gear (15).
NOTE
You must feel the pin (13) engaging perfectly in-
side the groove on the oil pump gear.
◆
Fit the seeger ring (16) in the groove of the oil pump
shaft.
NOTE
Make sure the seeger ring is inserted all the way
into the groove.
Make sure the ends are not pulled apart any more than
necessary.
◆
Check the rotation and end play of the oil pump shaft
(4).
3.7.7 ASSEMBLING THE DRIVE ASSEMBLY “2”
(REAR)
Carefully read 0.2.1 (PRECAUTIONS AND GENERAL
INFORMATIONS).
◆
Turn the driving shaft so that the connecting rod of cyl-
inder “2” (rear) is at TDC.
NOTE
Have the appropriate special tool
&
(17) to
hand (cod. 0240880 threaded bolt for retaining the driving
shaft at TDC).
◆
Lock the driving shaft in place with the threaded bolt
(17).
NOTE
When cylinder “2” is at TDC, the fastening slot
(18) of cylinder “1” is visible through the gap under the
countershaft.
The threaded bolt (17) must never be overtightened;
max. 5 Nm (0.5 kgm).
◆
Use grease to assure adherence between the thrust
washer (19) and the intermediate drive gear (20).
NOTE
Hook up the timing chain (21) based on the ref-
erence marking applied during its disassembly.
◆
Place the timing chain (21) around the intermediate
drive gear (20), guiding both through the chain com-
partment and inserting them in the housing.
N = Lubricating grease.
Summary of Contents for 8140172
Page 1: ...RSV mille MIN 956X Service and repair manual aprilia part 8140172 ...
Page 5: ...0 4 RSV mille NOTE ...
Page 6: ...1 1 RSV mille GENERAL INFORMATION 1 ...
Page 28: ...2 1 RSV mille 1 SERVICE AND SETTING UP 2 ...
Page 84: ...3 1 RSV mille 1 3 ENGINE 3 ...
Page 200: ...4 1 RSV mille 1 2 3 FUEL SUPPLY SYSTEM 4 ...
Page 226: ...5 1 RSV mille 1 2 3 4 COOLING SYSTEM 5 ...
Page 236: ...6 1 RSV mille 6 6 6 6 6 ELECTRICAL SYSTEM 6 ...
Page 239: ...6 4 ELECTRICAL SYSTEM RSV mille 42 0 43 9 54 ...


