background image

 Release 00 / 2002 - 09

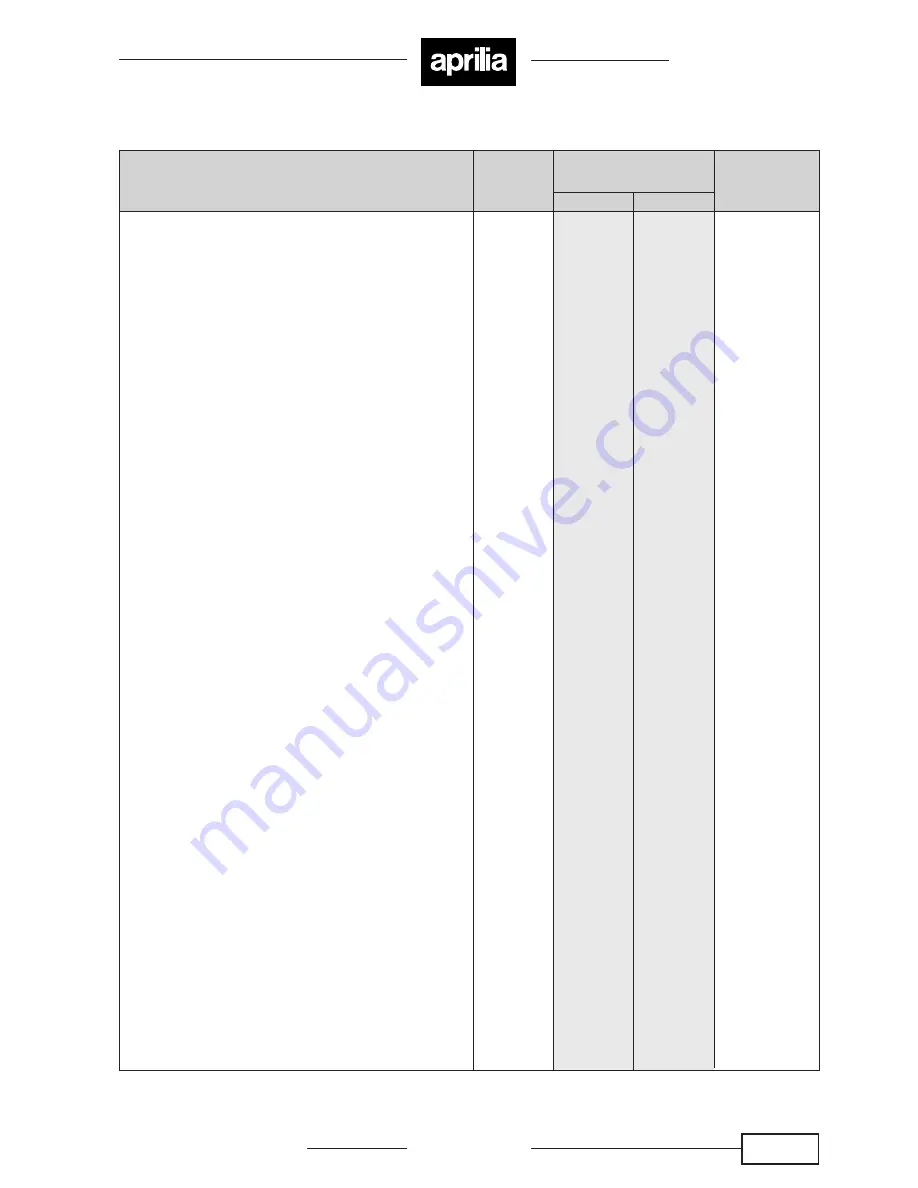
Air-injection 50 cc

Application

Pick-up locking

Stator locking

Transmission steel plate locking

Throttle body (with roller) hose clamp locking

Suction manifold (built-in, hexagonal) locking

Screws and pin securing intake manifold

Transmission cover

Variator cover

Bendix support locking

Starter motor

L/r carter locking

Wheel bearing retaining plate locking

Oil load plug (flanged)

Oil unload (Ch. 8)

Variator sliding pulley cover locking

Head locking (nut)

Clutch locking (nut)

Flywheel locking (nut)

Exhaust stud

Cylinder stud

Spark plug (thread)

Compressor screw locking

Fuel rail screw locking

 (flanged TE)

Variator fixed pulley locking (nut)

Cylinder head temperature probe

Kgm

0.4 - 0.6

0.4 - 0.6

0.8 - 1.2

end stop

0.8 - 1.2

0.9 - 1.1

0.8 - 1.2

0.8 - 1.2

0.8 - 1.2

0.8 - 1.2

0.8 - 1.2

0.6 - 1.0

1.0 - 1.4

0.5 - 0.6

0.2

1.1 - 1.3

4.5 - 5.5

3.5 - 4.5

0.4 - 0.5

0.4 - 0.5

 1.3 - 1.5

0.4 - 0.5

0.6 - 0.7

3.5 - 4.5

0.6 - 0.9

Sealant

not

not

Loctite 270

not

not

not

not

not

not

not

not

Loctite 243

not

not

not

not

not

not

Loctite 270

not

/

not

not

not

TIGHTENING

TORQUE


02/ 02

Chapter.2

TIGHTENING TORQUE 50 cc 

AIR INJ

ECTION ENGINE

Nm

4 - 6

4 - 6

8 - 12

end stop

8 - 12

9 - 11

8 - 12

8 - 12

8 - 12

8 - 12

8 - 12

6 - 10

10 - 14

5 - 6

2

11 - 13

45 - 55

35 - 45

4 - 5

4 - 5

13 - 15

4 - 5

6 - 7

35 - 45

6 - 9

Screw

M5 x 12

M5 x 25

M6 x 12

M6 x 20

M6 x 25

M6 x 25

M6 x 30

M6 x 25

M6 x 55

M6 x 75

M6 x 100

M6 x 16

M8 x 12

M6 x 12

M4 x 8

M6 h=9

M10x1.5

M10x1.25

M10x1.0

M5 x 20

M5 x 25

M12x1.25

6 - 9

Summary of Contents for Air-injection 50 cc

Page 1: ...aprilia QUICK WORKSHOP HANDBOOK Electronic air injection Aprilia Ditech Engine 1095 2 ...

Page 2: ...ed descriptions of all procedures special care must be taken for whatever repair or maintenance work is done in order to prevent damage to the vehicle and injury to persons In order to provide the best level of customer satisfaction Aprilia s p a constantly improves its products and relevant documentation All important technical changes and alterations to procedures are notified to all Aprilia dea...

Page 3: ...f left in contact with the skin for long periods used engine oil can cause skin cancer Although this is unlikely unless handled every day wash your hands with soap and water after handling used engine oil KEEP OUT OF THE REACH OF CHILDREN GENERAL PRECAUTIONS AND INFORMATION For repair and disassembly and reassembly operations follow the instructions Do not carry out any operation in the presence o...

Page 4: ...e housing Do not clean bearings with compressed air IMPORTANT Bearings must rotate freely without sticking or noise Replace if necessary Use only ORIGINAL Aprilia SPARE PARTS Stick to the oil chart and recommended wearing parts Wherever possible lubricate parts before reassembling them When tightening screws and nuts begin with the largest diameters or inner nuts and screws and tighten diagonally ...

Page 5: ...g distance Battery Fuse Generator magneto air injection air injection with direct petrol injection mono cylindrical horizontal 49 38 cm3 41 0 mm 37 4 mm rc 10 7 0 1 1650 50 r min electric centrifuge automatic stepless variator Electric oil pump forced air automatic stepless V belt minimum for stepless change 2 9 maximum for stepless change 0 75 with gears 130 cm3 BING Ø18 mm SIEMENS DEKA SYNERJECT...

Page 6: ...ng flanged TE Variator fixed pulley locking nut Cylinder head temperature probe Kgm 0 4 0 6 0 4 0 6 0 8 1 2 end stop 0 8 1 2 0 9 1 1 0 8 1 2 0 8 1 2 0 8 1 2 0 8 1 2 0 8 1 2 0 6 1 0 1 0 1 4 0 5 0 6 0 2 1 1 1 3 4 5 5 5 3 5 4 5 0 4 0 5 0 4 0 5 1 3 1 5 0 4 0 5 0 6 0 7 3 5 4 5 0 6 0 9 Sealant not not Loctite 270 not not not not not not not not Loctite 243 not not not not not not Loctite 270 not not not...

Page 7: ...tion A 41 000 41 006 1 6141 1 6144 Selection B 41 006 41 012 1 6144 1 6146 Selection C 41 012 41 018 1 6146 1 6149 Measure 15 mm 0 59 from the outer edge 0 005 0 0002 0 02 0 0008 Limit mm in 0 100 0 0039 40 912 1 6107 40 918 1 6109 40 924 1 6112 41 050 1 6161 41 056 1 6164 41 066 1 6168 0 03 0 0012 0 05 0 0020 TECHNICAL DATA Item Piston to cylinder clearance Piston diam Cylinder bore Cylinder dist...

Page 8: ...cylinder Segment slot clearance Piston pin housing bore on piston Piston pin outer diameter Limit mm in 1 2 1 2 T 4 5 0 18 Air injection Air injection Air injection Air injection Air injection 0 25 0 40 0 0098 0 0157 0 036 0 076 0 0014 0 0030 12 002 12 010 0 4725 0 4728 11 996 12 000 0 4723 0 4724 3 6 0 14 0 70 0 027 12 030 0 4736 11 980 0 4717 Standard mm in T Approx 1 2 ...

Page 9: ...om crank arm to arm A Misalignment limit C Side clearance of connecting rod big end D Standard crank width Limite mm in Air injection Air injection Air injection 16 003 16 011 0 6300 0 6304 36 0 0 05 16 040 0 6315 Standard mm in 0 03 0 001 Measured between two opposite points 37 95 38 10 1 494 1 5 0 15 0 75 0 0059 0 029 ...

Page 10: ...p 110 50 4 350 2 0 0 08 OIL PUMP Item Inner coil Ri 26 3 2 6 Ω a 20 C Specification 02 06 Chapter 2 TRANSMISSION Item Reduction ratio Final reduction ratio Drive belt width Driven face spring free Guide roller for variator Drum diameter Limit mm in 17 4 0 685 104 5 4 114 16 5 0 650 107 5 4 232 Air injection Standard mm in Variable 2 9 0 75 51 15 x 67 x 14 18 4 0 724 110 4 33 17 0 669 107 107 2 4 2...

Page 11: ...ended GREEN HIT 2 or CITY 2T Or alternatively branded oils with equivalent or better performance than ISO L ETC A P I TC Bearings and other grease points recommended AUTOGREASE MP or GREASE 30 Or alternatively branded grease for revolving bearings with temperature range of 30 C to 140 C dripping point 150 C 230 C with high protection and anti corrosion properties good resistance to water and oxida...

Page 12: ...INE TOOLS Illustration Tool code Name function or use UK Engine support Tool for fitting the teflon ring onto the air injector Tool for fitting the teflon ring onto the air injector Air injector extractor 8140229 8140429 8140430 8140431 04 01 Chapter 4 ...

Page 13: ...OOLS Illustration Tool code Name function or use UK Adapter plate for flywheel and crankcase extraction Reduction gear for bearing assembly Reduction gear for crankcase traction Spacer for crankcase centering 8140228 8140227 8140225 8140226 04 02 Chapter 4 ...

Page 14: ...Release 00 2002 09 Air injection 50 cc SPECIAL ENGINE TOOLS Illustration Tool code Name function or use UK Fuel air pressure gauge 8140488 04 03 Chapter 4 ...

Page 15: ...e and its housing and size B If clearance A is in excess of 0 2 mm 0 008 in replace the laminar valve B size is at least 1 mm 0 04 in LAMINAR VALVE A B Tighten the gas wire adjuster and the return nut 1 carefully If the nut is tightened to quickly the threaded pawl plastic housing may break 2 1 2 ...

Page 16: ...aprilia part 8140649 09 02 UK Produced and printed by Studio Gallo Design srl Via Mogno 34 1 35012 Camposampiero PD Italy tel 049 9303475 fax 049 9317954 www stgallo it e mail design stgallo it ...

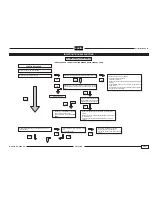
Page 17: ...olt between the two terminals of the injection control connector led YES Is there power between the red black cables of the led and the negative pole of the battery Check the continuity between the black wire and the ECU connector Check the ECU See ECU CON TROL Make sure the led connector and fuse are properly con nected Make sure the black wire between the led and CDI connec tor is continuous Che...

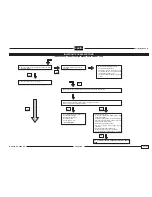
Page 18: ...HECK THE MALFUNCTION BEFORE REPLACING ANY PART Make sure the spark plug is clean clean or replace if necessary Make sure it produces a spark on ignition General diagnostics with Game boy Check battery voltage Replace the spark plug Check Plug lead Check the ECU See ECU CONTROL Check mechanical parts Is the compression ratio right piston rings piston and cylinder Check the Teflon gasket for the air...

Page 19: ...aning This will improve engine performance Stay on high revs for about 5 minutes YES DOUBLE CHECK THE MALFUNCTION BEFORE REPLACING ANY PART General diagnostics with Game boy Check battery voltage Replace the spark plug Check Plug lead Check the ECU See ECU CONTROL Check mechanical parts Is the compression ratio right piston rings piston and cylinder Check the Teflon gasket for the air injector to ...

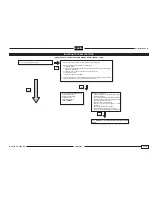
Page 20: ...heck ECU See ECU CONTROL Is the variator working properly NO NO See AIR FUEL CIRCUIT PRESSURE CONTROL PROCE DURE YES 8 Does the vehicle accelerate normally maximum acceleration NO YES DOUBLE CHECK THE MALFUNCTION BEFORE REPLACING ANY PART Check mechanical parts Are all transmission parts belt variator in good condition Is the compression ratio right piston rings piston and cylinder Check the Teflo...

Page 21: ...erfly valve at O if required Check the battery voltage Replace the spark plug Check Plug lead Check the pick up wiring Check ECU See ECU CONTROL Is the variator working properly NO NO See AIR FUEL CIRCUIT PRESSURE CONTROL PROCE DURE Check mechanical parts Are all transmission parts belt variator working properly Is the compression ratio right piston rings piston and cylinder Check the Teflon gaske...

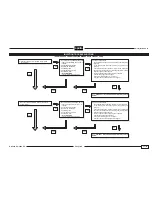
Page 22: ...ood condition Has the reed pack been damaged Is the petrol filter clogged Is it in place Has the exhaust been damaged Is it clogged General diagnostics by Game boy Check the battery voltage Replace the spark plug Check Plug lead Check the pick up wiring Check ECU See ECU CONTROL NO NO See AIR FUEL CIRCUIT PRESSURE CONTROL PROCE DURE 11 Does the engine work properly ticking over at minimum 12 Are n...

Page 23: ...s correct replace the petrol pump N B After replacing the pump start up as specified above point 6 of Troubleshooting the Injection YES NO Does the pressure stay at 2 5 2 0 bar Check the tank breather the petrol filter and tank delivery flange the fuel feed hose Start up as specified above point 6 of Troubleshooting the Injection YES NO Check the pump pressure blocking the delivery hose below the ...

Page 24: ...king check the maximum compressor pressure blocking the delivery hose between the pressure gauge fuel rail Is it above 4 bar Check the reed pack hoses oil seals and bearings air injector replace air compressor if necessary YES NO Does the pressure stay remain If the pressure drops suddenly check hoses replace air compressor if necessary YES NO Repeat cranking without blocking the hoses Is the air ...

Page 25: ...or Error of alignment primary throttle sensor TPS Error of alignment secondary throttle sensor TPS 3 2 Throttle wire improperly set on the handlebar Adjust throttle cable Check connectors Check continuity R 0 Ohm between the sensor and ECU yellow brown wire pink wire white wire yellow wire Throttle control sealing screw out of place Check the end screw which shouldn t be tampered with 4 5 Check co...

Page 26: ... oil pump 26 3 Ohm at 25 C between the positive and negative pole Pompa dell olio danneggiata Damaged ECU See ECU CONTROL Check the continuity R 0 Ohm of the brown wire be tween the pump and ECU Check the voltage 12V between the red black wire and negative battery pole Control the general electrical feed plant battery fuse main switch 11 Air injector fault Connectors Damaged wires Check connectors...

Page 27: ...ral feed cir cuit battery fuse main switch See ECU CONTROL Check the continuity R 0 Ohm of the yellow red wire between the fuel injector and ECU Check the voltage 12V between the red black wire and the negative pole of the battery Check connectors Check the general feed circuit battery fuse main switch Check connectors Fit the relay between the blue and red black wires If the relay closes check th...

Page 28: ...ed temperature sensor Damaged ECU Damaged temperature reader Damaged ECU Temperature reader wires Connectors Can be read using external control instruments Damaged ECU See ECU CONTROL Examine the cause of the high revs at start up Check connectors Check the continuity R 0 Ohm of the pink wire be tween the sensor and ECU and of the green red wire between the sensor and ECU See ECU CONTROL Check the...

Page 29: ...loosen the clamp 1B and remove the variator cover 2 Remove the 6 sided nut 3 spacer 4 toothed cup 5 spacer 6 Remove the primary fixed pulley 7 Remove the 6 sided nut 8 remove clutch bell 9 Remove the clutch assembly from the shaft 10 Remove the trapezoid belt 11 Remove shim 12 bush 13 and mobile primary pulley 14 Remove the three locking screws 15 of the cap 16 and of mobile pulley and remove the ...

Page 30: ...rease are greased or if necessary replaced with components specified in the table RELEASE 00 2002 09 AIR INJECTION GENERATOR Chap 6 TABLE 02 Engine oil Gearbox oil Molybdenum bisulphuroil Grease Loctite OM O C OBM G L New item N COOLING UNIT Remove the 4 screws 1 and aeration cover 2 Remove the 2 screws 3 and fan conveyor 4 Remove the 3 screws 5 retain the T sleeves 6 and remove the fan 7 Remove t...

Page 31: ...pecified in the table RELEASE 00 2002 09 AIR INJECTION INJECTION UNIT Chap 6 TABLE 03 INJECTION UNIT Empty the fuel tank Disconnect the wires Remove the 2 flanged screws 1 Remove the input valve 2 Remove the air injector using the proper tool 3 Slide off the O rings 4 5 DANGER If connector hoses are removed after removing the clamps be very careful when refitting the high pressure hose 6 maximum p...

Page 32: ...retain the washers 18 Slide off the mill pack 19 and gaskets 20 Remove the throttle body hose clamp 21 Remove the throttle body 22 Disconnect the oil pump hose 23 Do not lose the intake manifold 24 REASSEMBLY Reverse the order of disassembly instructions making sure tightening torques are correct and all components requiring grease are greased or if necessary replaced with components specified in ...

Page 33: ...guard 12 Remove the RH 13 and LH 14 bearing WARNING N B Grease the RH 13 and LH 14 crankshaft main bearings REASSEMBLY Reverse the order of disassembly instructions making sure tightening torques are correct and all components requiring grease are greased or if necessary replaced with components specified in the table 10 Crankcase 10 Crankcase 10 Crankcase 15 Connecting rod Standard width 37 95 38...

Reviews: