background image

66

use and maintenance

Pegaso 650

-

#(%#+).' 4(% %.').% /), ,%6%,

!.$ 4/00).' 50

Carefully read p. 36 (LUBRICANTS),
p. 61 (MAINTENANCE) and p. 104 (LU-
BRICANT CHART) 
.

a

WARNING

It is critical to the safe operation of your
vehicle that the proper lubricants, main-
tained at the proper levels, are used. 
Failure to heed this warning can lead to
an engine seizure with subsequent acci-
dent, serious injury or death.

a

WARNING

Remember that the tightening torque of
all fasteners on the wheels, brakes, ax-
les, and other components of the sus-
pension system is very important to en-
sure the safety of the vehicle, and must
be kept at the prescribed values. 
Check the tightening torque of the fas-
teners regularly, and always use a
torque  wrench when reinstalling them. 
Failure to comply with this warning
could allow one of these components to
be lost which could lock a wheel or
cause other handling problems with
consequent overturning and risk of se-
rious injury or even death.

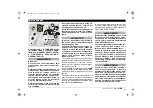
CHECKING

NOTE 

Position the vehicle on firm and

flat ground.

Stop the engine and let it cool down for
at least ten minutes, in order to allow the
oil to flow back to the oil pan and to cool
down.

a

WARNING

Exhaust gases contain carbon monox-
ide, which is extremely poisonous if in-
haled. 
Do not start the engine in closed or bad-
ly-ventilated rooms.
Failure to observe this warning may
cause loss of consciousness or even
lead to death by asphyxia.

Usa-01.fm  Page 66  Wednesday, December 15, 1999  9:31 AM

Summary of Contents for PEGASO 650 - 2009

Page 1: ...safe drive Usa 01 fm Page 17 Wednesday December 15 1999 9 31 AM ...

Page 2: ... it is advis able to not ride on these high speed high ways until you are thoroughly familiar with your vehicle and have attained a high de gree of skill in its operation A new vehicle must be carefully broken in see p 56 RUNNING IN Before starting the engine make sure that the brakes clutch transmission and throt tle controls function properly and that the fuel and oil supply is adequate The exha...

Page 3: ...cks in front of you In case of accident motorcycles scooters and mopeds do not provide the same de gree of protection ensured by automobiles The legs in particular are exposed the risk of being injured However the additional installation of leg guards may actually in crease the risk of injuries and their serious ness in case of accident Do not install leg guards available on the market of spare pa...

Page 4: ...ttle grip that it automatically return to the idle position This double cable arrangement enhances safety by providing for positive closing of the throttle aWARNING In the event of a throttle sticking emer gency always kill the engine using the engine stop switch located near the throttle grip on the right handlebar Nev er use your vehicle if the throttle does not automatically fully return to the...

Page 5: ...only original aprilia or aprilia approved accessories The use of aftermarket accessories and parts can se riously compromise the safety of your ve hicle as well as its performance and ser viceability Any modification which affects performance or safety voids your warranty completely Tampering with the emissions or noise control systems on your vehicle is against the law and can be punished by larg...

Page 6: ...ditions all handling of the vehi cle must be done gradually and smoothly Sudden acceleration braking or turning may make you lose control of your vehicle When traction is reduced accelerate and slow using your vehicle s engine braking insofar as possible Avoid rapid harsh application of the brakes Gradually open and close the throttle to avoid spinning or skidding the rear wheel On rough road surf...

Page 7: ...ith reflective sections sewn into the jacket pants and gloves Be particular aware of approaching automobiles and trucks that might be trying to turn left in front of you Many vehicle accidents are caused by an opposing automobile driver making a left turn without warning in front of the vehicle Inevitably the driver will look right at you and yet swear that they did not see you before they turned ...

Page 8: ... of the controls and reduce the distance from the ground and the angle of inclination in turns Avoid using accessories that hamper ac cess to the controls since this can prolong reaction times during an emergency Fairings and windshields installed on the vehicle may produce aerodynamic forces that will affect the stability of the vehicle during use especially at high speeds Make sure that anything...

Page 9: ...n Therefore you should avoid hard acceleration and hard braking Many accidents are caused by in experienced riders carrying passengers Remember that allowance must be made for the extra weight of the passenger for all driving maneuvers Avoid abrupt and excessive acceleration Always slow down in time and calculate longer stopping and manoeuvring distanc es Non compliance with these instructions may...

Page 10: ... 3 Fuel valve 4 Battery 5 Fuses 6 Glove tool kit compartment 7 Passenger grab rail 8 Rear luggage rack 9 Passenger left footrest snapping closed open 10 Center stand 11 Side stand 12 Rider left footrest with spring always open 13 Shift lever 14 Expansion tank Usa 01 fm Page 26 Wednesday December 15 1999 9 31 AM ...

Page 11: ...n 6 Anti theft hook for the aprilia Body Guard armored cable 7 Rear brake master cylinder 8 Passenger right footrest snapping closed open 9 Passenger grab rail 10 Saddle lock 11 Crash helmet hook 12 Rear brake reservoir 13 Air cleaner 14 Engine oil level plug dipstick 15 Front brake reservoir Usa 01 fm Page 27 Wednesday December 15 1999 9 31 AM ...

Page 12: ...ar 10 Ignition switch steering lock parking lights n m s Y 3425 43 4 23 11 Green direction indicator warning light c 12 Green neutral indicator warning light q 13 Red engine oil pressure warning light j 14 Blue high beam warning light a 15 Green low beam and parking light warning light p 16 Amber low fuel warning light g 17 Tachometer 18 Total miles odometer 19 Speedometer 20 Coolant temperature i...

Page 13: ...he correct operation of the lamp If during this phase the lamp does not turn on it must be replaced The engine oil pressure warning light j must go off when the engine is running If the engine oil pressure warning light j remains on when the en gine is running or if it comes on during the normal running of the en gine this means that the oil system is not developing sufficient pressure In this cas...

Page 14: ...o turn off the direction indicator press the switch 3 DIMMER SWITCH b a When the lever is in the position indicated by the b the parking lights dashboard light and low beam are on When the lever is moved to the a the high beam is illumi nated the dashboard and parking lights remain on 4 HIGH BEAM SIGNALING PUSH BUTTON a Depress the button momentarily to flash the high beam for signaling when passi...

Page 15: ...ty by providing for positive closing of the throttle aWARNING In the event of a throttle sticking emergency always kill the engine using the engine stop switch located near the throt tle grip on the right handlebar Never use your vehicle if the throttle does not automatically fully return to the idle posi tion when the throttle grip is released Contact your Local APRILIA Dealer for repairs Failure...

Page 16: ...the key 2 0 2 43 When you park the vehicle in a dark area or in a blady lit area parking lot or street it is possible and useful may leave the park ing lights on so the vehicle will be easily visible For leave the parking lights on Lock the steering see beside STEER ING LOCK without extract the key 2 Turn the key 2 to position Y PARK ING automatically the parking lights stay on Extract the key 2 a...

Page 17: ...rough the apposite loop on the crash helmet Insert the eyelet 1 completely in the hook 3 NOTE Before lowering and locking the saddle make sure that you have not left the key in the under saddle area Replace the saddle see p 81 REMOV ING THE SADDLE 4 4 4 The anti theft hook 4 is positioned on the right side of the vehicle near the rider s footboard To prevent the vehicle from being stolen it is adv...

Page 18: ...m 5 mm 6 mm and 8 mm Allen wrenches a 5 5 and 7 mm open end wrench an 8 and 11 mm open end wrench a 10 and 13 mm open end wrench a 19 mm open end wrench a 24 mm open end wrench an 18 mm spark plug socket wrench a double ended slot Phillips screwdriver a lever for the spark plug wrench tool pouch Max allowed weight 3 31 lb 1 5 kg 2 2 5 2 Max allowed weight 20 lb 9 kg Usa 01 fm Page 34 Wednesday Dec...

Page 19: ...oline should be accidentally spilt on the skin or clothes immediately wash it off with soap and water and change clothes Should you accidentally spill gasoline in your eyes flush with a large quantity of water and immediately contact a health professional Should you acci dentally get gasoline into your mouth do not induce vomiting Drink a large quantity of milk or clear water and im mediately cont...

Page 20: ... refueling before riding away ensure that the fuel valve lever 5 is to ON posi tion 5 2 43 aWARNING Proper vehicle lubrication is critical to safe operation Failure to maintain proper lubricant lev els or to use the proper type of clean new lubricant can lead to an engine or transmission seizure with subsequent accident serious injury or death aWARNING Use latex gloves for the maintenance op erati...

Page 21: ...akes When the road is wet from rain you should plan to use double the normal stopping dis tances since both the brakes them selves and the traction of the tires on the road are reduced by the presence of water Water on the brakes from washing your vehicle or splashed up from wet roads or crossing puddles or ditches can wet the brakes sufficiently to greatly reduce their effectiveness Failure to he...

Page 22: ...id reservoir 2 is under the upper part of the fairing on the right side of the vehicle Check the levels of the brake fluid in the reservoirs see below FRONT BRAKE p 40 REAR BRAKE and the wear of the pads see p 69 CHECKING THE BRAKE PAD WEAR every 3 750 mi 6 000 km aWARNING Never use your vehicle if any portion of either brake system is leaking 2 4 2 CHECKING THE SYSTEM NOTE Carry out these checks ...

Page 23: ...cause fluid to over flow the reservoir when the pads are re newed aWARNING Use only DOT 5 or 4 fluid taken from a clean sealed container Never reuse used brake fluid Top up the reservoir with brake fluid un til the fluid covers the glass gauge 3 completely Replace the gasket 6 in its seat correct ly Replace the cover 5 Screw and tighten the two screws 4 aCAUTION After servicing the brakes always c...

Page 24: ... BRAKE PAD WEAR and the rear disc wear If the pads and or the disc do not need re placing Top up the reservoir see below TOP PING UP TOPPING UP aCAUTION Do not operate the rear brake pedal with the reservoir filler cap 2 removed This will cause brake fluid to squirt out and spill Unscrew and remove the reservoir filler cap 2 aWARNING Avoid any prolonged exposure of the brake fluid to the air The b...

Page 25: ... ly Replace and tighten the reservoir filler cap 2 aCAUTION After servicing the brakes always check them for function If the stroke of the pedal is excessive or if you detect that the effectiveness of the brakes is reduced in any way have your vehicle serviced by your Local APRILIA Dealer It may be necessary to have your dealer bleed the system or there may be some other problem with the brake sys...

Page 26: ... master cylinder piston Then screw the push rod into the clevis to obtain a minimum clearance of 0 02 0 04 in 0 5 1 mm between the master cylinder push rod and the master cylin der piston Lock the push rod in position with the lock nut 4 aCAUTION Be sure there is the specified clearance between the master cylinder push rod and the master cylinder piston If this caution is not observed the brake wi...

Page 27: ...ING Pull in the clutch lever 4 completely and put the shift lever 5 in the 1st gear Make sure that the engine does not stop that the vehicle does not tend to advance or that the clutch does not slip during the acceleration phase or while the vehicle is running aWARNING If it is not possible to properly adjust the clutch this way see your Local APRILIA Dealer NOTE Inspect the clutch cable to make s...

Page 28: ...S Use extra caution not to spill the cool ant on any hot parts of the engine It is flammable and can emit invisible nox ious fumes Always wear rubber or latex gloves when servicing the cooling system Have the coolant changed by your Local APRILIA Dealer The coolant is made up of 50 water and 50 antifreeze This mixture is ideal for most running tem peratures and ensures good protection against corr...

Page 29: ... 1 aWARNING Coolant is poisonous Do not ingest coolant under any circumstance Should you get coolant in your mouth rinse with cool water and immediately seek medical attention Coolant is also very dangerous to your skin and eyes Should you accidentally get coolant on your clothing or skin change clothes immediately Wash coolant from your skin with hot water and soap Should you get coolant in your ...

Page 30: ...r Dealer Visually check if the tires are worn and in this case have them changed If a tire should go flat while you are riding the vehicle do not attempt to continue riding Avoid abrupt braking and steering inputs and avoid shutting the trottle quickly Slowly decrease the throttle setting moving to the side of the road using the engine compression to slow you to a stop Non compliance with these in...

Page 31: ...catalytic converter if used is a metal platinum rhodium bivalent type This device provides for the oxidation of the CO carbon monoxide and of the HC unburned hydrocarbons contained in the exhaust gases changing them into carbon dioxide and steam respectively aCAUTION Do not use leaded petrol since it causes the destruction of the catalytic converter 8 534 3 2 aWARNING Tampering with the exhaust sy...

Page 32: ...gine with the engine stop switch located on the right handlebar Do not attempt to restart the engine un til the throttle has been repaired and works perfectly Failure to obey this warning can lead to a runaway with seri ously injuries or even death Your vehicle is equipped with a double ca ble throttle One cable opens the throttle when you rotate the throttle grip toward you the other closes the t...

Page 33: ...h its entire range without fouling of any kind Make sure that the fork stops touch the frame at full left and full right fork lock 68 Clutch Check the play of the clutch lever Ensure that the clutch operates without jerking or slip ping 43 Side stand and center stand Make sure that it works smoothly and that the spring tension brings it back to its normal position If necessary lubricate joints and...

Page 34: ...ve lever 1 to the ON position Make sure the dimmer switch 2 is in the low beam b position Rotate the ignition key 3 to the n ON position At this point the engine oil pressure warn ing light j 4 must come on see p 29 Engine oil pressure warning light j If the low fuel warning light g 5 comes on move the fuel valve lever 1 to the RES position Top up as soon possible see p 35 FU EL Hold the vehicle i...

Page 35: ...the idle position when the throttle grip is re leased Contact your Local APRILIA Deal er for repairs Failure to heed this warn ing can lead to a serious accident and subsequent injury or even death aWARNING As soon as the engine has started the engine oil pressure warning light j 4 must go out If this does not occur or if the warning light comes on while the engine is running this means that the o...

Page 36: ...m oil sprays Press the starter button r 11 and let the starter run for about five seconds without accelerating STARTING AFTER A LONG PERIOD OF INACTIVITY If the vehicle has not been used for several weeks it may not start immediately This may be because the fuel in the carburetors float bowl has evaporated In this case Press the starter button r 11 for about five seconds This will fill the float c...

Page 37: ...he throttle aWARNING In the event of a throttle sticking emer gency always kill the engine using the engine stop switch located near the throttle grip on the right handlebar Nev er use your vehicle if the throttle does not automatically fully return to the idle position when the throttle grip is re leased Contact your Local APRILIA Deal er for repairs Failure to heed this warn ing can lead to a se...

Page 38: ...ing of the engine this means that the oil system is not developing suffi cient pressure In this case immediate ly stop the engine and contact your Lo cal APRILIA Dealer Failure to heed this warning can lead to engine seizure up set and serious injury or even death aWARNING If the pointer 14 of the coolant temper ature indicator reaches the red area 15 stop the engine and check the coolant level se...

Page 39: ...on downhill grades the discs and pads will overheat reducing the braking effi ciency Use engine compression and downshift to retard your vehicle while going downhill Use the brakes as little as possible to maintain a safe speed Never coast downhill with the engine off and or the clutch disengaged or the transmission in neutral On roads that are wet or covered with snow ice or mud ride very slowly ...

Page 40: ...first 312 mi 500 km never exceed 4 000 rpm Between 312 mi 500 km and 625 mi 1 000 km never exceed 5 000 rpm aWARNING After the vehicle has been operated for 625 mi 1 000 km perform the checking operations shown in column After run ning in of the REGULAR SERVICE IN TERVALS CHART see p 62 Rectify any faults found Failure to heed this warn ing could lead to damage to your vehicle or engine seizure or...

Page 41: ...ut on the brakes and at the same time shift down in order to de crease the speed see p 52 RIDING Once the speed has decreased before stopping the vehicle Pull in the clutch lever 2 Pos B in or der to prevent the engine dying When the vehicle has come to rest Position the shift lever 3 in neutral green warning light q 4 on Release the clutch lever 2 Pos C If you are stopping just briefly and not sh...

Page 42: ... which could destroy not only your vehi cle but also buildings around it and cause injury or even death to people as well Stop the vehicle see p 57 STOPPING Move the engine stop switch 1 to the m OFF position aCAUTION Do not leave the ignition on if you have stopped the engine by moving the en gine stop switch to the m OFF posi tion as this will discharge the battery When the vehicle has come to r...

Page 43: ...rip 5 and the left passenger grab rail 6 Put the stand lever 7 down aWARNING Make sure the vehicle is stable when parked If it falls down it will certainly be damaged and could injure others as well SIDE STAND Grab the left handle grip 5 and the left passenger grab rail 6 Put the side stand 8 down with your right foot Make sure it is extended com pletely and all the way forward Lean the vehicle to...

Page 44: ...se the appropriate aprilia Body Guard armored cable or an ad ditional anti theft device Make sure that all legal requirements reg istration license plates insurance etc are in order Write down your name address and tele phone number and the vehicle identifica tion number in the space below to facili tate finding the owner in case your vehicle is recovered after theft SURNAME NAME ADDRESS TELEPHONE...

Page 45: ...lly be per formed by the user However in some cases specific tools and technical exper tise may be required Do not hesitate to contact your Local aprilia Dealer who has all the latest factory infor mation and tools to properly service your vehicle Remember that many service operations if done improperly can be very hazardous If you have any questions about your ability to carry out the operations ...

Page 46: ...tion C Light system C C Safety switches C C Brake fluid C Coolant every 625 mi 1 000 km C Engine oil every 312 mi 500 km C Tires C every 625 mi 1 000 km C Tire pressure every month R Engine idling rpm R R Engine oil pressure warning light j at every start C Spoke tension C C Front and rear brake pad wear C before every trip and every 3 750 mi 6 000 km C Swinging arm pivot C C check and clean adjus...

Page 47: ... Tappet clearance C C Braking systems C C Cooling system C C Brake fluid C every 2 years S Brake pads if worn S Coolant every 2 years S Fork oil S Fuel valve C C Wheels tires C Nut bolt screw tightening C C Suspensions and attitude C C Brake fluid bleeding C Fuel pipes C every 4 years S C check and clean adjust lubricate or change if necessary P clean S change R adjust Perform these maintenance op...

Page 48: ...BER The engine number is stamped on the rear part of the left engine crankcase Engine no 2 2 Carefully read p 61 MAINTENANCE aWARNING Do not use gasoline or flammable sol vents to wash the air cleaner in order to avoid fire or explosion Inspect the air cleaner to ensure that it has not become clogged every 3 750 mi 6 000 km or 8 months of use Renew the air cleaner every 7 500 mi 12 000 km The air ...

Page 49: ...ragile and can be easily damaged Nev er use a screwdriver or other sharp hard tool to remove the air cleaner itself aWARNING During this operation always wear gog gles which provide your eyes with 360 protection Be very careful using com pressed air jets they can cause serious personal injury if directed towards your body Grasp the air cleaner vertically and strike it repeatedly on a clean hard ho...

Page 50: ...e tightening torque of the fas teners regularly and always use a torque wrench when reinstalling them Failure to comply with this warning could allow one of these components to be lost which could lock a wheel or cause other handling problems with consequent overturning and risk of se rious injury or even death CHECKING NOTE Position the vehicle on firm and flat ground Stop the engine and let it c...

Page 51: ...rew and extract the plug dipstick 1 Clean the part in contact with the oil with a clean cloth aCAUTION To check the oil level the plug dipstick 1 must neither be screwed nor tight ened in the filler neck 2 Insert the plug dipstick 1 completely in the filler neck 2 without screwing or tightening it 3 Withdraw the plug dipstick 1 again and read the oil level on the graduated mark ing MAX maximum lev...

Page 52: ... travel NOTE Carry out this operation with care Do not pull the fork back and forth too vigorously or you may observe play in the center stand which would give you a false indication of fork head slack Repeat this operation several times until you are confident you have accurately as sessed the fork head slack There should be no fore and aft slack If you detect any slack arrange to have your vehic...

Page 53: ...f the brake pads be fore every trip CHECKING WEAR OF THE BRAKE PADS Place the vehicle on the center stand see p 59 POSITIONING THE VEHICLE ON THE STAND Perform a visual check of the friction ma terial thickness Use a flashlight See the arrows 1 and 2 above If the friction material on one pad of a pair front 3 or rear 4 is worn to 0 06 in 1 5 mm or less replace both pads aWARNING Excessive wear of ...

Page 54: ... engine is running unless the transmis sion is in neutral To check the proper functioning of the safety switch 3 Sit on the vehicle in the normal riding po sition Retract the side stand 2 aWARNING Exhaust gases contain carbon monox ide which is extremely poisonous if in haled Do not start the engine in closed or bad ly ventilated rooms Failure to observe this warning may cause loss of consciousnes...

Page 55: ...front brake lever 2 is neces sary remove the right hand guard see p 82 REMOVING THE HAND GUARDS safety switch on the side stand 3 clutch lever switch 4 NOTE To be able to check the clutch le ver switch 4 is necessary remove the left hand guard see p 82 REMOVING THE HAND GUARDS Make sure that there is no dirt or mud on the switch The switch pin must move freely and without interference returning au...

Page 56: ...damaged in any way see your Local APRILIA Dealer 2 2 3530 3 The rear suspension consists of a spring shock absorber unit fixed to the frame by means of silent blocks To set the vehicle attitude the rear shock absorber is provided with an adjusting ring nut 1 a locking ring nut 2 and a screw 3 for the adjustment of the damping on extension The standard adjustment set by the manu facturer is suitabl...

Page 57: ...ecessary to also increase the hydraulic damping in order to avoid a jerky ride ADJUSTING THE PRELOAD OF THE SPRING AND OF THE HYDRAULIC BRAKING WITH EXTENDED SHOCK ABSORBER Soft adjustment for light load for exam ple solo rider Spring Rotate the handwheel 4 completely leftwards counterclockwise Shock absorber Rotate the adjusting screw 5 complete ly leftwards counterclockwise Intermediate adjustme...

Page 58: ...m Place the support 2 under the vehicle and a soft cloth 3 between them so that the front wheel can move freely and the vehicle cannot fall down Place a support 4 under the tire in such a way as to keep the wheel in its position after loosening it aWARNING Make sure that the vehicle is stable If it falls it may cause damage to by standers and other property as well as being damaged itself Have a h...

Page 59: ...ersonal injury Move the wheel around until the axle hole and the axle clamps are aligned Shift the mudguard support 7 only as much as necessary to insert the axle 8 partially from the right side of the vehicle Push in the axle 8 completely fitting the spacer ring 9 and tighten it to its appropriate tightening torque Axle 8 tightening torque 57 86 ftlb 80 Nm Correctly position the mudguard support ...

Page 60: ...way as to keep the wheel in its position after loosening it Hold the axle 2 from rotating with the appropriate Allen wrench Wheel nut 3 tightening torque 72 33 ftlb 100 Nm Remove the nut 3 and washer 4 NOTE To facilitate the extraction of the axle 2 slightly raise the wheel Remove the axle 2 from the right side and recover the washer 5 aWARNING Keep your fingers well away from the chain and sprock...

Reviews: