6
- 37
INSTALACIÓN ELÉCTRICA
ELECTRICAL SYSTEM
6.12 SUBSTITUCIÓN BOMBILLAS
Lea con mucha atención 1.4 (PRECAUCIONES E IN-
FORMACIONES GENERALES).
Antes de substituir una bombilla, gire el inte-
rruptor de encendido hacia la posición “
m
”.
Substituya la bombilla poniéndose guantes
limpios o utilizando un paño limpio y seco.
No deje huellas sobre la bombilla ya que po-
drían causar el sobrecalentamiento y, por lo
tanto, la rotura de la misma.
Si toca la bombilla con las manos sin protección, lim-
pie las posibles huellas con alcohol, para evitar que
se dañen anticipadamente.
NO FUERCE LOS CABLES ELÉCTRICOS.
6.12.1 SUBSTITUCION BOMBILLAS FARO
DELANTERO
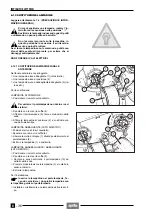
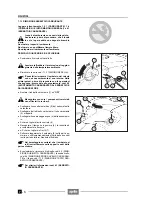
En el faro delantero están alojadas:
◆
Una bombilla luz larga (1) (lado izquierdo).
◆
Una bombilla luz de posición (2).
◆
Una bombilla luz de cruce/luz larga (3) (lado derecho).
Para la sustitución:
BOMBILLA DE POSICION
◆
Coloque el vehículo sobre el caballete.
Para extraer el casquillo portalámparas no tire
de los cables eléctricos.
◆
Desplace con las manos el elemento de protección
(4).
◆
Sujete el casquillo portalámparas (5), estírelo y desco-
néctelo de su sede.
◆
Extraiga la bombilla de posición (2) y sustitúyala con
otra del mismo tipo.
BOMBILLA LUZ LARGA (LADO IZQUIERDO)
◆
Coloque el vehículo sobre el caballete.
◆
Desplace con las manos el elemento de protección (6).
◆
Suelte el muelle de retención (7) colocado detrás del
casquillo portalámparas (8).
◆
Extraiga la bombilla (1) y sustitúyala.
BOMBILLA LUZ DE CRUCE/LUZ LARGA
(LADO DERECHO)
Lea con cuidado pág. 58 (BOMBILLAS).
◆
Coloque el vehículo sobre el caballete.
◆
Desplace con las manos el elemento de protección (9).
◆
Gire en sentido antihorario el casquillo portalámparas
(10) y extráigalo de su sede.
◆
Presione moderadamente la bombilla (3) y gírela en
sentido antihorario.
◆
Extraiga la bombilla.
Para la instalación:
Introduzca la bombilla en el casquillo porta-
lámparas haciendo coincidir las dos espigas
con las correspondientes guías sobre el portalámpa-
ras.
◆
Instale correctamente otra bombilla del mismo tipo.
a
a
a
c
6.12 CHANGING THE BULBS
Read 1.4 carefully (PRECAUTIONS AND GENERAL
INFORMATION).
Before changing a bulb, turn the ignition
switch to the “
m
” position.
Change the bulb wearing clean gloves or
using a clean, dry cloth.
Do not leave fingerprints on the bulb as they
may cause its overheating and consequent
breakage.
If you touch the bulb with bare hands, remove any
fingerprints with alcohol to avoid damaging it ahead
of time.
DO NOT FORCE THE ELECTRIC CABLES.
6.12.1 CHANGING THE HEADLIGHT
BULBS
The headlight contains:
◆
One high beam bulb (1) (left side).
◆
One parking light bulb (2).
◆
One low/high beam bulb (3) (right side).
To change the bulbs, proceed as follows:
PARKING LIGHT BULB
◆
Position the vehicle on the stand.
To extract the bulb socket, do not pull the
electric wires.
◆
Move the protection element (4) with your hands.
◆
Seize the bulb socket (5), pull it and remove it from its
seat.
◆
Withdraw the parking light bulb (2) and replace it with
one of the same type.
HIGH BEAM BULB (LEFT SIDE)
◆
Position the vehicle on the stand.
◆
Move the protection element (6) with your hands.
◆
Release the check spring (7) positioned at the rear of
the bulb socket (8).
◆
Extract the bulb (1) and replace it.
LOW/HIGH BEAM BULB (RIGHT SIDE)
◆
Position the vehicle on the stand.
◆
Move the protection element (9) with your hands.
◆
Rotate the bulb socket (10) anticlockwise and extract it
from its seat.
◆
Slightly press the bulb (3) and rotate it anticlockwise.
◆
Extract the bulb.
For the installation:
Insert the bulb in the bulb socket, making the
two bulb pins coincide with the relevant gui-
des on the socket.
◆
Correctly install a new bulb of the same type.
a
a
a
c
Summary of Contents for Pegaso 650
Page 1: ......
Page 3: ...0 4 NOTE NOTES ANMERKUNGEN ...
Page 4: ...1 1 1 2 3 4 5 6 7 8 INFORMAZIONI GENERALI INFORMACIONES GENERALES GENERAL INFORMATION ...
Page 42: ......
Page 69: ...3 1 1 2 3 4 5 6 7 8 MOTORE MOTOR ENGINE ...
Page 90: ...3 22 MOTORE NOTE NOTAS NOTES ...
Page 91: ...4 1 1 2 3 4 5 SISTEMA DI ALIMENTAZIONE SISTEMA DE ALIMENTACIÓN FUEL SYSTEM ...
Page 116: ...4 26 SISTEMA DI ALIMENTAZIONE NOTE NOTAS NOTES ...
Page 117: ...5 1 1 2 3 4 5 6 7 8 IMPIANTO DI RAFFREDDAMENTO SISTEMA DE REFRIGERACIÓN COOLING SYSTEM ...
Page 130: ...5 14 IMPIANTO DI RAFFREDDAMENTO SISTEMA DE REFRIGERACIÓN COOLING SYSTEM NOTE NOTAS NOTES ...
Page 131: ...6 1 6 1 2 3 4 5 6 7 8 IMPIANTO ELETTRICO INSTALACIÓN ELÉCTRICA ELECTRICAL SYSTEM ...
Page 176: ...IMPIANTO ELETTRICO INSTALACIÓN ELÉCTRICA ELECTRICAL SYSTEM 6 46 NOTE NOTAS NOTES ...
Page 177: ...7 1 1 2 3 4 5 6 7 8 CICLISTICA PARTE CICLO CHASSIS PARTS ...
Page 226: ... 67 3 57 2 66 6 3 576 7 50 5827 3267 5 25 58 75 6 5 5 5 ...
Page 242: ... 67 3 57 2 66 6 3 576 7 66 5 12 17 5 25 5 12 17 52 5217 5 ...
Page 246: ... 67 3 57 2 66 6 3 576 7 70 5 12 3267 5 25 5 12 75 6 52 5 5 5 ...
Page 272: ... 67 3 57 2 66 6 3 576 7 96 NOTE NOTAS NOTES ...
Page 311: ...INFORMAZIONI PER LE RIPARAZIONI INFORMACIONES PARA LAS REPARACIONES REPAIRS 8 39 ...


