7
- 53
3$57(&,&/2
&+$66,63$576
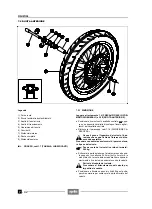
7.3.1 DESMONTAJE
Lea con mucho cuidado 1.4 (PRECAUCIONES E IN-
FORMACIONES GENERALES) y 2.29 (RUEDA TRA-
SERA).
X
Coloque el vehículo sobre el caballete central
-
o
sobre un especial caballete de sostén fijado en los pi-
votes del caballete central.
X
Desmonte el protector de cárter, véase 7.1.9 (DES-
MONTAJE PROTECTOR DE CARTER).
A causa del peso y del espacio que ocupa el
vehículo, la operación que sigue a continua-
ción necesita la intervención de un segundo
operador.
Siga adelante con cuidado y compruebe si puede so-
portar el peso del vehículo.
Peso en vacío del vehículo (en orden de mar-
cha): 200 kg.
X
Levante la parte trasera del vehículo y coloque un so-
porte adecuado (con altura 350 mm) por debajo del
motor de manera que la rueda trasera tenga espacio
suficiente para moverse libremente y para evitar la
caída del vehículo.
Peligro caída del vehículo.
Provea a equilibrar el vehículo para que no
caiga.
X
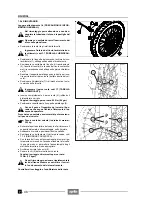
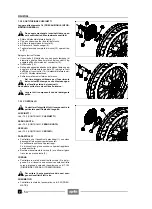
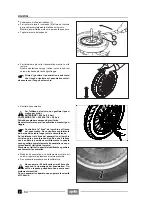
Bloquee con la llave correspondiente la rotación del
eje de la rueda (1).
X
Destornille y quite la tuerca (2) y guarde la arandela
(3).
Para facilitar la extracción del eje de la rueda,
levante moderadamente la rueda.
X
Extraiga manualmente el eje de la rueda (1) y guarde
la arandela (4).
X
Haga avanzar la rueda trasera y suelte la cadena de
transmisión (5) de la corona dentada (6).
X
Extraiga desde la parte trasera la rueda del basculan-
te, poniendo cuidado al extraer el disco de la pinza del
freno.
No accione la palanca del freno trasero tras
haber extraído la rueda, en caso contrario el
émbolo de la pinza del freno podría salirse de
su alojamiento, causando la pérdida del líquido de
los frenos.
7.3.1 DISASSEMBLY
Read 1.4 (PRECAUTIONS AND GENERAL INFORMA-
TION) and 2.29 (REAR WHEEL) carefully.
X
Position the vehicle on the centre stand
-
or on an
apposite support stand fixed to the centre stand cou-
plings.
X
Remove the oil pan guard, see 7.1.9 (REMOVING
THE OIL PAN GUARD).
Due to the weight and dimensions of the vehi-
cle, the following operation cannot be per-
formed by one person only.
Proceed with care and make sure that you can sup-
port the weight of the vehicle.
Weight of the vehicle without driver (ready for
starting): 200 kg.
X
Raise the rear part of the vehicle, have a suitable sup-
port (the height of which should be 350 mm) placed
under the engine, so that the rear wheel can rotate
freely and the vehicle cannot fall down.
The vehicle may fall down.
Provide for balancing the vehicle, in order to
prevent it from falling down.
X
Lock the wheel pin (1) rotation, by means of the suita-
ble spanner.
X
Unscrew and remove the nut (2) and take the washer
(3).
To facilitate the extraction of the wheel pin,
slightly raise the wheel.
X
Extract the wheel pin (1) manually and take the washer
(4).
X
Make the rear wheel advance and release the gearing
chain (5) from the crown gear (6).
X
Withdraw the wheel from the rear fork from behind,
carefully withdrawing the disc from the brake caliper.
Never pull the rear brake lever after removing
the wheel, otherwise the caliper piston may
go out of its seat, thus causing the outflow of
the brake fluid.
Summary of Contents for Pegaso 650
Page 1: ......
Page 3: ...0 4 NOTE NOTES ANMERKUNGEN ...
Page 4: ...1 1 1 2 3 4 5 6 7 8 INFORMAZIONI GENERALI INFORMACIONES GENERALES GENERAL INFORMATION ...
Page 42: ......
Page 69: ...3 1 1 2 3 4 5 6 7 8 MOTORE MOTOR ENGINE ...
Page 90: ...3 22 MOTORE NOTE NOTAS NOTES ...
Page 91: ...4 1 1 2 3 4 5 SISTEMA DI ALIMENTAZIONE SISTEMA DE ALIMENTACIÓN FUEL SYSTEM ...
Page 116: ...4 26 SISTEMA DI ALIMENTAZIONE NOTE NOTAS NOTES ...
Page 117: ...5 1 1 2 3 4 5 6 7 8 IMPIANTO DI RAFFREDDAMENTO SISTEMA DE REFRIGERACIÓN COOLING SYSTEM ...
Page 130: ...5 14 IMPIANTO DI RAFFREDDAMENTO SISTEMA DE REFRIGERACIÓN COOLING SYSTEM NOTE NOTAS NOTES ...
Page 131: ...6 1 6 1 2 3 4 5 6 7 8 IMPIANTO ELETTRICO INSTALACIÓN ELÉCTRICA ELECTRICAL SYSTEM ...
Page 176: ...IMPIANTO ELETTRICO INSTALACIÓN ELÉCTRICA ELECTRICAL SYSTEM 6 46 NOTE NOTAS NOTES ...
Page 177: ...7 1 1 2 3 4 5 6 7 8 CICLISTICA PARTE CICLO CHASSIS PARTS ...
Page 226: ... 67 3 57 2 66 6 3 576 7 50 5827 3267 5 25 58 75 6 5 5 5 ...
Page 242: ... 67 3 57 2 66 6 3 576 7 66 5 12 17 5 25 5 12 17 52 5217 5 ...
Page 246: ... 67 3 57 2 66 6 3 576 7 70 5 12 3267 5 25 5 12 75 6 52 5 5 5 ...
Page 272: ... 67 3 57 2 66 6 3 576 7 96 NOTE NOTAS NOTES ...
Page 311: ...INFORMAZIONI PER LE RIPARAZIONI INFORMACIONES PARA LAS REPARACIONES REPAIRS 8 39 ...


