2
- 45
OPERACIONES DE MANTENIMIENTO PERIÓDICO Y DE
PUESTA A PUNTO
PERIODIC SERVICE AND SETTING UP OPERATIONS
2.24 DIRECCIÓN
Lea con mucha atención 1.4 (PRECAUCIONES E IN-
FORMACIONES GENERALES).
Controle tras los primeros 1000 km (o 4 meses) y sucesi-
vamente, cada 6000 km (o 8 meses).
Para una mejor maniobrabilidad, la dirección está equi-
pada con cojinetes de rodadura.
Para una fácil rotación del manillar y una conducción se-
gura, hay que ajustar correctamente la dirección.
Si la dirección es demasiado dura, obstaculiza la rotación
fácil del manillar, mientras que si es demasiado blanda el
vehículo tiene poca estabilidad.
2.24.1 CONTROL JUEGO COJINETES
◆
Saque el protector de carter, véase 7.1.9 (DESMON-
TAJE PROTECTOR DE CARTER).
A causa del peso y del espacio que ocupa el
vehículo la operación que sigue a continua-
ción necesita la intervención de un segundo
operador. Siga adelante con cuidado y compruebe si
puede soportar el peso del vehículo.
Peso en vacío del vehículo (en orden de mar-
cha): 200 kg.
◆
Levante la parte delantera y coloque un soporte ade-
cuado (con altura 350 mm) por debajo del motor, de
manera que la rueda delantera tenga espacio suficien-
te para moverse libremente y para evitar la caída del
vehículo.
◆
Mantenga bajada la parte trasera del vehículo.
◆
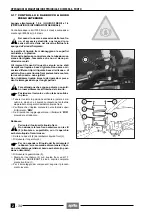
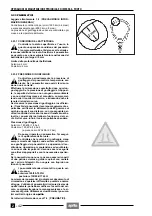
Sacuda la horquilla en el sentido de marcha (véase fi-
gura).
◆
Ajuste en caso de que note un juego.
2.24.2 AJUSTE JUEGO COJINETES
◆
★
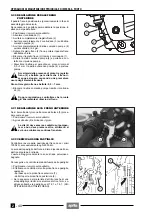
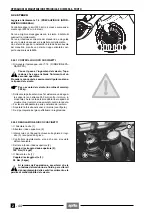
Afloje el tornillo (1).
◆
Afloje el tornillo superior (2).
◆
Ajuste el juego mediante la tuerca de regulación (3)
con la llave correspondiente.
◆
Controle varias veces hasta que haya solucionado el
problema.
◆
Apriete hasta el fondo el tornillo superior (2).
Par de apriete del tornillo superior (2):
100 Nm (10 kgm)
◆
★
Apriete el tornillo (1).
Par de apriete del tornillo (1): 50 Nm (5 kgm).
Cuando haya finalizado la operación, cerció-
rese que la rotación del manillar sea fluida,
para evitar que las bolas se dañen y que el ve-
hículo pierda maniobrabilidad.
a
c
a
2.24 STEERING
Read 1.4 carefully (PRECAUTIONS AND GENERAL
INFORMATION).
Check after the first 1000 km (or 4 months) and then after
every 6000 km (or 8 months).
To ensure improved handling the steering is equipped
with rolling bearings.
The steering must be adjusted correctly to provide
smooth rotation of the handlebar and safe driving.
A tight steering hinders the smooth rotation of the handle-
bar whereas a slack steering implies inadequate stability.
2.24.1 CHECKING THE BEARING SLACKS
◆
Remove the oil pan guard, see 7.1.9 (REMOVING
THE OIL PAN GUARD).
Due to the weight and dimensions of the vehi-
cle, the following operation cannot be per-
formed by one person only.
Proceed with care and make sure that you can sup-
port the weight of the vehicle.
Weight of the vehicle without driver (ready for
starting): 200 kg
◆
Raise the front part of the vehicle and have a suitable
support (the weight of which should be about 350 mm)
placed under the engine, so that the front wheel can
rotate freely and the vehicle cannot fall down.
◆
Keep the rear part of the vehicle down.
◆
Shake the fork in the direction of travel (see figure).
◆
In case you find any slack, adjust the steering.
2.24.2 ADJUSTING THE BEARING SLACKS
◆
★
Loosen the screw (1).
◆
Loosen the upper screw (2).
◆
Tighten the ring nut (3) with the suitable spanner, elim-
inating the slack.
◆
Repeat the check-up until the inconvenience is reme-
died.
◆
Completely tighten the upper screw (2).
Driving torque of upper screw (2): 100 Nm (10 kgm)
◆
★
Tighten the screw (1).
Driving torque of screw (1): 50 Nm (5 kgm).
On completion of operation make sure that
the rotation of the handlebar is smooth in or-
der to avoid damage to the balls and the loss
of manoeuvrability of the vehicle.
a
c
a
Summary of Contents for Pegaso 650
Page 1: ......
Page 3: ...0 4 NOTE NOTES ANMERKUNGEN ...
Page 4: ...1 1 1 2 3 4 5 6 7 8 INFORMAZIONI GENERALI INFORMACIONES GENERALES GENERAL INFORMATION ...
Page 42: ......
Page 69: ...3 1 1 2 3 4 5 6 7 8 MOTORE MOTOR ENGINE ...
Page 90: ...3 22 MOTORE NOTE NOTAS NOTES ...
Page 91: ...4 1 1 2 3 4 5 SISTEMA DI ALIMENTAZIONE SISTEMA DE ALIMENTACIÓN FUEL SYSTEM ...
Page 116: ...4 26 SISTEMA DI ALIMENTAZIONE NOTE NOTAS NOTES ...
Page 117: ...5 1 1 2 3 4 5 6 7 8 IMPIANTO DI RAFFREDDAMENTO SISTEMA DE REFRIGERACIÓN COOLING SYSTEM ...
Page 130: ...5 14 IMPIANTO DI RAFFREDDAMENTO SISTEMA DE REFRIGERACIÓN COOLING SYSTEM NOTE NOTAS NOTES ...
Page 131: ...6 1 6 1 2 3 4 5 6 7 8 IMPIANTO ELETTRICO INSTALACIÓN ELÉCTRICA ELECTRICAL SYSTEM ...
Page 176: ...IMPIANTO ELETTRICO INSTALACIÓN ELÉCTRICA ELECTRICAL SYSTEM 6 46 NOTE NOTAS NOTES ...
Page 177: ...7 1 1 2 3 4 5 6 7 8 CICLISTICA PARTE CICLO CHASSIS PARTS ...
Page 226: ... 67 3 57 2 66 6 3 576 7 50 5827 3267 5 25 58 75 6 5 5 5 ...
Page 242: ... 67 3 57 2 66 6 3 576 7 66 5 12 17 5 25 5 12 17 52 5217 5 ...
Page 246: ... 67 3 57 2 66 6 3 576 7 70 5 12 3267 5 25 5 12 75 6 52 5 5 5 ...
Page 272: ... 67 3 57 2 66 6 3 576 7 96 NOTE NOTAS NOTES ...
Page 311: ...INFORMAZIONI PER LE RIPARAZIONI INFORMACIONES PARA LAS REPARACIONES REPAIRS 8 39 ...

