4
ANCHOR INSTALLATION INSTRUCTIONS
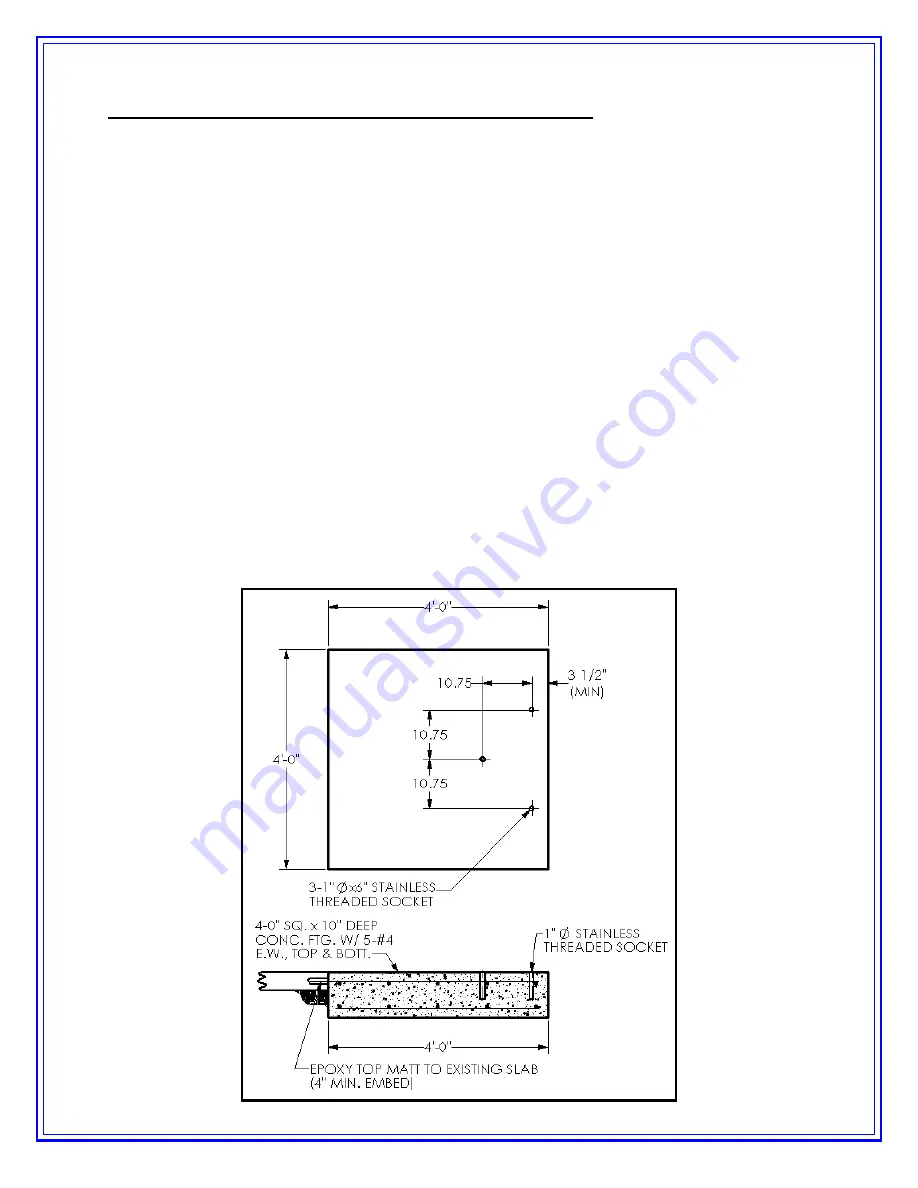
Before installing the anchors, it is necessary to determine where you want to place the lift on
your deck. You will want to locate the lift as close to the outside wall of your pool/spa as
possible to ensure that the seat arm clears your spa/pool wall. As shown in figure 1 below, the
lift must be a minimum 3 ½ ” from the front anchor holes to the pool/spa wall. Also, you will
want to allow enough room for the seat arm to swing around away from the pool/spa. Refer to
the specifications for lift dimensions.
1.) The lift is shipped with 4” anchors. If you are installing the anchors and have not
received the lift, use the dimensions from figure 2 below to set the anchor locations.
Make a mark on the deck with a marker or chalk at each anchor location. If you have the
lift and have not installed the anchors, position the lift at the desired location and mark
the concrete at each anchor location.
2.) Using the
1 1/8” [30mm] masonry bit drill a hole in the concrete deck to a depth of 4”
[102mm] at each of the three anchor locations. The holes must be drilled plum, or the lift
bolts will not thread into the anchors. Once the holes have been drilled to the proper
depth, clean debris out of anchor holes.
3.) Check that the holes are deep enough by dropping a 4” anchor into the hole to make sure
it comes out flush with the deck surface. If not re-drill the hole/holes until they are flush.
4.) Fill each hole ½ full with expanding epoxy or hydraulic cement. Thread a 1-1/2” bolt into
each anchor and then insert the anchor into the hole, twisting as you go. Clean off any
excess epoxy from around the hole, and make sure not to get any epoxy on the ½”
threads.
FIGURE 2
Summary of Contents for PRO SPA 60
Page 14: ...14 EXPLODED VIEW PRO SPA 60 ...


