background image

Cousteau/ SEA First Stage Service & Repair Manual

13

© 2000 Aqua Lung America, Inc.

6.

Repeat the adjustment procedure in step 4 to adjust the
Cousteau/ SEA first stage intermediate pressure to exactly
135 psi.  Repeatedly purge the second stage or open and shut
the test gauge bleed valve at least 15 times to ensure that the
intermediate pressure locks up consistently and remains stable
at 135 (

±

5) psi, with no signs of creeping or fluctuation.

7.

Final Assembly – “DRY” Environmental Kit

a.

While the regulator is still pressurized with 2,500 – 3,000
psi, insert the stem of the piston(33) into the hex opening
of the adjustment screw.

b.

Lay the external diaphragm(36) inside the external dia-
phragm retainer(36), and tamp it down past the threads to
ensure that it seats evenly against the sealing surface.

c.

Mate the external diaphragm retainer onto the spring
retainer, and apply the retainer wrench (P/N 0812-47) to
tighten it clockwise until completely snug.

d.

Cycle the regulator to ensure that the intermediate pres-
sure has not dropped below 135 psi.  If necessary, depres-
surize the regulator and disassemble the environmental kit
to reset the intermediate pressure, and repeat steps 6-7.

8.

After performing the overhaul and adjustment procedures
outlined in the Aqua Lung Service & Repair Manual provided
for the second stage, connect the first and second stage regu-
lators to perform the following tests:

9.

External Leak Test – Connect the regulator to a cylinder
which contains 2,500 - 3,000 psi, and open the cylinder valve
to pressurize the system.  Submerge the cylinder and regulator
in a test tank of fresh water, and observe closely for up to one
minute to check for the formation of bubbles.  If a steady
stream of bubbles is present, the system must be disassembled
at the source to check sealing surfaces, assembly sequence,
and component positioning in order to correct the problem(s).

NOTE:  Extremely small leaks may be better detected by
applying a soap solution or Snoop™ to the leak area.
Bubble streams will indicate the source of the leak.  Before
disassembling to correct any leaks, rinse the entire regulator
thoroughly with fresh water and blow out all residual mois-
ture with filtered, low-pressure (30 psi) air.  Disassemble and
remedy the problem, referring to Table 1 – Troubleshooting.

10. Subjective Breathing Test – Depress the second stage purge to

ensure that the volume of airflow is adequate to clear the
second stage.  Then, breathe deeply from the mouthpiece.  A
properly serviced and adjusted regulator should deliver a
smooth, uninterrupted airflow upon deep inhalation; without
excessive effort, hesitation, or freeflow.  If any abnormalities
or problems occur, refer to Table 1 – Troubleshooting.

This concludes the annual service procedures for the

Cousteau/ SEA First Stage.

Summary of Contents for Cousteau/ SEA

Page 1: ...Cousteau SEA First Stage Regulator Copyright 2000 Aqua Lung America Inc Authorized Dealer SERVICE REPAIR MANUAL ...

Page 2: ...onnection 7 Reassembly Procedures 8 Reassembly of Yoke Connection 10 Reassembly of DIN Connection 10 Final Adjustment and Testing Procedures 12 Table 1 Troubleshooting Guide 14 Table 2 Recommended Tool List 15 Table 3 Standard Parts Replacement Schedule 16 Table 4 Torque Specifications 17 Table 5 Test Bench Specifications 17 Procedure A Cleaning Lubrication 18 Table A Recommended Lubricants Cleane...

Page 3: ...utlined in the Regulator Owner s Manual GENERAL GUIDELINES 1 In order to correctly perform the procedures outlined in this manual it is important to follow each step exactly in the order given Read over the entire manual to become familiar with all procedures before attempting to disassemble or service the Cousteau SEA first stage and to learn which specialty tools and replacement parts will be re...

Page 4: ...n may cause further damage to the finish 4 Closely examine all other parts of the first stage for any other signs of external damage or corrosion 5 If present examine the external diaphragm of the DRY environmental protection kit to determine whether moisture has entered the sealed chamber above the main diaphramg IMMERSION LEAK TEST 1 While the regulator is fully assembled and connected to a seco...

Page 5: ...nder only as far as necessary to pressurize the first stage While closely monitor ing the IP test gauge to ensure that the intermediate pressure does not rise above 200 psi slowly turn the knob of the bleed valve clockwise until it is completely shut CAUTION If a second stage is not connected to the first stage and the intermediate pressure continues to rise above 200 psi immediately reopen the bl...

Page 6: ...ridge P N 7039 09 connected to a HP port adapter P N 1020 85 into the HP port of the first stage body 10 WARNING DO NOT use a C02 cartridge which has not been discharged Doing so may cause the cartridge to rupture possibly resulting in serious personal injury 3 Secure the vise mounting tool inside a bench vise so that the first stage is positioned standing vertical outside the vice with the spring...

Page 7: ...r LP ports leaving one LP port open while the other ports are sealed 10 Direct a short burst of low pressure 50 psi air through the primary LP port to partially dislodge the diaphragm 26a from the first stage body see Fig 2 Lift out the diaphragm and discard Remove the port plugs that were installed in the previous step CAUTION DO NOT attempt to pry the diaphragm out of the first stage with a meta...

Page 8: ...inside the bore of the first stage body to ensure that is perfectly smooth and free of any scratches or other blemishes If the body shows these signs of damage or serious corrosion it must be replaced with new and cannot be reused 20 Using a magnifier closely examine the crown seating surface to check for any signs of scratches nicks or other blemishes If found discard the crown and do not attempt...

Page 9: ... 8a and turn it counter clockwise to loosen and remove from the inlet fitting 8e Remove and discard both O rings 8b 8c C Apply a 19mm open end wrench to the hex feature of the inlet fitting and turn the inlet fitting counter clockwise to loosen and remove from the first stage body Remove and discard the O ring 8f and the filter disc 8d D Closely inspect the threaded portion of the handwheel to ens...

Page 10: ...ts seating shoulder see Fig 4 3 Insert the handle of the extractor tool into the high pressure side of the body once again and press the crown into place so that it fits snugly over the seating shoulder 4 Turn the body over and stand it on a padded surface with the high pressure side facing down Place the small end of the pin support 25 inside the opening in the center of the body 5 Lay the diaphr...

Page 11: ...assembly of the D environmental protection kit at this time Instructions for final assembly follow the section titled Final Adjustment Testing Procedures 12 While holding the high pressure seat 13 by its stem insert the pin 24 into the center opening Hold the first stage above the pin with the high pressure side facing down and carefully align the end of the pin with the opening of the crown insid...

Page 12: ...e inside the inlet fitting 7 B Install a new filter 5 into the yoke retainer with the conical portion facing downward and press it firmly into place so that it seats inside the O ring Using internal circlip pliers install a circlip 4 to secure the filter NOTE Install the circlip with the flat side facing up to ensure greater holding strength C Mate the inlet fitting through the yoke 8 and into the...

Page 13: ...easure ment of 15 foot lbs 2 F Loosen the vise to remove the first stage and remove the vise mounting tool G Install the O ring 8b into the groove at the top of the inlet fitting and fasten the DIN protective cap over the DIN connection 20 Install all O rings 20 22 onto all hoses and port plugs 21 23 Install all LP and HP hoses and port plugs into the body and tighten the port plugs clockwise unti...

Page 14: ...ediate pressure does not rise above 120 psi slowly turn the knob of the bleed valve clockwise until it is completely shut CAUTION If a second stage is not connected to the first stage and the intermediate pressure rises above 200 psi immediately reopen the bleed valve of the test gauge and shut off the air supply Refer directly to Table 1 Trouble shooting and remedy as needed before proceeding fur...

Page 15: ...l provided for the second stage connect the first and second stage regu lators to perform the following tests 9 External Leak Test Connect the regulator to a cylinder which contains 2 500 3 000 psi and open the cylinder valve to pressurize the system Submerge the cylinder and regulator in a test tank of fresh water and observe closely for up to one minute to check for the formation of bubbles If a...

Page 16: ... Sealing surface of HP crown 11 6 Replace HP crown damaged 7 Springblock springs 14a 14b 7 Replace springblock springs weakened or damaged Low intermediate pressure 1 First stage improperly adjusted 1 Readjust adjustment screw 31 2 Main spring 29 damaged 2 Replace main spring 3 Spring retainer 28 or 32 loose 3 Tighten to 20 2 foot lbs External air leakage 1 Spring retainer 28 or 32 loose 1 Tighten...

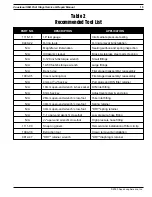
Page 17: ...5 Vise mounting tool First stage disassembly reassembly N A 4mm or 5 32 hex key Port plugs and DIN filter retainer N A 19mm open end wrench hex socket DIN inlet fitting N A 8mm hex key Adjustment screw end plug N A 26mm open end wrench crow foot Yoke inlet fitting N A 30mm open end wrench crow foot Spring retainer N A 34mm open end wrench crow foot DRY spring retainer N A 9 16 open end wrench crow...

Page 18: ...TION KEY NUMBER QTY 8200 94 O ring 3 1 8630 51 Circlip 4 1 1068 29 Filter 5 1 8200 14 O ring 6 1 8244 08 O ring 9 1 8200 38 O ring 12 1 1059 40 High Pressure Seat 13 1 8200 80 O ring 15 1 8280 05 Backup Ring 16 1 8244 07 O ring 18 1 9570 04 O ring 20 2 8200 11 O ring 22 4 1034 25 Diaphragm w Washer 26 1 1063 37 Environmental Diaphragm 39 1 ...

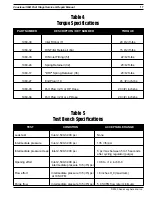
Page 19: ...2 inch lbs 1063 04 Port Plug 23 or LP Hose 20 2 inch lbs Table 4 Torque Specifications Table 5 Test Bench Specifications TEST CONDITION ACCEPTABLE RANGE Leak test Inlet 2 500 3 000 psi None Intermediate pressure Inlet 2 500 3 000 psi 135 5 psi Intermediate pressure creep Inlet 2 500 3 000 psi 5 psi max between 5 to 15 seconds after cycling regulator purge Opening effort Inlet 2 500 3 000 psi 0 8 t...

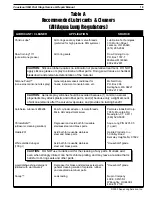
Page 20: ...l residue Remove parts from the acid bath and place directly into this rinse Agitate lightly and allow to soak for 5 10 minutes Remove and blow dry with low pressure 25 psi filtered air and inspect closely to ensure proper cleaning and like new condition ANODIZED ALUMINUM PLASTIC RUBBER PARTS Anodized aluminum parts and parts made of plastic or rubber such as box bottoms box tops dust caps etc may...

Page 21: ...d brass parts 50 Valley Road Berkeley Heights NJ 07922 White distilled vinegar Acid bath for reusable stainless Household grade 100 gr steel and brass parts Liquid dishwashing detergent Degreaser for brass and stainless steel parts Household grade diluted with warm water general cleaning solution for plastic rubber and anodized aluminum parts Snoop Leak testing Nupro Company 400 E 345th St Willoug...

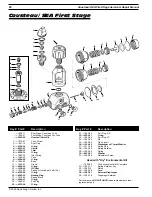
Page 22: ... 1063 22 Body 11 1060 27 Crown 12 8200 38 O ring 13 1059 40 HP Seat 14 1015 09 Spring Kit includes 14a 14b 15 8200 80 O ring 16 8280 05 Backup Ring 17 1015 65 Spring Block 18 8244 07 O ring 19 1063 27 End Plug 20 9570 04 O ring 21 1063 03 Port Plug HP 22 8200 11 O ring 23 1063 04 Port Plug LP 24 1063 23 Pin 25 1060 22 Pin Support 26 1034 25 Diaphragm w Thrust Washer 27 1017 29 Spring Pad 28 1063 2...

Page 23: ...First Stage Cousteau Dry EAN 9002 06 Overhaul Parts Kit pre cleaned sealed 1 1063 94 Decal EAN 2 1075 06 Yoke Screw 3 1073 28 Dust Cap Green 4 n a O ring EAN 5 8630 51 Circlip 6 1068 29 Filter Conical 7 n a O ring EAN 8 1063 39 Inlet Fitting 9 1073 11 Yoke 10 n a O ring EAN 11 1073 24 Color Ring EAN 12 1063 22 Body 13 1060 27 Crown 14 n a O ring EAN 15 1059 40 HP Seat 16 1015 09 Spring Kit include...

Page 24: ...2340 Cousteau Court Vista California 92083 Phone 760 597 5000 Fax 760 597 4900 www aqualung com ...

Reviews: