background image


15 


Fig. 1: Qube 40


3. Installazione 


Fissare  il  Qube  al  pannello  dell'acquario  utilizzando  il  supporto.  Non  torcere  il  supporto,  altrimenti  il  cavo 

all'interno del collo d'oca potrebbe danneggiarsi. 


Attenzione:

 mantenere puliti e asciutti i pulsanti luminosi; assicurati anche che le tue mani siano asciutte prima 

di toccare la luce, altrimenti i tasti touch potrebbero non funzionare. 


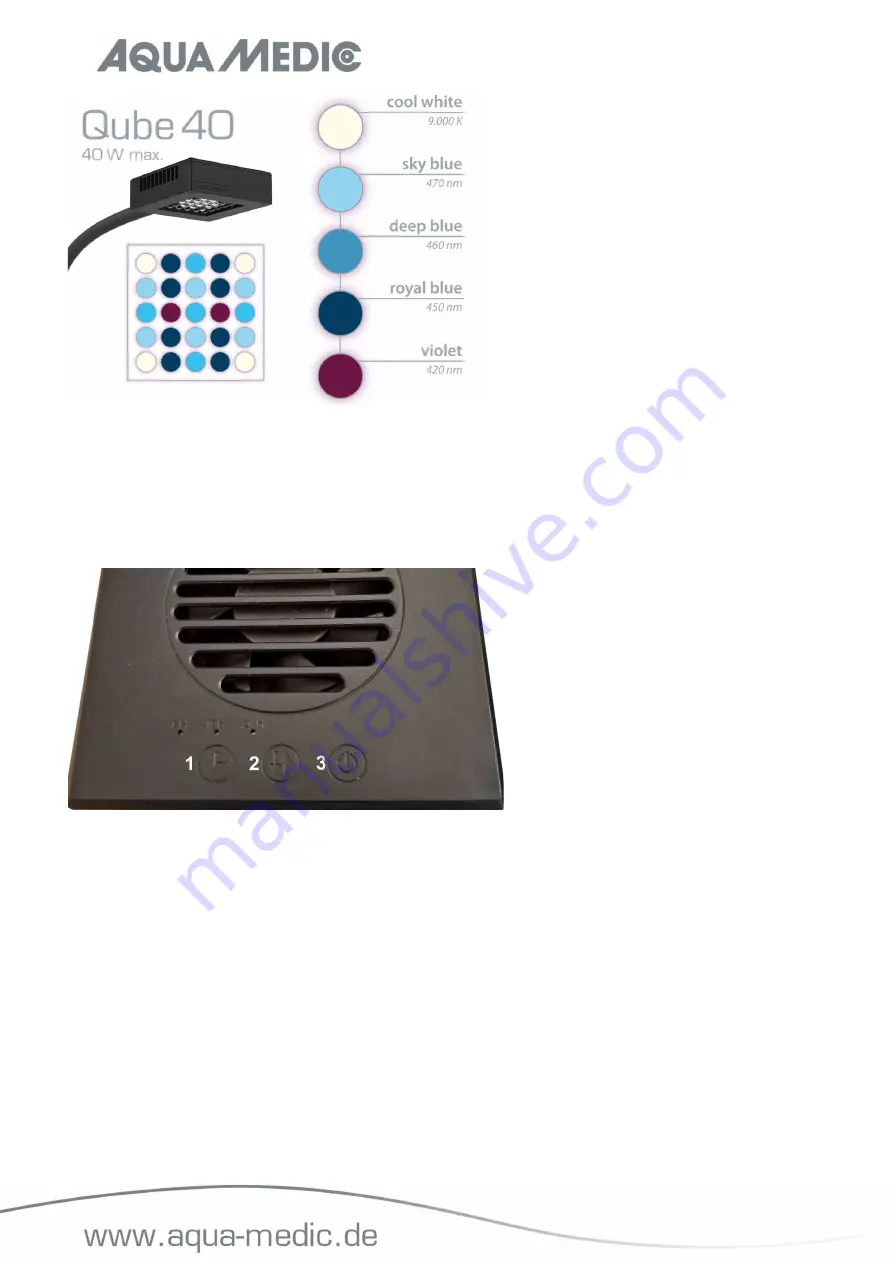
Fig. 2: Pannello touch 


Pulsante On/Off (3) 


Toccare il pulsante On/Off per accendere la luce. Dopo aver toccato nuovamente il pulsante On/Off, il Qube si 

spegne. Quando accendi la luce, dovrebbe accendersi immediatamente. In caso contrario, toccare il pulsante di 

regolazione della luminosità (2) per assicurarsi che il Qube 40 sia oscurato. 


Pulsante di regolazione (2) 


Qui è possibile modificare la luminosità complessiva toccando più volte. I singoli LED non possono essere regolati 

perché il colore della luce è stato ottimizzato per mantenere coralli e altri animali marini. 


Pulsante impostazione tempo (1) 


24 h: In questa modalità, la luce può essere controllata tramite un timer esterno. 

10 h: La luce è accesa per 10 ore al giorno, a partire dall'orario di programmazione. Non è richiesto alcun timer 

esterno. 

6 h: La luce è accesa per 6 ore al giorno, a partire dall'orario di programmazione. Non è richiesto alcun timer 

esterno. 


Summary of Contents for 83216040

Page 1: ...lisation P 8 10 NL Gebruiksaanwijzing Lees de handleiding voor gebruik zorgvuldig door P 11 13 IT Manuale Operativo Leggere il manuale attentamente in modo P 14 16 PL Instrukcja u ytkowania Prosimy uw...

Page 2: ...integriert Qube 40 1 Den Qube aus der Verpackung nehmen 2 Vergewissern Sie sich dass das Netzkabel nicht besch digt ist Den Stecker nicht mit nassen H nden anfassen 3 Die Leuchte nicht selbst ffnen L...

Page 3: ...aus Wenn Sie die Leuchte anschalten ist sie sofort hell Falls nicht dr cken Sie die Dimmtaste 2 um sicherzustellen dass der Qube 40 hochgedimmt ist Dimm Taste 2 Hier kann die Gesamthelligkeit durch m...

Page 4: ...atige Garantie ab Kaufdatum auf alle Material und Verarbeitungsfehler des Ger tes Sie gilt nicht bei Verschlei teilen Im brigen stehen dem Verbraucher die gesetzlichen Rechte zu diese werden durch die...

Page 5: ...ugh for power supply in the gooseneck Qube 40 1 Please take the Qube out of the box 2 Make sure the power cord is not damaged Do not touch the plug with wet hands 3 Do not disassemble the light Must o...

Page 6: ...e dim button 2 to ensure that the Qube 40 is dimmed up Dimmer button 2 The overall brightness can be changed here by tapping several times Individual LEDs cannot be dimmed because the light colour has...

Page 7: ...consumer has legal rights these are not limited by this warranty This warranty does not cover user serviceable parts due to normal wear tear The original invoice or receipt is required as proof of pu...

Page 8: ...pour c ble pour l alimentation lectrique int gr e dans le bras flexible Qube 40 1 Sortez le Qube de son emballage 2 Assurez vous que le c ble ne soit pas endommag Ne jamais manipuler la prise avec de...

Page 9: ...ez la lumi re elle s allume imm diatement Dans le cas contraire appuyez sur la touche dimmer 2 afin d assurer que le Qube 40 est mont en puissance Touche dimmer 2 La luminosit totale peut tre modifi e...

Page 10: ...remier acheteur durant 24 mois partir de la date d achat contre tout d faut mat riel ou de fabrication Il ne s applique pas aux pi ces d usure Le consommateur b n ficie par ailleurs des droits l gaux...

Page 11: ...Qube 40 1 Haal de Qube uit de doos 2 Controleer dat de voedingskabel niet beschadigd is Raak de stekker niet aan met natte handen 3 Haal de verlichting niet uit elkaar Hij mag uitsluitend door specia...

Page 12: ...de verlichting aan doet zal hij in een keer oplichten Als dit niet het geval is drukt u op de dimknop 2 om ervoor te zorgen dat de Qube 40 wordt gedimd Dimmerknop 2 De algehele helderheid kan hier wo...

Page 13: ...of afwerking van het apparaat Deze garantie geldt niet voor onderdelen die aan normale sluitage tgv normaal gebruik onderhevig zijn Garantie wordt alleen verleend door het bewijs van de originele aan...

Page 14: ...to Cavo integrato per alimentazione perno flessibile Qube 40 1 Estrarre il Qube dalla scatola 2 Assicurarsi che il cavo di alimentazione non sia danneggiato Non toccare la spina con le mani bagnate 3...

Page 15: ...ndo accendi la luce dovrebbe accendersi immediatamente In caso contrario toccare il pulsante di regolazione della luminosit 2 per assicurarsi che il Qube 40 sia oscurato Pulsante di regolazione 2 Qui...

Page 16: ...ic GmbH provveder a riparare o a propria scelta sostituire gratuitamente la parte difettosa sempre che il prodotto sia stato installato correttamente utilizzato per gli scopi indicati dalla casa costr...

Page 17: ...wienie lampy Zintegrowany przew d zasilaj cy w elastycznym ramieniu Qube 40 1 Prosz wyj Qube z pude ka 2 Upewnij si e przew d zasilaj cy nie jest uszkodzony Nie dotykaj wtyczki mokrymi r kami 3 Nie ro...

Page 18: ...y si Kiedy w czysz wiat o powinno za wieci si od razu Je li nie dotknij przycisk przyciemnienia 2 aby upewni si e Qube 40 jest przyciemniony Przycisk ciemniacza 2 Og ln jasno mo na zmieni dotykaj c pr...

Page 19: ...u w a cicielowi 24 miesi cznej gwarancji na materia oraz wykonanie Nasza gwarancja nie wyklucza ustawowych praw jakie przys uguj konsumentom Gwarancj nie s obj te elementy zu ywaj ce si i eksploatacyj...

Page 20: ...150 mol m 2s 1 8 10 24 Qube 40 1 Qube 2 3 4 Qube 5 6 7 Qube 8 Qube 9 2 80 x 80 x 25 365 1 5 300 x 300 PAR 1 150 mol m 2s 1 40 100 240 50 60 24 IPX4 LED 9 000 K 4 sky blue 470 nm 6 deep blue 460 nm 5 r...

Page 21: ...21 1 Qube 40 3 Qube Qube 2 3 Qube 2 Qube 40 2 1 24 10 10 6 6...

Page 22: ...22 4 1 2 3 4 Qube 5 6 40 C 5 AB Aqua Medic GmbH 24 AB Aqua Medic AB Aqua Medic GmbH AB Aqua Medic GmbH Gewerbepark 24 49143 Bissendorf Germany 10 2022 v1...

Reviews: