7
Mounting:
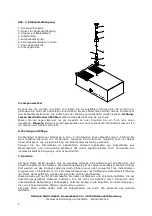
The ceiling plate (1) must be securely screwed to the ceiling. Suitable screws and plugs are
provided but you should ensure your ceiling is capable of holding the weight of the luminaire in this
way. It may be necessary to use specialised cavity plasterboard fixings or to screw through into
blocks you have fitted behind the ceiling. The suspension points are 14 cm from each end of the
aquaspacelight.
The distance between suspension point centers is therefore:
- single lamp
( 60 cm total length):
32 cm
- twin lamp
(120 cm total length):
92 cm
- triple lamp
(180 cm total length):
158 cm
Stainless steel cable
Now, the stainless steel cable is fed through the retaining bush (2) of the ceiling plate so that the
stopper (3) is placed inside the ceiling plate. The retaining bush is screwed onto the ceiling plate
allowing the stainless steel cable to hang free.
Fixing of the lamp:
First of all, the plug respectively screw covering the holes of the suspension has to be removed.
Both lamp fixings (5) have to be screwed into those holes.
Caution:
Ensure that the plastic washer
(8) is placed inbetween.
The stainless steel cable is fed through the lamp fixing from the top (6). It comes out of the lateral
opening (7) and then it has to be pulled out and adjusted to the correct height above the
aquarium.
Release the fixing:
The lamp fixing has got a non-return mechanism so that the cable can be adjusted easily. To
remove the lamp or adjust height put one finger on the fixing screw (6).
Caution:
Hold the lamp
tight! Now, the cable can be removed from fixing.
When the lamp is mounted to the correct height any surplus cable may be cut off.
Pay attention to the required minimum distance of 30 cm to the water surface!
Electric connection:
The
aquaspacelight
can be connected to any safety socket or to a timer if automatic operation is
requested.


