background image


Stainless steel wire: 

 
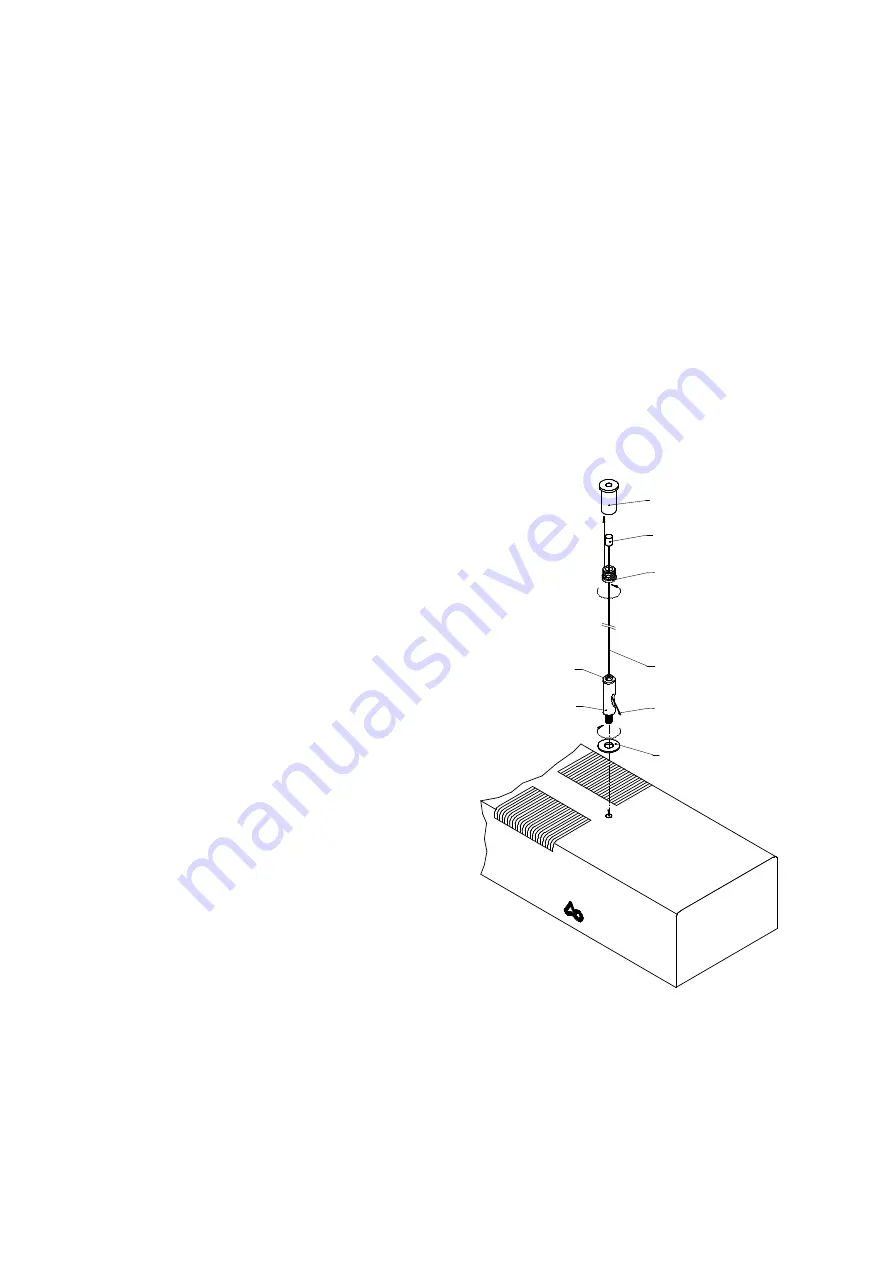
The stainless steel wire (4) is now fed through the retaining bush (2) of the ceiling plate (1) so that 
the ferrule (3) is retained inside the ceiling plate. The retaining bush is screwed onto the ceiling 
plate allowing the stainless steel wire to hang free. 
 

Lamp mounting: 
 

The protective plugs in the back of the 

Ocean Light 

are removed and the luminaire attachments 

(5) are screwed in, ensuring that the plastic washer (8) is placed between 

Ocean Light

 and 

luminaire attachment. The end of the stainless steel wire (7) is fed through the luminaire 
attachment from top, via non-return cap (6). It is drawn through the side opening and the 
luminaire is adjusted to the correct height from the aquarium (minimum 30 cm above water level).  
 

Release the mounting:  

 
To remove the luminaire or re-adjust the height, the non-return mechanism is released by pushing 
down the top cap (6) of the luminaire attachment. 

CAUTION:

 Ensure the luminaire is adequately 

supported. The stainless steel wire can now be removed from the luminaire attachments. 
 
When the luminaire is mounted in correct position, any surplus wire may be cut off with pliers.   
 

Pay attention to the required minimum 
distance of 30 cm to the water surface! 
 
Electric connection: 

 
The 

Ocean Light

 can be connected to any 

safety socket or timer if automatic operation 
is desired. Lighting systems including 
moonlight can be operated either with two 
timers or the AB Aqua Medic

 Light 

Computer


Fig. 1: Stainless steel wire suspension 
 

1. Ceiling plate                    
2. Retaining bush 
3. Ferrule                           
4. Stainless steel wire 
5. Luminaire attachment     
6. Non-return cap  
7. End of wire             


8. Plastic washer 


3

2

1

4

6

7

5

aq

ua

sta

rlig

ht

8


Caution:

 If the mains plug of a lighting is pulled out during operation, note that high voltages 

remain at the contact pins for a longer time.  
 

Avoid touching them! 


Summary of Contents for Ocean Light LED

Page 1: ...ten speziell f r den aquaristischen Gebrauch entwickelt und erprobt worden Hochwertige Technik und beste Materialien sowie modernes Design gew hrleisten dass Sie lange Freude an Ihrer Aquarienbeleucht...

Page 2: ...Anschlie end h ngen Sie die Leuchte ab Bei der Reinigung achten Sie darauf dass keine Feuchtigkeit durch die L ftungs ffnungen in das Innere der Leuchte gelangt Achten Sie auf einen ausreichenden W r...

Page 3: ...ss oder die Leuchte abgeh ngt werden soll kann mit dem Finger auf die Fixierungsschraube 6 gedr ckt werden Achtung Leuchte festhalten Das Seil l sst sich jetzt wieder aus der Lampenbefestigung herausz...

Page 4: ...ammensetzung ver ndern Reinigen Sie die Filterscheibe im abgek hlten Zustand regelm ig von R ckst nden aus Wasserspritzern und Verdunstung behutsam mit einem angefeuchteten Tuch Verwenden Sie niemals...

Page 5: ...ally designed for aquarium use and has been tested by experts High quality components and newest technology as well as modern design guarantee that you will enjoy your aquarium lighting for many years...

Page 6: ...tilation slits and enters the interior of the lighting system Pay attention to a sufficient thermal exchange Keep ventilation slits always free Do not mount the system in enclosures or behind panels M...

Page 7: ...height the non return mechanism is released by pushing down the top cap 6 of the luminaire attachment CAUTION Ensure the luminaire is adequately supported The stainless steel wire can now be removed...

Page 8: ...se that was intended by us is used in accordance with the operating instructions and is returned to us carriage paid The warranty term is not applicable on the all consumable products Proof of Purchas...

Reviews: