background image


28 

 
When  changing  the  fluorescent  lamp,  first of  all  the  socket  rings  have  to  be  released  and  pushed 
over the bulb. Now, the bulb can be taken out.  
 
When assembling the new fluorescent lamp, first of all the socket rings have to be pushed on the 
bulb. Then the lamp can be inserted.  
 
Please make sure that the socket rings are mounted tightly on the bulb when mounting the lamp. 
The  lamps  are  only  waterproof  when  the  rings  are mounted  correctly.  Also  pay  attention  that  the 
sealing at the socket ring is mounted correctly.  
 
Only  turn  on  the  light  when  the  fluorescent  lamp  is  mounted  and  the  socket  rings  are  fastened 
tightly. Replace broken socket rings by new original ones by AB Aqua Medic.  

 
7.6. Maintenance and Care 
 

The service life of the T5 bulbs will be about 6,000 to 8,000 hours. This corresponds to about 1,5 
years with a daily illumination time of 10 hours. It is recommended to exchange the bulbs before 
expiration of this time interval since efficiency and colour composition change.  
 
Clean the sun cover from time to time using a moistened cloth. Never use any additional cleaning 
agents!   
 
Into the filter baskets (fig. 2, No. 16) below the Rieselfilterplatte (fig. 2, No. 3) can be brought in 
activated  charcoal  and  a  phosphate  absorber  (antiphos  Fe)  in  filter  bags.  Coal  and 
Phosphatentferner must be renewed in regular intervals.


Activated  carbon  and  phosphate  remover  (antiphos  Fe)  in  filter  bags  can  be  inserted  in  the  filter 
baskets  (Fig.  2,  No.  16)  underneath  the  trickle  filter  plate  (Fig.  2,  No.  3).  Activated  carbon  and 
phosphate remover have to be exchanged regularly.  
 
The  sponges  (Fig.  2,  No.  2  and  17)  have  to  be  washed,  if  necessary.  The  overflow  comb  (Fig.  2, 
No. 11) has to be cleaned of algae and dirt remainders, too. 

 
8. Cover with fans        
 

The fans are connected to the transformer provided via a connecting cable.  

 
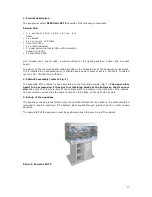
Photo 4: Cover incl. fans          


8.1. Features 

Summary of Contents for PERCULA 100 T5

Page 1: ... Meerwasseraquarium PERCULA ist ein Komplettsystem mit Unterschrank Abschäumer Filteranlage und Beleuchtung GmbH Gewerbepark 24 49143 Bissendorf Germany __________________________________________________________________________________________ ...

Page 2: ...hen 100 150 Watt aus 2 Aufbau des Unterschrankes siehe Abb 1 Die Montage ist entsprechend der beigefügten Zeichnung vorzunehmen Die obere Platte wird nicht angeschraubt Sie besitzt an der Unterseite vier Halteklötze damit sie nicht verrutschen kann Achten Sie beim Aufbau darauf dass sich die Bohrung der Schrankplatte auf der rechten Seite des Schrankes befindet An dieser Seite ist auch die Tür zu ...

Page 3: ...3 Abb 1 Schrank Den Schrank in der nummerierten Reihenfolge montieren Foto 2 Filter ...

Page 4: ...ufkamm 3 Verrieselungsplatte 12 Einstellschieber Abschäumer 4 Rieselfilter 13 Strömungsrohr mit Kugelgelenk 5 Klarwasserkammer 14 Druckrohr Rückförderpumpe 6 Bohrung für Rücklauf 15 Powerfilter PF 1000 7 Auflagegitter 16 Filterkorb 8 NanoProp 5000 17 Filterschwamm 9 Gummiring für NanoProp 5000 ...

Page 5: ...asser haben Mit organischen Verbindungen angereichert steigen sie nun nach oben und bilden einen festen Schaum der im Schaumrohr entwässert wird und schließlich in den Schaumtopf hinein befördert wird Auf diese Weise lassen sich wirksam organische Verunreinigungen aus dem Aquarienwasser entfernen ohne dass sie in den biologischen Reinigungszyklus einbezogen werden Die Dispergatorpumpe des Turboflo...

Page 6: ...sch automatisch richtig eingestellt ist Er ist allerdings stark vom Wasserstand abhängig Beim Einsatz im Percula Aquarium kann der Wasserstand in der Abschäumerkammer durch den Schieber vor dem Rieselfilter eingestellt werden Diese Einstellung kann zur Leistungsregulierung des Abschäumers genutzt werden Luftblasen Wird der Abschäumer bei einem bestehenden Aquarium nachgerüstet kann es sein dass im...

Page 7: ...öchstens 1 bis 2 mal im Jahr gereinigt zu werden In diesen Intervallen sollte auch die Dispergatorpumpe ausgebaut und gereinigt werden damit die Luftleistung nicht beeinträchtigt wird Dazu wird die Pumpe ausgebaut und das gesamte Kreiselgehäuse und das Fadenrad mit sauberem Wasser ausgespült Auch die Lufteinzugsdüse sollte dann gereinigt und mit frischem Wasser gespült werden 4 8 Störungen Störung...

Page 8: ...instellbar von 6 12 V 5 2 Eigenschaften Die Magnetkreiselpumpe der NanoProp zeichnet sich spätestens nach einem Tag Einlaufzeit durch eine besondere Laufruhe aus Sie besitzt einen gekapselten Synchronmotor Alle Materialien sind meerwasserbeständig Die Pumpe wird mit 12 V Sicherheitsspannung betrieben der Transformator ist im Lieferumfang enthalten Der Antriebspropeller ist als Dreiflügler ausgeleg...

Page 9: ... starten und dann auf 6 V zurückzuschalten damit sie sicher anläuft Die Pumpe ist vorne offen Man sollte sie deswegen niemals unkontrolliert z B über eine Zeitschaltuhr starten Es könnten sich Tiere im Ansaugkorb befinden die durch den startenden Propeller verletzt oder getötet würden 5 4 Aufbau der Pumpe Abb 5 Aufbau NanoProp 5000 1 Filterkorb 2 Läuferbaugruppe 3 Motorblock 5 5 Aufstellung Die Pu...

Page 10: ... Stellung des Schiebers reguliert den Wasserstand in der Abschäumerkammer ACHTUNG Der Schieber sollte so tief sitzen dass das Wasser in der Abschäumerkammer direkt unter dem Schaumtopf steht Auf den Rieselfilter folgt die Klarwasserkammer Abb 2 Nr 5 in der sich eine Pumpe PF 1000 befindet die das Wasser in das Aquarium zurück befördert Der Wasserstand im PERCULA darf nicht zu stark absinken da and...

Page 11: ...r Std l min Förderhöhe max 1 000 16 1 0 m Kabellänge in m Schutzklasse Schutzart 1 5 II IP68 größte Betriebstauchtiefe 1 m 1m max Medientemperatur 35 C Abb 6 Aufbau des Powerfilters PF 1000 1 Motorblock 2 Verschluss Kreiselgehäuse 7 Halteplatte 8 Gummisauger 9 Läufer 10 Keramikachse 11 Gummilager 12 Netzstecker ...

Page 12: ...nd wieder eingebaut werden 7 Beleuchtung Sun Cover 2x 39 Watt 7 1 Technische Daten Netzanschluss 230 Volt 50 Hz andere Ausführungen für USA etc siehe Typenschild Wattage s Typenschild Lieferumfang Sun Cover Leuchte mit spritzwassergeschützten Fassungen für T5 Leuchtstofflampen HO Lampen 2 Stück Hochglanzreflektoren 7 2 Sicherheitshinweise Die Leuchte darf nicht unter Wasser betrieben werden Bei je...

Page 13: ...en Sie auch auf den richtigen Sitz der Dichtung am Fassungsring Schalten Sie die Leuchte erst ein wenn die Leuchtstofflampen montiert und die Fassungsringe angezogen sind Ersetzten Sie defekte Fassungsringe durch Original Ersatzteile von AB Aqua Medic 7 6 Wartung und Pflege Die Standzeit der T5 Röhren beträgt ca 6 000 8 000 Stunden Dies entspricht etwa 1 5 Jahren bei einer täglichen Brennzeit von ...

Page 14: ...us Nur diese sind strahlwasserfest und zum Einbau an Aquarien geeignet 9 Betrieb des Aquariums Als Zubehör zum Betrieb des PERCULA empfehlen wir Ihnen unsere REEF LIFE Reihe REEF LIFE CALCIUM dient zur Versorgung der Korallen mit lebensnotwendigem Kalk und Spurenelementen REEF LIFE IODINE hat sich für die Pflege vieler Korallen ebenfalls als unentbehrlich erwiesen Beide Präparate kombiniert und re...

Page 15: ...uf der Garantiezeit Probleme mit Ihrem Gerät auftreten wenden Sie sich bitte an Ihren Fachhändler Diese Garantie gilt nur für den Erstkäufer Sie deckt nur Material und Verarbeitungsfehler die bei bestimmungsgemäßem Gebrauch auftreten Sie gilt nicht bei Schäden durch Transporte oder unsachgemäße Behandlung Fahrlässigkeit falschen Einbau sowie Eingriffen und Veränderungen die von nicht autorisierten...

Page 16: ...uarium PERCULA is a complete ready to use system with integrated internal filtration protein skimmer lighting and cabinet GmbH Gewerbepark 24 49143 Bissendorf Germany __________________________________________________________________________________________ ...

Page 17: ... Watt In heated rooms 100 150 Watt are sufficient 2 Cabinet s assembly refer to Fig 1 The assembly of the cabinet is done according to the following drawing Fig 1 The upper plate hasn t to be screwed on It has got four retaining blocks at the bottom so that it cannot slip Take care that the bore hole of the cabinet plate is located on the right side of the cabinet The door where you can hide the s...

Page 18: ...18 Fig 1 Cabinet Install the cabinet in numbered order Photo 2 Filter ...

Page 19: ...b 3 Trickle plate 12 Adjustment plate for skimmer 4 Trickle filter 13 Current pipe with ball joint 5 Clean water compartment 14 Pressure pipe for return pump 6 Bore hole for backflow 15 Powerfilter PF 1000 7 Grate 16 Filter basket 8 NanoProp 5000 17 Filter sponge 9 Rubber sealing ring for NanoProp 5000 ...

Page 20: ...ed into the reactor pipe in a such a way that they undergo a long contact time within the counter urrent Enriched with organic substances they rise to the top and form a firm foam that is dehydrated and pushed into the collection cup This method removes organic wastes from aquarium water before they become part of the biological waste treatment cycle The venturi pump of Turboflotor Percula draws w...

Page 21: ...er level In the percula aquarium the water level in the skimmer chamber can be adjusted by the adjustment plate in front of the trickle filter This adjustment plate can also be used for the regulation of the skimmer Air bubbles If the skimmer is added to an existing aquarium there might be a high concentration of organic substances already dissolved in the water This results in very tiny bubbles i...

Page 22: ...y daily or weekly depending on organic load The reaction pipe of the skimmer needs to be cleaned only once or twice a year The venturi pump should be cleaned at the same time The pump has to be removed and the complete pump housing and mesh wheel flushed with clean water The same procedure should be done with the air injection nozzle 4 8 Problems Problems may arise if the ration of drawn air and w...

Page 23: ...40 V 18 watts max adjustable from 6 12 V 5 2 Features The NanoProp 5000 magnetically coupled current pump is very quiet in operation It has a fully encapsulated synchronous motor All materials are salt water resistant The pump is operated with 12 V safety voltage transformer is included The propeller of the rotor is designed as a 3 blade model This design runs more smooth than the 2 blade propelle...

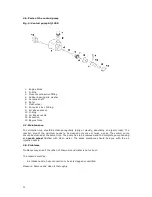
Page 24: ...a time switch Animals could be in the sucking in basket and they could be injured or killed by the starting propeller 5 4 Exploded parts diagram Fig 5 Structure NanoProp 5000 1 Filter basket 2 Rotor assembly 3 Motor housing 5 5 Set Up The pump can only be operated under water The maximum depth is 1 m The pump should be mounted at least 10 cm below the water surface to avoid air to be sucked in The...

Page 25: ... No 2 is located The water flows out of the pre filter chamber into the trickle filter Fig 2 No 4 via the adjustment plate Fig 2 No 12 The position of the adjustment plate controls the water level in the skimmer chamber Warning The adjustment plate should be adjusted that low that the water in the skimmer chamber is directly beneath the foam cup After the trickle filter there s the clean water com...

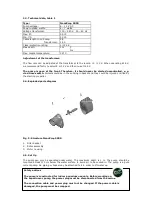
Page 26: ...e connected with the pump from 2 sides The pump head 2 can be fitted to the motor 1 in 2 ways so the outlet can be adjusted The water flow can be directed by using the 45 elbow If aeration is desired the air injection nozzle can be mounted Safety advices The pump is constructed for indoor use only Before working on the aquarium or on the pump always disconnect the device from the mains The connect...

Page 27: ...e lighting must not be used under water In case of changing the fluorescent lamps always disconnect the light from the mains In case the connection pipe is broken don t repair it yourself The lamp has to be exchanged completely It is prohibited to open the lamp When working on the aquarium always pull the lamp s plug beforehand Please don t try to repair the lighting system yourself but send it to...

Page 28: ...s with a daily illumination time of 10 hours It is recommended to exchange the bulbs before expiration of this time interval since efficiency and colour composition change Clean the sun cover from time to time using a moistened cloth Never use any additional cleaning agents Into the filter baskets fig 2 No 16 below the Rieselfilterplatte fig 2 No 3 can be brought in activated charcoal and a phosph...

Page 29: ...nd within 12 months of the date of purchase AB Aqua Medic GmbH undertakes to repair or at our option replace the defective part free of charge always provided the product has been installed correctly is used for the purpose that was intended by us is used in accordance with the operating instructions and is returned to us carriage paid The warranty term is not applicable on the all consumable prod...

Reviews: