7
Set Up Instructions
All plumbing components are already glued
into place except where threaded joints are
required for assembly into the aquarium or
to allow access for maintenance. Two people
may be required to connect the plumbing
through the base of the aquarium, one to
access from above the weir and one to hold
pipes in place below the aquarium.
Consider where you are going to place the
aquarium. Keep it away from direct light or
areas with large temperature fluctuations.
Before setting up the aquarium, consider what
you wish to keep in the aquarium. Depending
on how you wish to use this aquarium, you
may want to add substrate and rockwork
during the assembly stage of setting up.
Please consult with your aquarium specialist
for advice before assembling the aquarium.
1. Assemble the cabinet according to the
instructions on pages 4 and 5.
2. Place the cabinet on a level surface strong
enough to support the weight of all equipment.
Note that water is heavy (1kg per litre).
3. Unpack the aquarium box. Remove all
equipment before lifting the sump tank out.
Two people are required to lift the sump tank.
Take care not to hit the aquarium with the
sump tank while lifting it out.
4. Place the sump in the cabinet as per
instructions for cabinet assembly.
5. Place the aquarium onto the cabinet. Ensure
that you place the black foam pad between
the aquarium and the cabinet. Failure to do so
may result in damage to the aquarium
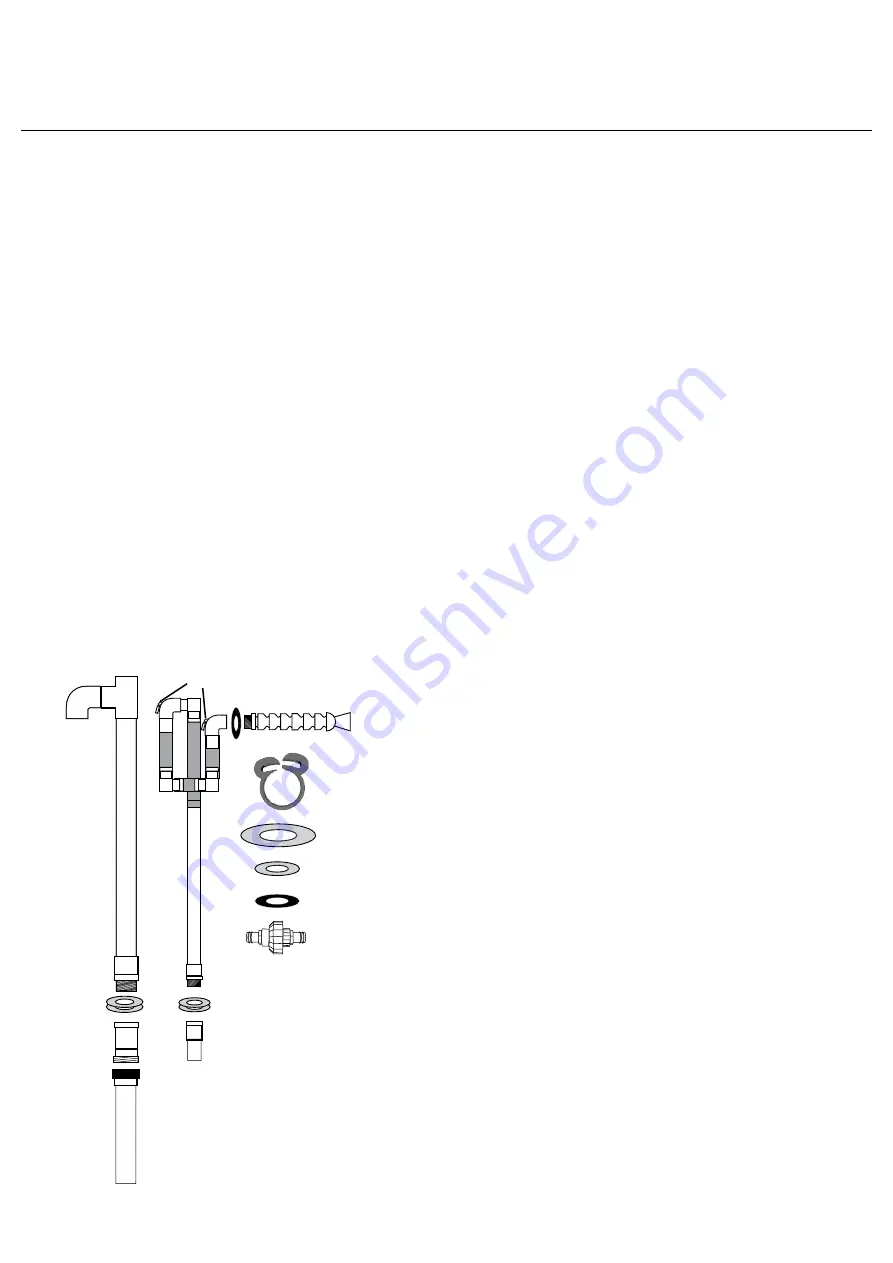
6. Disassemble the Return Barrel Union (11)
by unscrewing the large ring. Attach one
piece of the green return hose to each half of
the Barrel Union and secure each with a hose
clamp (7). Take care not to lose the o-ring in
the Barrel Union.
7. Attach the free end of one piece of green
return hose to the Return Bulkhead (6) and
secure with a hose clamp (7).
8. Insert the threaded end of the Return Pipe
(5) into the smaller hole in the base of the
weir. Ensure one Small Clear O-ring (9) is
placed between the glass and the connection
and that the threaded elbow at the top of the
return pipe is facing towards the round hole
in the overflow Ensure that both Bleed Valves
(12) are pointed downward.
9. Attach the Return Bulkhead (6) to the male
thread beneath the aquarium. Ensure a Small
Clear O-ring (8) is in place between it and the
glass. Do NOT overtighten, hand tightened is
sufficient.
10. Repeat step 8 and 9 with the Stand Pipe
(1) and Drain Bulkhead (2). Ensure Large
Clear O-rings (8) are used on both sides of
the glass.
1. Stand Pipe
2. Drain Bulkhead
3. Drain Pipe
4. Flexible Outlet
5. Return Pipe
6. Return Bulkhead
7. Hose Clamp (x4)
8. Large O-ring (Clear) (x2)
9. Small O-ring (Clear) (x2)
10. Small O-ring (Black)
11. Return Barrel Union
12. Bleed Valve (x2)
1
2
3
4
5
6
7
8
9
10
11
12


