A Q U A - S TA R H A L O G E N L I G H T S F O R C O N C R E T E P O O L S – I N S TA L L AT I O N I N S T R U C T I O N S & O W N E R S M A N U A L
AQUA-STAR HALOGEN
LIGHTS FOR
CONCRETE POOLS
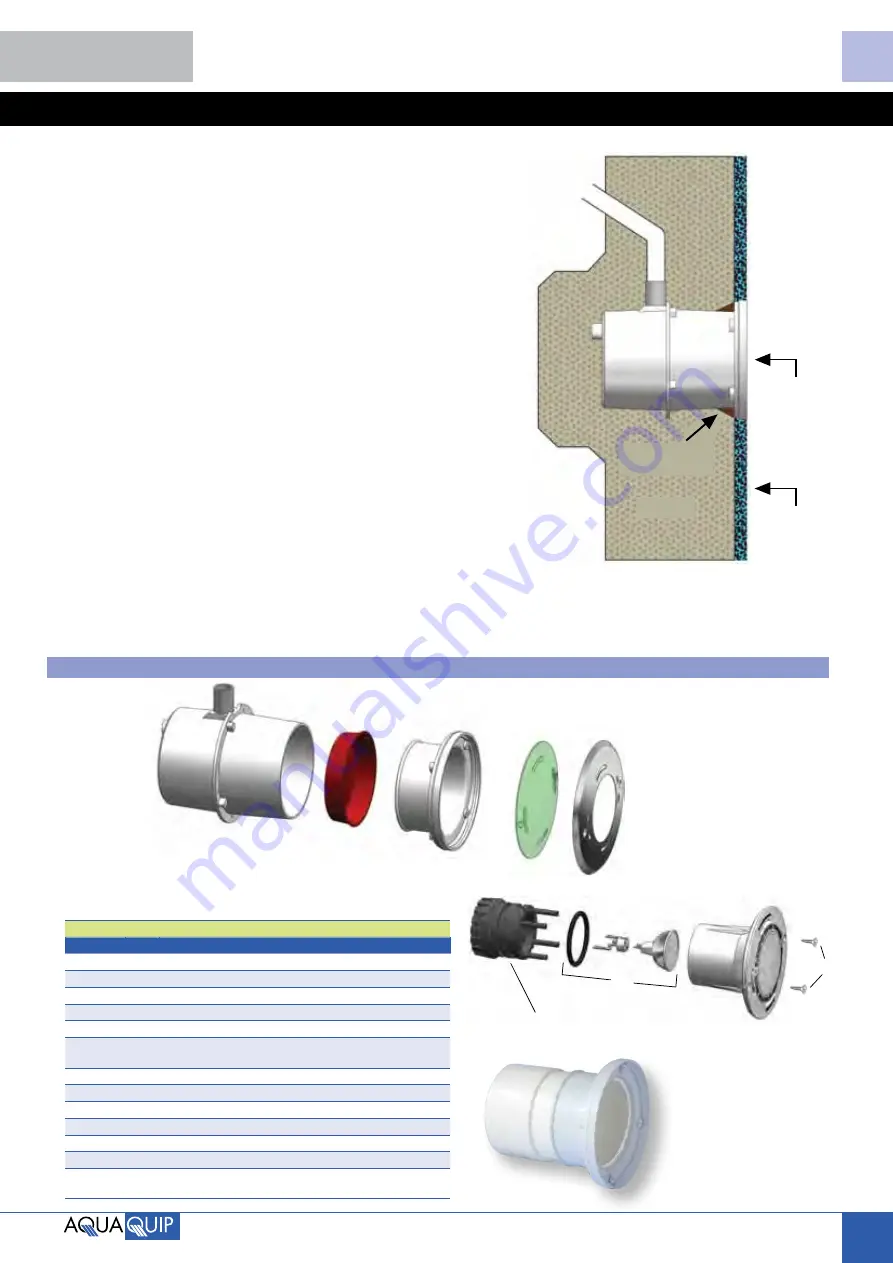
AQUA-STAR HALOGEN POOL LIGHTS SPARE PARTS
CODE
ITEM DESCRIPTION
ASL 050
18
HOUSING – CONCRETE
ASL 116
2
PROTECTIVE CAP FOR HOUSING (RED)
ASL 051
3
ADJUSTABLE DRESS RING
ASL 054
19
NUT O-RING
ASL 102
20
GLOBE, 12V 50W
ASL 101
21
AQUA-STAR GLOBE HOLDER KIT INCLUDES GLOBE, LAMP-
HOLDER AND O-RING
ASL 052
22
BODY, DIFFUSER & LOCK RING
ASL 070
23
BLUE LENS
ASL 071
23
GREEN LENS
ASL 074
23
CLEAR LENS
ASL 065
10
SCREW KIT (5/8” CSK)
ASL 076
26
EXTENDED DRESS RING
ASL 056
24
STAINLESS STEEL TRIM RING KIT, AQUA-STAR CONCRETE
INCLUDES BLUE AND GREEN LENSES AND 7/8” CSK SCREW KIT
HOUSING INSTALLATION
Diagram 2 – Sealing
Diagram 3 – Parts
3
DRESS RING INSTALLATION
Adjustable Dress Ring Installation
–
After Concreting and Sealing (Diagram 2)
7
Remove
red-coloured Concrete Cap
. Use pvc glue or
construction adhesive to secure the
Adjustable Dress
Ring
inside the
Housing
to your required depth and
alignment. If
Housing
protrudes out from the concrete,
a maximum of 20mm can be cut off from the front. If
the housing has been set back too far in the wall, then
a special extension ring (P/N ASL 076) is available. The
eyeball feature on the
Adjustable Dress Ring
allows
adjustment so that the
Adjustable Dress Ring
face can
be aligned flush with the anticipated pool interior finish
even if the
Housing
is out of alignment. When gluing or
securing the
Adjustable Dress Ring
, ensure that 2 of the
screw holes are located horizontally.
8
The
Cable
can be drawn through, excess cable must be
coiled up and stored inside
Housing
.
Important: Allow enough cable to enable pool light to
be floated to pool deck.
9
The
Adjustable Dress Ring
is now in position ready for
the pool interior to be applied. Pool interior should finish
flush with the front face of the
Adjustable Dress Ring
.
Adjustable
Dress Ring
Installed
and
Sealed
Interior
Pool Wall
Finish
Construction
Adhesive Seal
Concrete
AQUA-STAR HALOGEN POOL LIGHTS – PARTS
21
18
2
3
23
24
19
20
22
Nut is not sold separately
10
Extended Dress Ring (Item 26)
is required (in place of Item 3)
when front of housing is set
back more than 65mm from
intended interior pool finish.
26


