Installating the In-Shower Control
IMPORTANT:
Turn power to the steam generator OFF before
installing the control. Failure to turn the power offwill result in an
inoperable control.
Step 1
Determine the desired installation location of the control.
The
control is designed to be installed inside or out-
side the steam room as a matter of personal preference.
The control cable length is 30 ft. (9 m) Insure that the
control and/or steam generator are located accordingly.
IMPORTANT:
Do not oversize or undersize the hole.
Step 2
R oute the control cable to the steam generator. Connect the connec-
tor to the steam generator.
Note:
The connector is keyed
IMPORTANT:
Do not strain, staple, pinch or otherwise damage
the control cable. R oute cable as required to permit replacement.
Step 3
Turn on power to the steam generator and test the control to verify
correct connections. Test per the instructions. Proceed with installa-
tion and verification of proper control function.
IMPORTANT:
Turn power to the steam generator OFF before
installing the control. Failure to turn the power offwill result in an
inoperable control.
Step 4
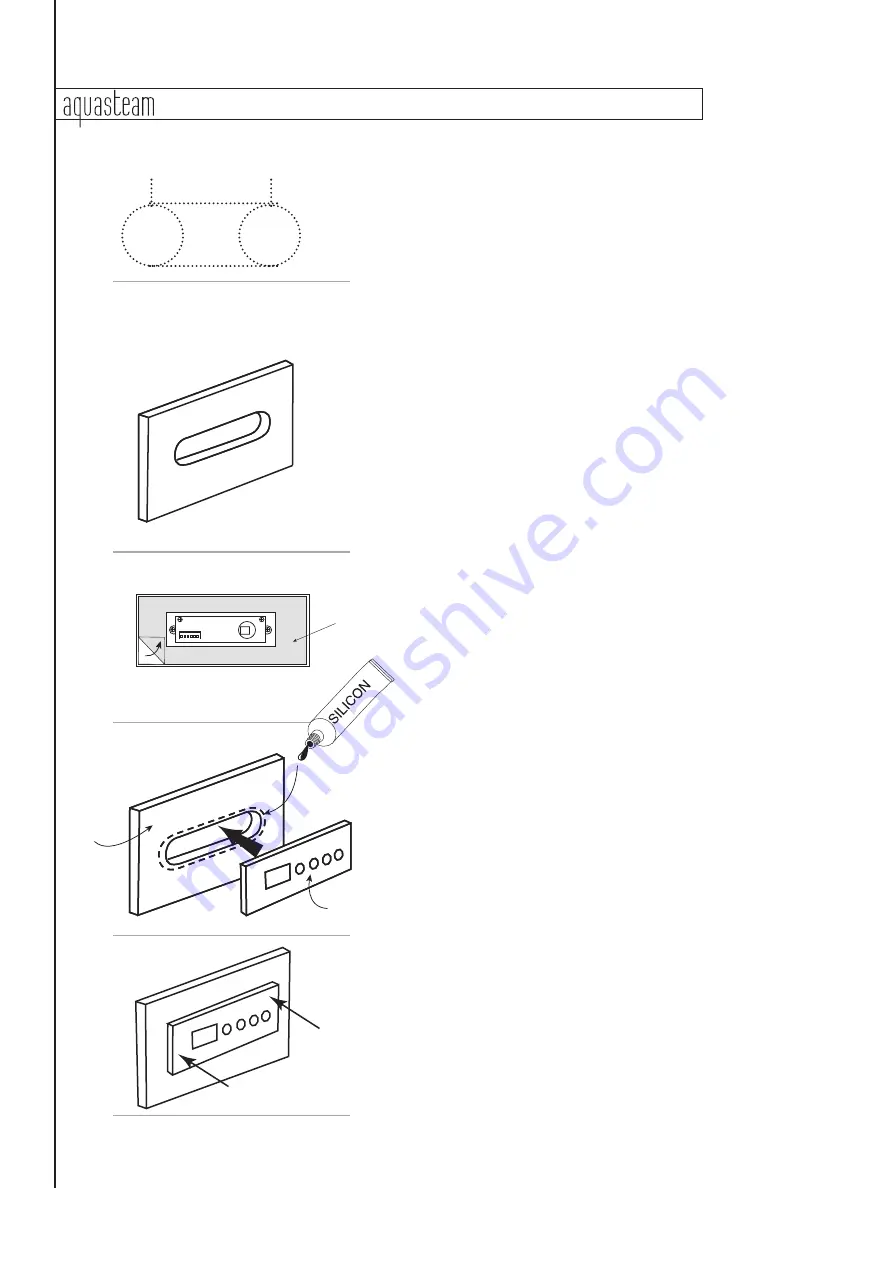
R emove & discard peel-offpaper to expose adhesive liner as shown.
Step 5
R un a bead of silicone (provided) as shown around the edge of the
hole.
IMPORTANT:
Do not apply excessive amounts of silicone. Do not
apply silicone to any other parts of the control including the adhe-
sive gasket.
Step 6
Insure the mounting surface is clean and dry as required for good
adhesion. Apply silicone into the hole in the wall as required to cre-
ate a moisture seal. The holder plate may be used to secure the
control if the back of the wall can be accessed.
Step 7
Hold the control and press the control against the wall until the
adhesive sticks and holds firmly as shown.
2
5/8
"
67 mm
1 "
25 mm
1 "
25 mm
Adhesive tape
Wall
Wall
Back of Control
Step 1
Step 2
Step 4
Step 6
Step 7
aquasteam
aquabrass.com
Keypad
Wall
Residential Steambath Generator Systems
1
2


