background image

9 - Produce hydrogen water for drinking

Important: 

the device must be filled with drinking water before 

you press the start button.

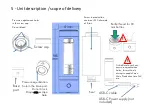
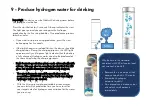
Press the start button for 3 seconds. A beep indicates the start. 
The light goes on and you can recognize the hydrogen 
production by the fine rising bubbles. One production process 
takes 5 minutes.

If you want to stop a running production, press the start 
button again for 3 seconds.

If the light changes to red and flashes, the device should be 
charged soon. During the charging process, the LED lights 
up permanently until a green light indicates that the battery 
is fully charged. Hydrogen water can also be produced at 
the same time during the charging process.

Each 5-minute production phase ends automatically with 
a beep. This can also be seen from the fact that the LED 
goes out and the formation of bubbles has stopped.

You are welcome to repeat the production cycle a 
second time WITHOUT opening the lid, if even higher 
hydrogen values are desired.

With the H

2

measuring drops available as accessories, 

you can test which production time you have to set for 
your target value for hydrogen concentration for the water 
you are using.

Why better use the standard 
container with 240 ml content and 
not screwed-in bottles?

Because this is an amount that 
anyone can drink in 10 minutes.

Remember: hydrogen 
outgasses quickly!

Do not produce in advance, but 
often drink small amounts 
immediately.

Sec.

5 min.

Summary of Contents for AquaVolta NANO

Page 1: ...Enhanced NANO BUBBLES NANO Hydrogen Water Booster 5th generation MANUAL By Karl H Asenbaum Version 2021 08...

Page 2: ...l The lower the redox potential the higher the readiness of the water to give up electrons For every 0 018 volts 18 millivolts lower redox potential this readiness doubles AquaVolta water has a 400 to...

Page 3: ...ater However they are also relatively expensive and have an acidic aftertaste that is rather annoying European consumers in particular therefore preferred a do it yourself solution for which Karl H As...

Page 4: ...oster You can also fill the BPE free Tritan container with your favourite mineral water It is even possible to unscrew the Tritan container and screw on a mineral water bottle with a 30 mm thread plas...

Page 5: ...USB C cable USB C Power supply not included Pressure equalisation holes in the screw cap Do not block Seal Screw cap Pressure equalisation hole in the base part Do not block Drops can escape here Base...

Page 6: ...water into the electrolysis cell to a height of max 1 cm and close it with the silicone plug Tips Before first use fill the production vessel with water for at least 30 minutes to soak the electrolysi...

Page 7: ...t sunlight or temperatures below 0 or above 50 degrees C Do not place the unit in damp or dirty rooms 7 General instructions for use Do not place the unit outdoors Do not use the USB C cable if it is...

Page 8: ...at you want to enrich with hydrogen and drink You should only fill in so much water that the water level does not touch the pressure cap so that no water penetrates there 6 At the end of the charging...

Page 9: ...en water can also be produced at the same time during the charging process Each 5 minute production phase ends automatically with a beep This can also be seen from the fact that the LED goes out and t...

Page 10: ...soak in for 1 hour and then rinse the container with lid and the electrode several times with warm water This cleaning is also necessary for hygienic reasons at least every 2 weeks or if unpleasant o...

Page 11: ...y life is low Less than 10 production cycles Recharge fully 1 hour after charging green Smell in the lid Unscrew the cover Treat the lid recess with disinfectant Your retailer is responsible for and t...

Page 12: ......

Reviews: