background image


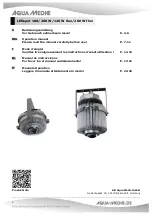
Operation manual  ENG 


In  purchasing  this 

LEDspot

,  you  have  selected  a  top  quality  product.  It  has  been  specifically  designed  for 

aquarium use and has been tested by experts. High quality components and latest technology as well as modern 
design guarantee for enjoying your aquarium lighting for many years. 
 

1. Technical Data 
 
Line voltage:

 100 - 240 Volt, 50/60 Hz (if not stated otherwise on the ID-label). 


Lamps: 

100 W resp. 200 W LED chips (12,000 Kelvin or 6,500 Kelvin, other light colours on request), 120/200 

W flex, bundled to 90° (60° lens available as accessory).  


The electronic ballast is placed in a splash-proofed body on the light. The cooling element is made of saltwater-
resistant anodized aluminium. The cooling is done passively. Diametre: 32 cm. Height: 100 W = 38 cm, 200 W 
= 48 cm. The spotlight can be hung up with a chain or screwed on with the holder.  
 

2. Unpacking 
 

On unpacking, please check the light immediately for any damages. In case of any complaints, please contact 
your dealer directly.         
 

Included in shipment:  


LEDspot with holder and central loop for hanging up with chain  


Cable link for power supply and control cable 

 
3. Safety advices 


The light cannot be used as aquarium cover. It has to be mounted only above the aquarium. If it is mounted 
above the aquarium, the minimum distance between lighting and aquarium must be at least 30 cm. 


The housing may become hot during operation. 

Be cautious when touching it! 

For cleaning, disconnect 

the light from the mains and let it cool down. Afterwards, take the light down. 


When cleaning, take care that no humidity enters the interior of the light! 


Pay attention to a sufficient thermal exchange. 

Keep the ventilation slits always free!


Do not mount 

the system in enclosures or behind panels.

 Missing aeration may result in overheating and damage the 

electrical components. 


Do not try to repair the light (LEDs, electronic parts). Please send it in for checking, preferably with a list of 
defects. Also, broken LED chips can only be exchanged by an expert.  


When working on the light, always pull all power plugs. 


4. Installation 
 

The light can be hung up on the central loop with a chain on the ceiling or can be screwed on with the holder.                     


5. Changing the lenses / lamps  
 
LEDspot 100/120 W: 
 

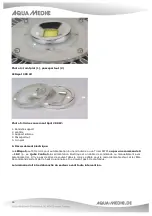
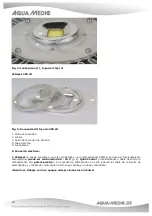
Broken  LED  chips  can  only  be  exchanged  by  an  expert.  The  standard  built-in  90°  lens  can  be  subsequently 
replaced by a lens with 60°. For this, place the lamp steadily with the LED upward (Fig. 1) and remove the four 
screws with a 3 mm Allen screw (Fig. 2). Now, the retaining ring (Fig. 2, No. 6) and the lens (Fig. 3, No. 5) with 
the silicone holder (Fig. 3, No. 4) can be removed, the lens can be exchanged (convert the silicone holder) and 
then the whole spot can  be remounted. Please respect the sequence:  flat sealing, passe-partout, aluminium 
retaining ring, lens with silicone holder, retaining ring. 
 
Available spare parts: Please refer to www.aqua-medic.de. 


Summary of Contents for LEDspot 100

Page 1: ...euillez lire soigneusement les instructions d avant utilisation P 12 16 ES Manual de instrucciones Por favor lea el manual cuidadosamente P 17 21 IT Manuale Operativo Leggere il manuale attentamente i...

Page 2: ...i Betrieb kann das Geh use sehr hei werden Vorsicht bei Ber hrung Zur Reinigung trennen Sie die Leuchte vollst ndig vom Netz und lassen sie abk hlen Anschlie end h ngen Sie die Leuchte ab Bei der Rein...

Page 3: ...3 Abb 1 Leuchte standsicher aufstellen Abb 2 Schrauben 7 mit Inbusschl ssel entfernen Haltering 6 Abb 3 Aluhaltering 3 Silikonhaltering 4 Linse 5...

Page 4: ...ch an eine Schaltuhr oder einen PWM Timer angeschlossen werden oder ber 0 10 V angesteuert werden z B Qube Control plus Netzteil und Steuerkabel oder manuell mit Potentiometer Ein Netzstecker ist im L...

Page 5: ...auch ber die Steuerleitung mit 0 10 V oder PWM Signal angesteuert werden Abb 7 Kennzeichnung der Anschl sse LEDspot 200 W flex 120 W flex 7 Wartung und Pflege Reinigen Sie die Linse im abgek hlten Zu...

Page 6: ...em Gebrauch auftreten Sie gilt nicht bei Sch den durch Transporte unsachgem e Behandlung falschen Einbau Fahrl ssigkeit oder Eingriffen durch Ver nderungen die von nicht autorisierter Stelle vorgenomm...

Page 7: ...t least 30 cm The housing may become hot during operation Be cautious when touching it For cleaning disconnect the light from the mains and let it cool down Afterwards take the light down When cleanin...

Page 8: ...8 Fig 1 Place the lamp steadily Fig 2 Remove the screws 7 with an Allen screw Retaining ring 6 Fig 3 Aluminium retaining ring 3 silicone retaining ring 4 lens 5...

Page 9: ...spot can be connected to a timeswitch or a PWM timer if automatic operation is desired or can be controlled by 0 10 V e g Qube Control plus power supply and control cable or manually via a potentionme...

Page 10: ...n also be connected to the control cable with 0 10 V or PWM signal if automatic operation is required Fig 9 Labelling of connections of LEDspot 200 W flex 120 W flex 7 Maintenance and Care Clean the l...

Page 11: ...or renewed parts This warranty only covers material and processing faults that occur when used as intended It does not apply to damage caused by transport improper handling incorrect installation negl...

Page 12: ...du fonctionnement le bo tier peut devenir tr s chaud Attention en cas de contact Pour le nettoyage d brancher compl tement le luminaire de la prise secteur et laissez le refroidir D crochez ensuite le...

Page 13: ...ibles voir sous www aqua medic de Photo 1 Installer le luminaire de fa on stable Photo 2 Retirer les vis 7 avec une cl hexagonale Cercle de fixation 6 Photo 3 Cercle support en aluminium 3 cercle supp...

Page 14: ...automatisation une minuterie ou un Timer PWM ou par une commande 0 10 V p ex Qube Control plus alimentation lectrique et un c ble de commande ou manuellement avec potentiom tre Il n y a pas de prise...

Page 15: ...s le cadre de son automatisation par le circuit de commande avec 0 10 V ou PWM signal Photo 6 Identification des connexions LEDspot 200 W flex 120 W flex 7 Entretien Nettoyer r guli rement avec pr cau...

Page 16: ...ilisation ad quate Elle n est pas valable en cas de dommages dus au transport ou une manipulation non conforme de la n gligence une mauvaise installation ou des manipulations modifications effectu s p...

Page 17: ...l acuario debe ser de 30 cms La caja puede sobrecalentarse mientras trabaja Sea cuidadoso cuando los toque Para su limpieza desconecte el foco de la corriente el ctrica y espere a que se enfr e A cont...

Page 18: ...favor dir jase a www aqua medic de Fig 1 Colocar la l mpara de forma segura Fig 2 Retire los tornillos 7 con una llave Allen Anillo de retenci n 6 Fig 3 Anillo de retenci n de aluminio 3 anillo de ret...

Page 19: ...onectar a un reloj controlador o a un temporizador PWM si se desea el funcionamiento autom tico o puede ser controlado de 0 10 V p ej Qube Control y transformador e cable de control o manualmente con...

Page 20: ...l cable de control con 0 10 V o PWM se al si se requiere un funcionamiento autom tico Fig 7 Etiquetado de conexiones del LEDspot 200 W flex 120 W flex 7 Mantenimiento y cuidados Limpie el filtro de cr...

Page 21: ...ant a solo cubre los defectos de material y de procesamiento que se producen cuando se utilizan seg n lo previsto No se aplica a los da os causados por transporte manipulaci n inadecuada instalaci n i...

Page 22: ...cm La scocca puo diventare rovente quando e in funzione Maneggiare con cautela Per pulire scollegare la lampada e lasciarla raffreddare In seguito staccare la lampada Fate attenzione ci sia sufficient...

Page 23: ...23 Fig 1 Mettere la lampada stesa affrancata Fig 2 Rimuovere le viti 7 con cacciavite Anello di tenuta 6 Fig 3 Anello di alluminio 3 anello di silicone 4 lenti 5...

Page 24: ...ere collegato ad un orologio timer oppure ad un timer PWM se si desidera il funzionamento in automatico oppure puo essere controllato da 0 a 10 V p e Qube Control con alimentatore e cavo di controllo...

Page 25: ...collegato al cavo di controllo da 0 10 V o segnale PWM se e richiesta operazione in automatico Fig 7 Etichetta dei collegamenti di LEDspot 200 W flex 120 W flex 7 Manutenzione e Cura Pulire le lenti r...

Page 26: ...el modello e la data di acquisto oppure se il caso il cartoncino della garanzia Questa garanzia decade se il numero del modello o di produzione alterato cancellato o rimosso se persone o enti non auto...

Reviews: